本文将对 SwiftUI 的 zIndex 修饰符做以介绍,包括:使用方法、zIndex 的作用域、通过 zIndex 避免动画异常、为什么 zIndex 需要设置稳定的值以及在多种布局容器内使用 zIndex 等内容。
zIndex 修饰符
在 SwiftUI 中,开发者使用 zIndex 修饰符来控制重叠视图间的显示顺序,具有较大 zIndex 值的视图将显示在具有较小 zIndex 值的视图之上。在没有指定 zIndex 值的时候,SwiftUI 默认会给视图一个为 0 的 zIndex 值。
ZStack {
    Text("Hello") // 默认 zIndex 值为 0 ,显示在最后面

    Text("World")
        .zIndex(3.5)  // 显示在最前面

    Text("Hi")
        .zIndex(3.0)

    Text("Fat")
        .zIndex(3.0) // 显示在 Hi 之前, 相同 zIndex 值,按布局顺序显示
}
可以在 此处获取本文的全部代码
zIndex 的作用域
-
zIndex 作用范围被限定在布局容器内
视图的 zIndex 值仅限于在同一个布局容器之间进行比较( Group 不是布局容器)。处于不同的布局容器或父子容器之间的视图无法直接比较。
-
当一个视图有多个 zIndex 修饰符时,视图将使用最内层的 zIndex 值
struct ScopeDemo: View {
    var body: some View {
        ZStack {
            // zIndex = 1
            Color.red
                .zIndex(1)

            // zIndex = 0.5
            SubView()
                .zIndex(0.5)

            // zIndex = 0.5, 使用最内层的 zIndex 值
            Text("abc")
                .padding()
                .zIndex(0.5)
                .foregroundColor(.green)
                .overlay(
                    Rectangle().fill(.green.opacity(0.5))
                )
                .padding(.top, 100)
                .zIndex(1.3)

            // zIndex = 1.5 ,Group 不是布局容器,使用最内层的 zIndex 值
            Group {
                Text("Hello world")
                    .zIndex(1.5)
            }
            .zIndex(0.5)
        }
        .ignoresSafeArea()
    }
}

struct SubView: View {
    var body: some View {
        ZStack {
            Text("Sub View1")
                .zIndex(3) // zIndex = 3 ,仅在本 ZStack 中比较

            Text("Sub View2") // zIndex = 3.5 ,仅在本 ZStack 中比较
                .zIndex(3.5)
        }
        .padding(.top, 100)
    }
}
执行上面的代码,最终只能看到 Color 和 Group

设定 zIndex 避免动画异常
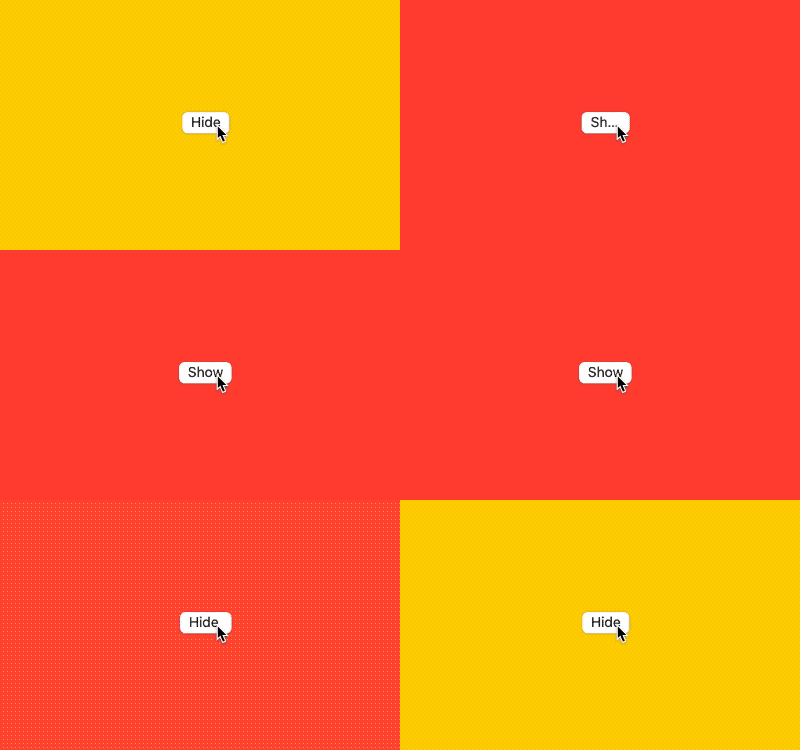
如果视图的 zIndex 值相同(比如全部使用默认值 0 ),SwiftUI 会按照布局容器的布局方向( 视图代码在闭包中的出现顺序 )对视图进行绘制。在视图没有增减变化的需求时,可以不必显式设置 zIndex 。但如果有动态的视图增减需求,如不显式设置 zIndex ,某些情况下会出现显示异常,例如:
struct AnimationWithoutZIndex: View {
    @State var show = true
    var body: some View {
        ZStack {
            Color.red
            if show {
                Color.yellow
            }
            Button(show ? "Hide" : "Show") {
                withAnimation {
                    show.toggle()
                }
            }
            .buttonStyle(.bordered)
            .padding(.top, 100)
        }
        .ignoresSafeArea()
    }
}
点击按钮,红色出现时没有渐变过场,隐藏时有渐变过场。
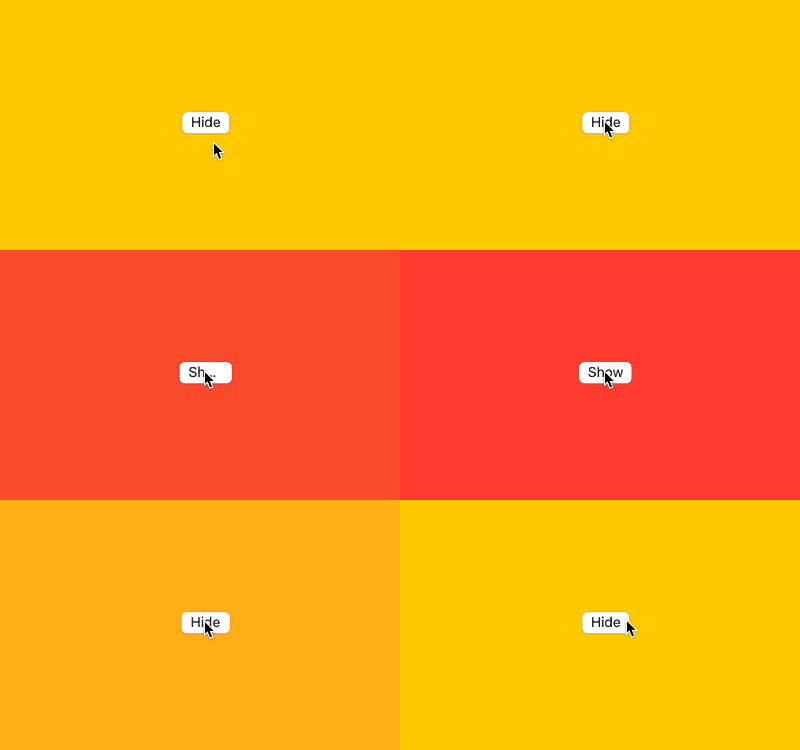
如果我们显式地给每个视图设置了 zIndex 值,就可以解决这个显示异常。
struct AnimationWithZIndex: View {
    @State var show = true
    var body: some View {
        ZStack {
            Color.red
                .zIndex(1) // 按顺序设置 zIndex 值
            if show {
                Color.yellow
                    .zIndex(2) // 取消或显示时,SwiftUI 将明确知道该视图在 Color 和 Button 之间
            }
            Button(show ? "Hide" : "Show") {
                withAnimation {
                    show.toggle()
                }
            }
            .buttonStyle(.bordered)
            .padding(.top, 100)
            .zIndex(3) // 最上层视图
        }
        .ignoresSafeArea()
    }
}
zIndex 是不可动画的
同 offset 、rotationEffect 、opacity 等修饰符不同, zIndex 是不可动画的 ( 其内部对应的 _TraitWritingModifier 并不符合 Animatable 协议)。这意味着即使我们使用例如 withAnimation 之类的显式动画手段来改变视图的 zIndex 值,并不会出现预期中的平滑过渡,例如:
struct SwapByZIndex: View {
    @State var current: Current = .page1
    var body: some View {
        ZStack {
            SubText(text: Current.page1.rawValue, color: .red)
                .onTapGesture { swap() }
                .zIndex(current == .page1 ? 1 : 0)

            SubText(text: Current.page2.rawValue, color: .green)
                .onTapGesture { swap() }
                .zIndex(current == .page2 ? 1 : 0)

            SubText(text: Current.page3.rawValue, color: .cyan)
                .onTapGesture { swap() }
                .zIndex(current == .page3 ? 1 : 0)
        }
    }

    func swap() {
        withAnimation {
            switch current {
            case .page1:
                current = .page2
            case .page2:
                current = .page3
            case .page3:
                current = .page1
            }
        }
    }
}

enum Current: String, Hashable, Equatable {
    case page1 = "Page 1 tap to Page 2"
    case page2 = "Page 2 tap to Page 3"
    case page3 = "Page 3 tap to Page 1"
}

struct SubText: View {
    let text: String
    let color: Color
    var body: some View {
        ZStack {
            color
            Text(text)
        }
        .ignoresSafeArea()
    }
}
因此在进行视图的显示切换时,最好通过 opacity 或 transition 等方式来处理(参阅下面的代码)。
// 使用 opacity
ZStack {
    SubText(text: Current.page1.rawValue, color: .red)
        .onTapGesture { swap() }
        .opacity(current == .page1 ? 1 : 0)

    SubText(text: Current.page2.rawValue, color: .green)
        .onTapGesture { swap() }
        .opacity(current == .page2 ? 1 : 0)

    SubText(text: Current.page3.rawValue, color: .cyan)
        .onTapGesture { swap() }
        .opacity(current == .page3 ? 1 : 0)
}

// 通过 transition
VStack {
    switch current {
    case .page1:
        SubText(text: Current.page1.rawValue, color: .red)
            .onTapGesture { swap() }
    case .page2:
        SubText(text: Current.page2.rawValue, color: .green)
            .onTapGesture { swap() }
    case .page3:
        SubText(text: Current.page3.rawValue, color: .cyan)
            .onTapGesture { swap() }
    }
}
为 zIndex 设置稳定的值
由于 zIndex 是不可动画的,所以应尽量为视图设置稳定的 zIndex 值。
对于固定数量的视图,可以手动在代码中进行标注。对于可变数量的视图(例如使用了 ForEach),需要在数据中找到可作为 zIndex 值参考依据的稳定标识。
例如下面的代码,尽管我们利用了 enumerated 为每个视图添加序号,并以此序号作为视图的 zIndex 值,但当视图发生增减时,由于序号的重组,就会有几率出现动画异常的情况。
struct IndexDemo1: View {
    @State var backgrounds = (0...10).map { _ in BackgroundWithoutIndex() }
    var body: some View {
        ZStack {
            ForEach(Array(backgrounds.enumerated()), id: \.element.id) { item in
                let background = item.element
                background.color
                    .offset(background.offset)
                    .frame(width: 200, height: 200)
                    .onTapGesture {
                        withAnimation {
                            if let index = backgrounds.firstIndex(where: { $0.id == background.id }) {
                                backgrounds.remove(at: index)
                            }
                        }
                    }
                    .zIndex(Double(item.offset))
            }
        }
        .frame(minWidth: 0, maxWidth: .infinity, minHeight: 0, maxHeight: .infinity)
        .ignoresSafeArea()
    }
}

struct BackgroundWithoutIndex: Identifiable {
    let id = UUID()
    let color: Color = {
        [Color.orange, .green, .yellow, .blue, .cyan, .indigo, .gray, .pink].randomElement() ?? .red.opacity(Double.random(in: 0.8...0.95))
    }()

    let offset: CGSize = .init(width: CGFloat.random(in: -200...200), height: CGFloat.random(in: -200...200))
}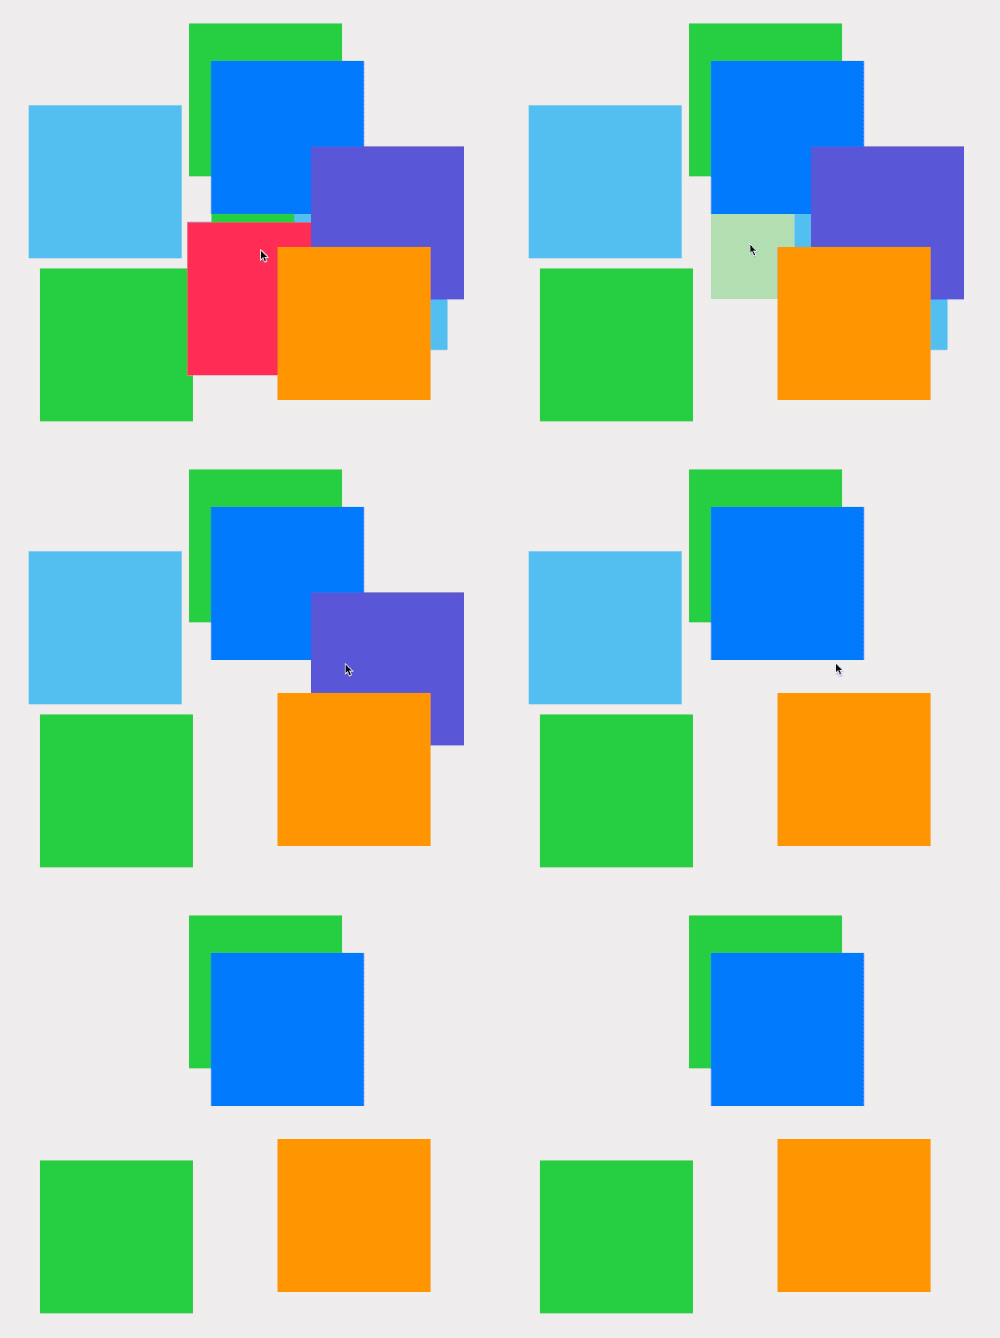
删除第四个色块(紫色)时,显示异常。
通过为视图指定稳定的 zIndex 值,可以避免上述问题。下面的代码,为每个视图添加了稳定的 zIndex 值,该值并不会因为有视图被删除就发生变化。
struct IndexDemo: View {
    // 在创建时添加固定的 zIndex 值
    @State var backgrounds = (0...10).map { i in BackgroundWithIndex(index: Double(i)) }
    var body: some View {
        ZStack {
            ForEach(backgrounds) { background in
                background.color
                    .offset(background.offset)
                    .frame(width: 200, height: 200)
                    .onTapGesture {
                        withAnimation {
                            if let index = backgrounds.firstIndex(where: { $0.id == background.id }) {
                                backgrounds.remove(at: index)
                            }
                        }
                    }
                    .zIndex(background.index)
            }
        }
        .frame(minWidth: 0, maxWidth: .infinity, minHeight: 0, maxHeight: .infinity)
        .ignoresSafeArea()
    }
}

struct BackgroundWithIndex: Identifiable {
    let id = UUID()
    let index: Double // zIndex 值
    let color: Color = {
        [Color.orange, .green, .yellow, .blue, .cyan, .indigo, .gray, .pink].randomElement() ?? .red.opacity(Double.random(in: 0.8...0.95))
    }()

    let offset: CGSize = .init(width: CGFloat.random(in: -200...200), height: CGFloat.random(in: -200...200))
}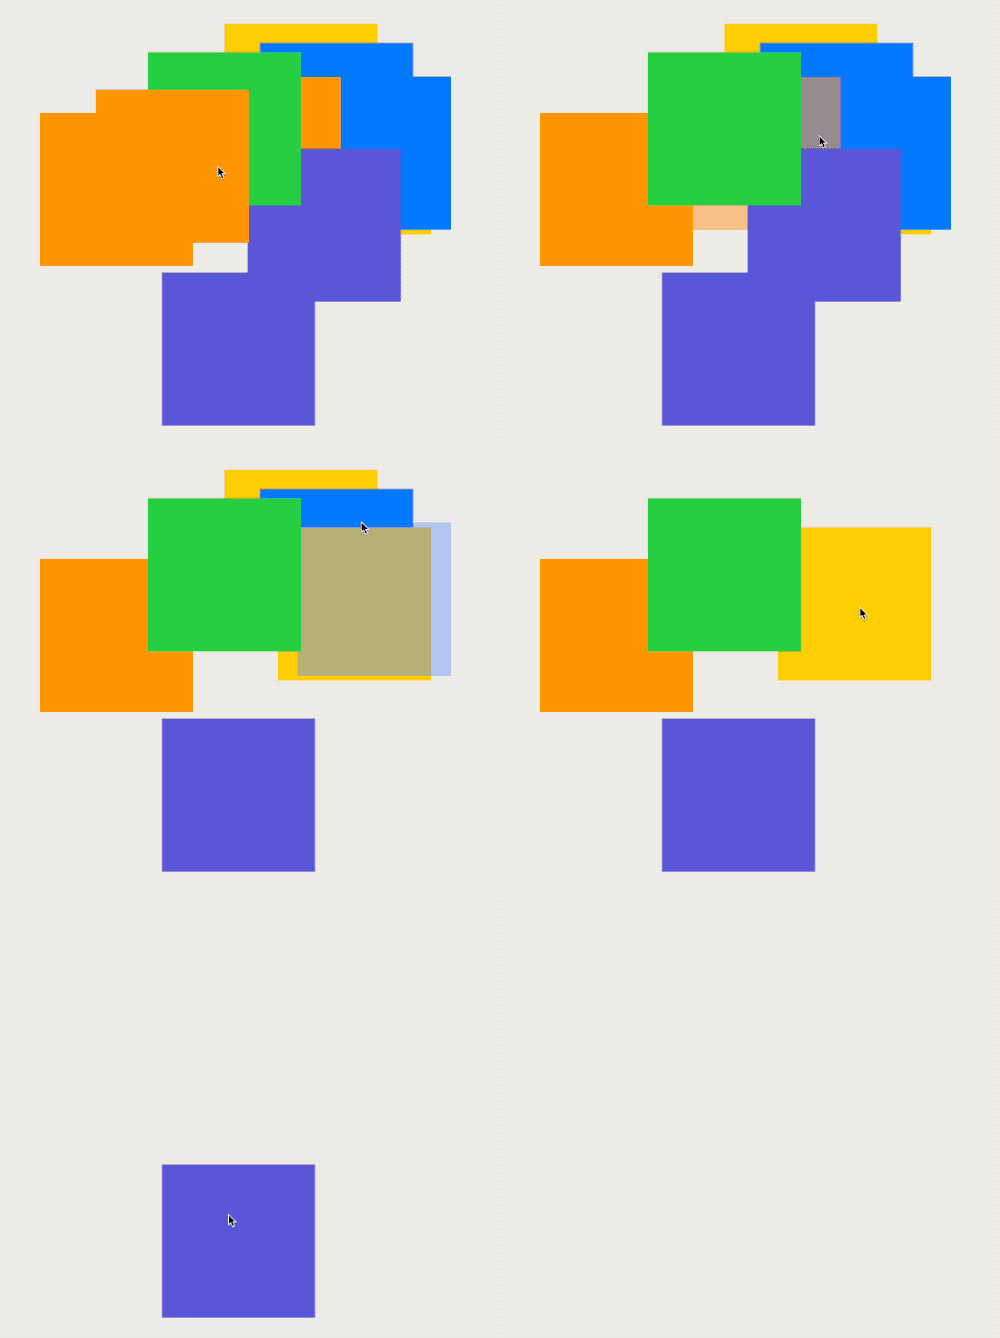
并非一定要在数据结构中为 zIndex 预留独立的属性,下节中的范例代码则是利用了数据中的时间戳属性作为 zIndex 值的参照依据。
zIndex 并非 ZStack 的专利
尽管大多数人都是在 ZStack 中使用 zIndex ,但 zIndex 也同样可以使用在 VStack 和 HStack 中,且通过和 spacing 的配合,可以非常方便的实现某些特殊的效果。
struct ZIndexInVStack: View {
    @State var cells: [Cell] = []
    @State var spacing: CGFloat = -95
    @State var toggle = true
    var body: some View {
        VStack {
            Button("New Cell") {
                newCell()
            }
            .buttonStyle(.bordered)
            Slider(value: $spacing, in: -150...20)
                .padding()
            Toggle("新视图显示在最上面", isOn: $toggle)
                .padding()
                .onChange(of: toggle, perform: { _ in
                    withAnimation {
                        cells.removeAll()
                        spacing = -95
                    }
                })
            VStack(spacing: spacing) {
                Spacer()
                ForEach(cells) { cell in
                    cell
                        .onTapGesture { delCell(id: cell.id) }
                        .zIndex(zIndex(cell.timeStamp))
                }
            }
        }
        .padding()
    }

    // 利用时间戳计算 zIndex 值
    func zIndex(_ timeStamp: Date) -> Double {
        if toggle {
            return timeStamp.timeIntervalSince1970
        } else {
            return Date.distantFuture.timeIntervalSince1970 - timeStamp.timeIntervalSince1970
        }
    }

    func newCell() {
        let cell = Cell(
            color: ([Color.orange, .green, .yellow, .blue, .cyan, .indigo, .gray, .pink].randomElement() ?? .red).opacity(Double.random(in: 0.9...0.95)),
            text: String(Int.random(in: 0...1000)),
            timeStamp: Date()
        )
        withAnimation {
            cells.append(cell)
        }
    }

    func delCell(id: UUID) {
        guard let index = cells.firstIndex(where: { $0.id == id }) else { return }
        withAnimation {
            let _ = cells.remove(at: index)
        }
    }
}

struct Cell: View, Identifiable {
    let id = UUID()
    let color: Color
    let text: String
    let timeStamp: Date
    var body: some View {
        RoundedRectangle(cornerRadius: 15)
            .fill(color)
            .frame(width: 300, height: 100)
            .overlay(Text(text))
            .compositingGroup()
            .shadow(radius: 3)
            .transition(.move(edge: .bottom).combined(with: .opacity))
    }
}
在上面的代码中,我们无需更改数据源,只需调整每个视图的 zIndex 值,便可以实现对新增视图是出现在最上面还是最下面的控制。
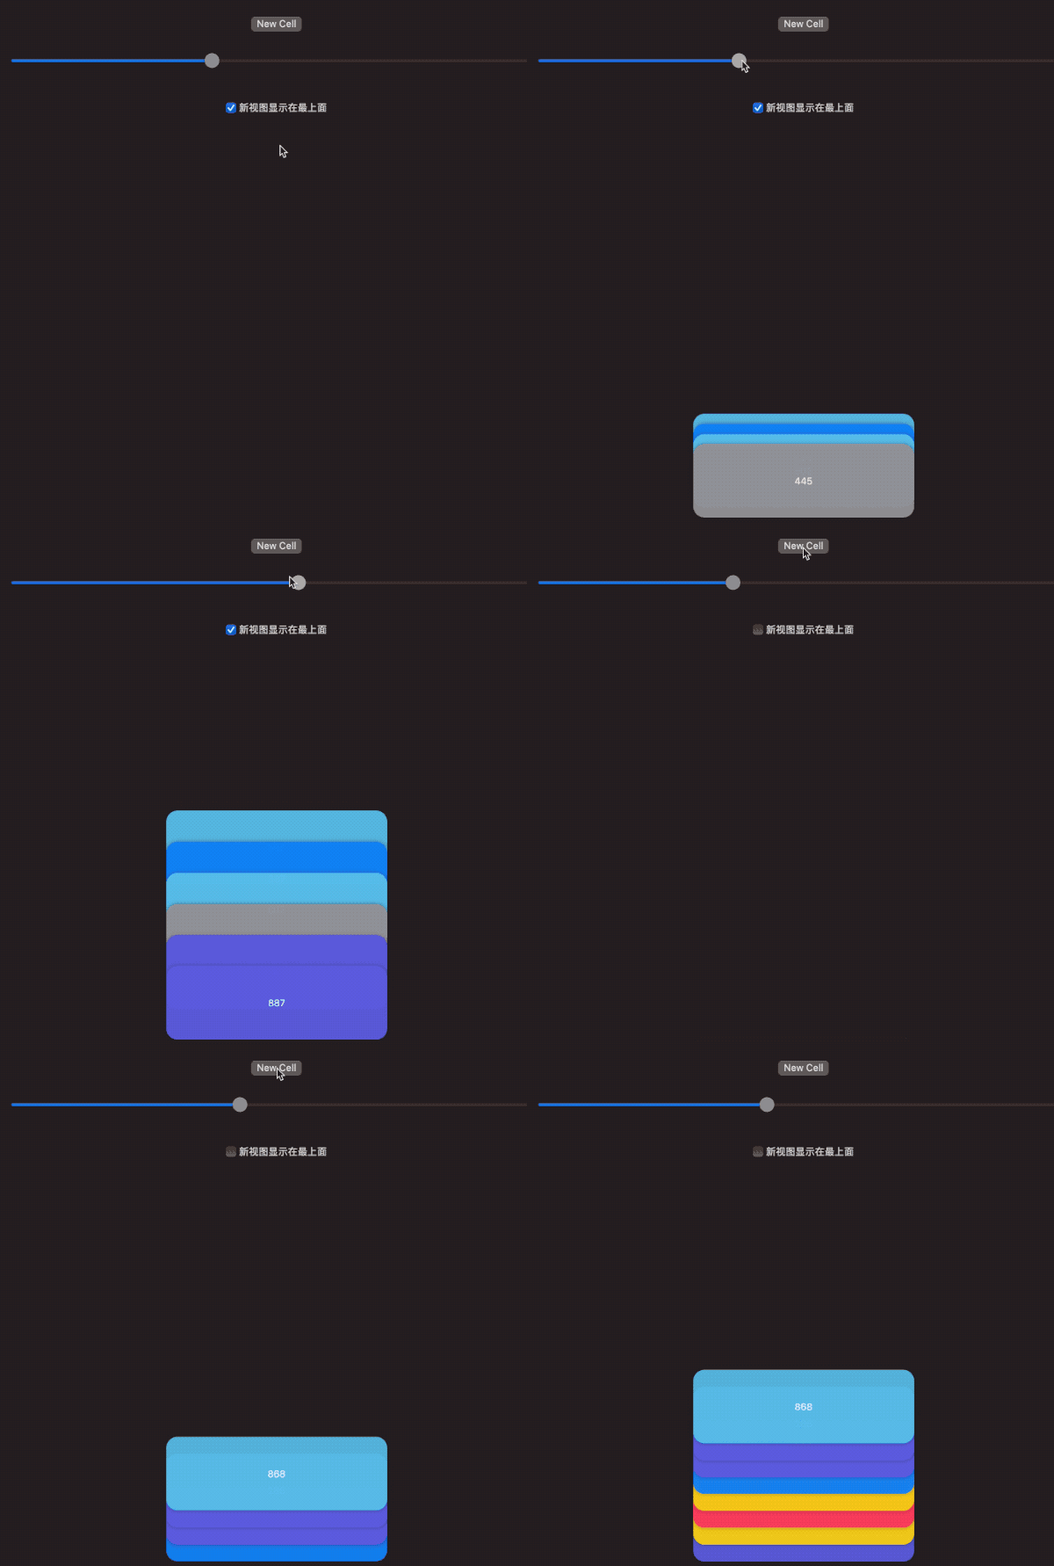
SwiftUI Overlay Container 即是通过上述方式实现了在不改变数据源的情况下调整视图的显示顺序
总结
zIndex 使用简单,效果明显,为我们提供了从另一个维度来调度、组织视图的能力。