我们不仅可以利用 Publish 内置的接口来开发插件进行扩展,同时还可以使用 Publish 套件中其他的优秀库(Ink、Plot、Sweep、Files、ShellOut 等)来完成更多的创意。本文将通过几个实例(添加标签、增加属性、用代码生成内容、全文搜索、命令行部署)在展示不同扩展手段的同时向大家介绍 Publish 套件中其他的优秀成员。在阅读本文前,最好能先阅读 用 Publish 创建博客(一)——入门、用 Publish 创建博客(二)——主题开发。对 Publish 有个基本了解。本文篇幅较长,你可以选择自己感兴趣的实战内容阅读。
基础
PublishingContext
在 用 Publish 创建博客(一)——入门 中我们介绍过 Publish 有两个 Content 概念。其中 PublishingContext 作为根容器包含了你网站项目的全部信息(Site、Section、Item、Page 等)。在对 Publish 进行的大多数扩展开发时,都需要和 PublishingContext 打交道。不仅通过它来获取数据,而且如果要对现有数据进行改动或者添加新的 Item、Page 时(在 Content 中采用不创建 markdown 文件的方式)也必须要调用其提供的方法。比如 mutateAllSections、addItem 等。
Pipeline 中的顺序
Publish 会逐个执行 Pipeline 中的 Step, 因此必须要在正确的位置放置 Step 和 Plugin。比如需要对网站的所有数据进行汇总,则该处理过程应该放置在 addMarkdownFiles(数据都被添加进 Content)之后;而如果想添加自己的部署(Deploy),则应放置在生成所有文件之后。下面会通过例子具体说明。
热身
下面的代码,以放置在
Myblog(第一篇中创建,并在第二篇中进行了修改)项目里为例。
准备
请将
try Myblog().publish(withTheme: .foundation)换成
try Myblog().publish(using: [
    .addMarkdownFiles(), //导入 Content 目录下的 markdown 文件,并解析添加到 PublishingContent 中
    .copyResources(), //将 Resource 内容添加到 Output 中
    .generateHTML(withTheme:.foundation ), //指定模板
    .generateRSSFeed(including: [.posts]), //生成 RSS
    .generateSiteMap() //生成 Site Map
])
创建 Step
我们先通过官方的一个例子了解一下 Step 的创建过程。当前导航菜单的初始状态:

下面的代码将改变 SectionID。
//当前的 Section 设置
enum SectionID: String, WebsiteSectionID {
        // Add the sections that you want your website to contain here:
        case posts //rawValue 将影响该 Section 对应的 Content 的目录名。当前的目录为 posts
        case about //如果改成 case abot = "关于" 则目录名为“关于”,所以通常会采用下方更改 title 的方法
 }

//创建 Step
extension PublishingStep where Site == Myblog {
    static func addDefaultSectionTitles() -> Self {
      //name 为 step 名称,在执行该 Step 时在控制台显示
        .step(named: "Default section titles") { context in //PublishingContent 实例
            context.mutateAllSections { section in //使用内置的修改方法
                switch section.id {
                case .posts:
                    section.title = "文章"  //修改后的 title,将显示在上方的 Nav 中
                case .about:
                    section.title = "关于"
                }
            }
        }
    }
}
将 Step 添加到 main.swift 的 pipeline 中:
    .addMarkdownFiles(),
    .addDefaultSectionTitles(),
    .copyResources(),
添加该 Step 后的导航菜单:

Pipeline 中的位置
如果将 addDefaultSectionTitles 放置在 addMarkdownFiles 的前面,会发现 posts 的 title 变成了

这是因为,当前的 Content--posts 目录中有一个 index.md 文件。addMarkdownFiles 会使用从该文件中解析的 title 来设置 posts 的 Section.title。解决的方法有两种:
- 向上面那样将
addDefaultSectionTitles放置在addMarkdownFiles的后面 - 删除掉
index.md
等效的 Plugin
在 用 Publish 创建博客(一)——入门 中提过 Step 和 Plugin 在作用上是等效的。上面的代码用 Plugin 的方式编写是下面的样子:
extension Plugin where Site == Myblog{
    static func addDefaultSectionTitles() -> Self{
        Plugin(name:  "Default section titles"){
            context in
            context.mutateAllSections { section in
                switch section.id {
                case .posts:
                    section.title = "文章"
                case .about:
                    section.title = "关于"
                }
            }
        }
    }
}
在 Pipeline 中 使用下面的方式添加:
    .addMarkdownFiles(),
    .copyResources(),
    .installPlugin(.addDefaultSectionTitles()),
它们的效果完全一样。
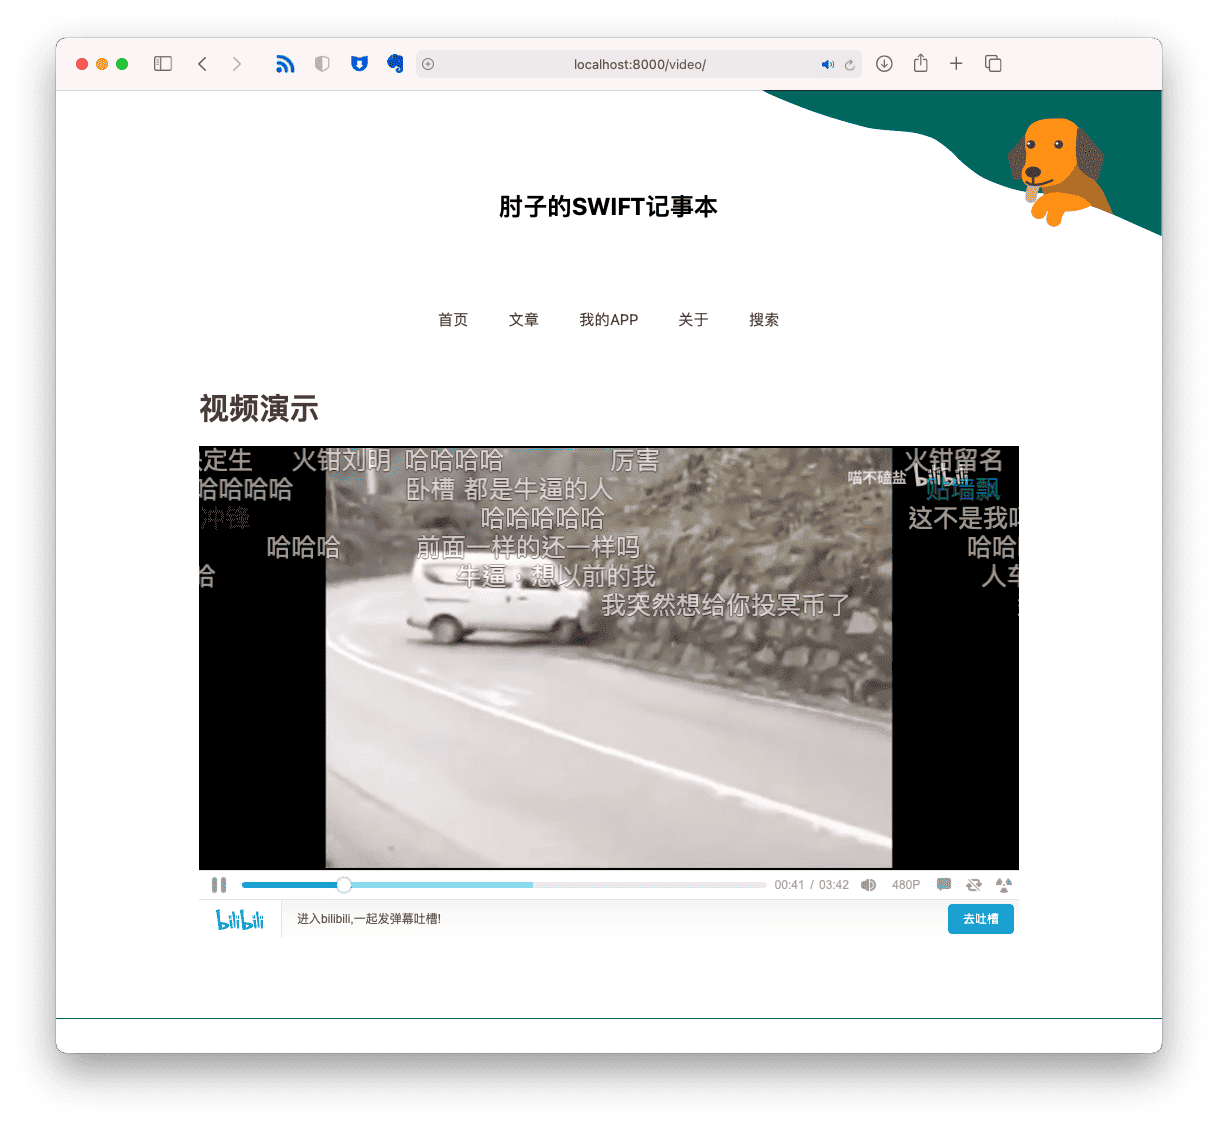
实战 1:添加 Bilibili 标签解析
Publish 使用 Ink 作为 markdown 的解析器。Ink 作为 Publish 套件的一部分,着重点在 markdown 到 HTML 的高效转换。它让使用者可以通过添加 modifier 的方式,对 markdown 转换 HTML 的过程进行定制和扩展。Ink 目前并不支持全部的 markdonw 语法,太复杂的它不支持(而且语法支持目前是锁死的,如想扩充必须 fork Ink 代码,自行添加)。
在本例中我们尝试为如下 markdown 的 codeBlock 语法添加新的转义功能:

aid 为 B 站视频的 aid 号码,danmu 为 弹幕 开关
让我们首先创建一个 Ink 的 modifier
/*
每个 modifier 对应一个 markdown 语法类型。
目前支持的类型有:metadataKeys,metadataValues,blockquotes,codeBlocks,headings
         horizontalLines,html,images,inlineCode,links,lists,paragraphs,tables
*/
var bilibili = Modifier(target: .codeBlocks) { html, markdown in
     // html 为 Ink 默认的 HTML 转换结果,markdown 为该 target 对应的原始内容
     // firstSubstring 是 Publish 套件中的 Sweep 提供的快速配对方法。
    guard let content = markdown.firstSubstring(between: .prefix("```bilibili\n"), and: "\n```") else {
        return html
    }
    var aid: String = ""
    var danmu: Int = 1
    // scan 也是 Sweep 中提供另一种配对获取方式,下面的代码是获取 aid: 和换行之间的内容
    content.scan(using: [
        Matcher(identifier: "aid: ", terminator: "\n", allowMultipleMatches: false) { match, _ in
            aid = String(match)
        },
        Matcher(identifiers: ["danmu: "], terminators: ["\n", .end], allowMultipleMatches: false) {
            match,
            _ in
            danmu = match == "true" ? 1 : 0
        },
    ])
    //modifier 的返回值为 HTML 代码,本例中我们不需要使用 Ink 的默认转换,直接全部重写
    //在很多的情况下,我们可能只是在默认转换的 html 结果上做出一定的修改即可
    return
        """
        <div style="position: relative; padding: 30% 45% ; margin-top:20px;margin-bottom:20px">
        <iframe style="position: absolute; width: 100%; height: 100%; left: 0; top: 0;" src="https://player.bilibili.com/player.html?aid=\(aid)&page=1&as_wide=1&high_quality=1&danmaku=\(danmu)" frameborder="no" scrolling="no"></iframe>
        </div>
        """
}
通常情况下,我们会将上面的 modifier 包裹在一个 Plugin 中,通过 installPlugin 来注入,不过现在我们直接创建一个新的 Step 专门来加载 modifier
extension PublishingStep{
    static func addModifier(modifier:Modifier,modifierName name:String = "") -> Self{
        .step(named: "addModifier \(name)"){ context in
            context.markdownParser.addModifier(modifier)
        }
    }
}
现在就可以在 main.swift 的 Pipeline 中添加了
.addModifier(modifier: bilibili,modifierName: "bilibili"), //bilibili 视频
.addMarkdownFiles(),
modifier 在添加后并不会立即使用,当 Pipeline 执行到 addMarkdownFiles 对 markdown 文件进行解析时才会调用。因此 modifier 的位置一定要放在解析动作的前面。
Ink 允许我们添加多个 modifier,即使是同一个 target。因此尽管我们上面的代码是占用了对 markdown 的 codeBlocks 的解析,但只要我们注意顺序,就都可以和平共处。比如下面:
 .installPlugin(.highlightJS()), //语法高亮插件,也是采用 modifier 方式,对应的也是 codeBlock
 .addModifier(modifier: bilibili), //在这种状况下,bilibili 必须在 highlightJS 下方。
Ink 将按照 modifier 的添加顺序来调用。添加该插件后的效果

上面代码在我提供的 范例模板 中可以找到
通过 modifier 扩展 markdown 到 HTML 的转义是 Publish 中很常见的一种方式。几乎所有的语法高亮、style 注入等都利用了这个手段。
实战 2:为 Tag 添加计数属性
在 Publish 中,我们只能获取 allTags 或者每个 Item 的 tags,但并不提供每个 tag 下到底有几个 Item。本例我们便为 Tag 增加 count 属性。
//由于我们并不想在每次调用 tag.count 的时候进行计算,所以一次性将所有的 tag 都提前计算好
//计算结果通过类属性或结构属性来保存,以便后面使用
struct CountTag{
    static var count:[Tag:Int] = [:]
    static func count<T:Website>(content:PublishingContext<T>){
        for tag in content.allTags{
          //将计算每个 tag 下对应的 item, 放置在 count 中
            count[tag] =  content.items(taggedWith: tag).count
        }
    }
}

extension Tag{
    public var count:Int{
        CountTag.count[self] ?? 0
    }
}
创建一个调用在 Pipeline 中激活计算的 Plugin
extension Plugin{
    static func countTag() -> Self{
        return Plugin(name: "countTag"){ content in
            return CountTag.count(content: content)
        }
    }
}
在 Pipeline 中加入
.installPlugin(.countTag()),现在我们就可在主题中直接通过 tag.count 来获取所需数据了,比如在主题方法 makeTagListHTML 中:
.forEach(page.tags.sorted()) { tag in
       .li(
       .class(tag.colorfiedClass), //tag.colorfieldClass 也是通过相同手段增加的属性,在文章最后会有该插件的获取地址
              .a(
               .href(context.site.path(for: tag)),
               .text("\(tag.string) (\(tag.count))")
               )
          )
  }
显示结果

实战 3:将文章按月份汇总
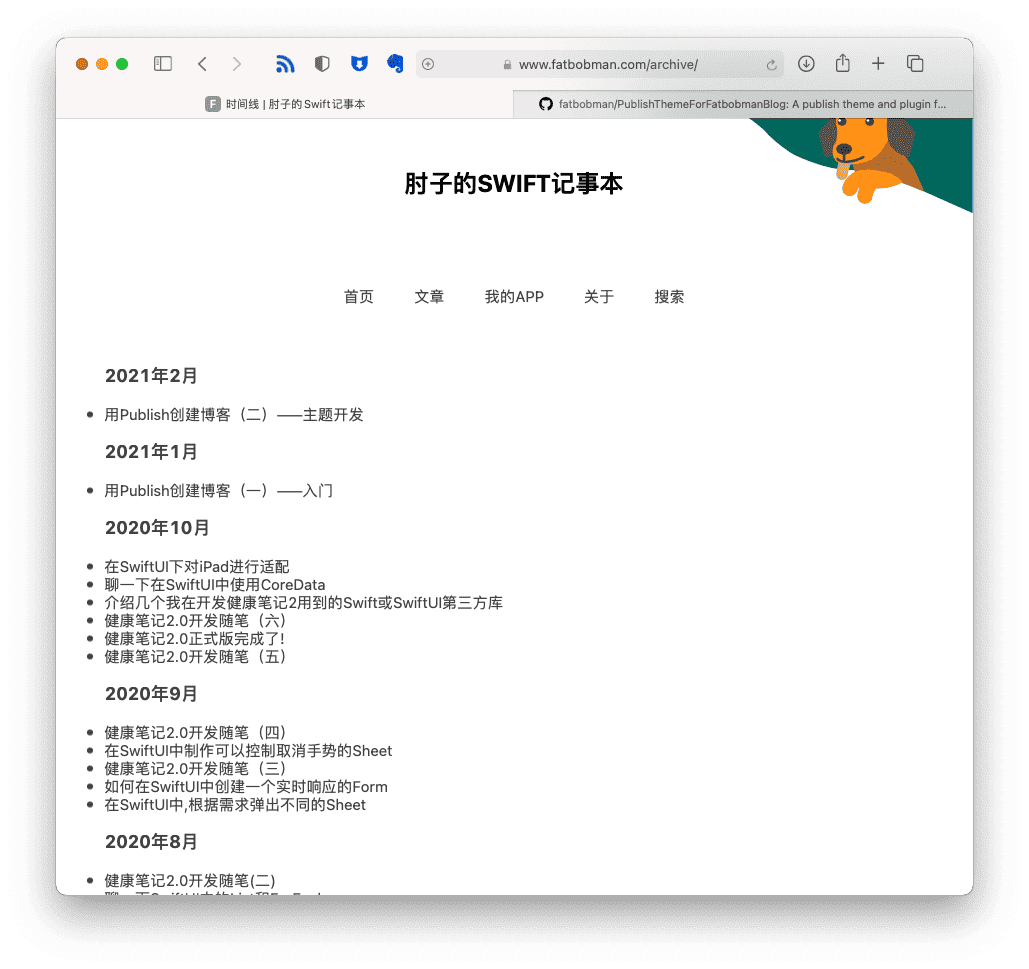
在 Publish 创建博客(二)——主题开发 中我们讨论过目前 Publish 的主题支持的六种页面,其中有对 Item 以及 tag 的汇总页面。本例演示一下如何用代码创建主题不支持的其他页面类型。
本例结束时,我们将让 Publish 能够自动生成如下的页面:

//创建一个 Step
extension PublishingStep where Site == FatbobmanBlog{
    static func makeDateArchive() -> Self{
        step(named: "Date Archive"){ content in
            var doc = Content()
             /*创建一个 Content,此处的 Content 是装载页面内容的,不是 PublishingContext
              Publish 在使用 addMarkdownFiles 导入 markdown 文件时,会为每个 Item 或 Page 创建 Content
              由于我们是使用代码直接创建,所以不能使用 markdown 语法,必须直接使用 HTML
             */
            doc.title = "时间线"
            let archiveItems = dateArchive(items: content.allItems(sortedBy: \.date,order: .descending))
             //使用 Plot 生成 HTML,第二篇文章有 Plot 的更多介绍
            let html = Node.div(
                .forEach(archiveItems.keys.sorted(by: >)){ absoluteMonth in
                    .group(
                        .h3(.text("\(absoluteMonth.monthAndYear.year) 年、(absoluteMonth.monthAndYear.month) 月")),
                        .ul(
                            .forEach(archiveItems[absoluteMonth]!){ item in
                                .li(
                                    .a(
                                        .href(item.path),
                                        .text(item.title)
                                    )
                                )
                            }
                        )
                    )
                }
            )
            //渲染成字符串
            doc.body.html = html.render()
            //本例中直接生成了 Page,也可以生成 Item,Item 需在创建时指定 SectionID 以及 Tags
            let page = Page(path: "archive", content:doc)
            content.addPage(page)
        }
    }
    //对 Item 按月份汇总
    fileprivate static func dateArchive(items:[Item<Site>]) -> [Int:[Item<Site>]]{
        let result = Dictionary(grouping: items, by: {$0.date.absoluteMonth})
        return result
    }
}

extension Date{
    var absoluteMonth:Int{
        let calendar = Calendar.current
        let component = calendar.dateComponents([.year,.month], from: self)
        return component.year! * 12 + component.month!
    }
}

extension Int{
    var monthAndYear:(year:Int,month:Int){
        let month = self % 12
        let year = self / 12
        return (year,month)
    }
}
由于该 Step 需要对 PublishingContent 中的所有 Item 进行汇总,所以在 Pipeline 中应该在所有内容都装载后再执行
.addMarkdownFiles(),
.makeDateArchive(),
上面的代码可以在 Github 下载。
实战 4:给 Publish 添加搜索功能
谁不想让自己的 Blog 支持全文搜索呢?对于多数的静态页面来说(比如 github. io),是很难依靠服务端来实现的。
下面的代码是在参照 local-search-engine-in-Hexo 的方案实现的。local-search-engin 提出的解决方式是,将网站的全部需检索文章内容生成一个 xml 或 json 文件。用户搜索前,自动从服务端下载该文件,通过 javascript 代码在本地完成搜索工作。javascripte 代码 使用的是 hexo-theme-freemind 创建的。另外 Liam Huang 的这篇 博客 也给了我很大的帮助。
最后实现的效果是这样的:
创建一个 Step 用来在 Pipeline 的末端生成用于检索的 xml 文件。
extension PublishingStep{
    static func makeSearchIndex(includeCode:Bool = true) -> PublishingStep{
        step(named: "make search index file"){ content in
            let xml = XML(
                .element(named: "search",nodes:[
                    //之所以将这个部分分开写,是因为有时候编译器对于复杂一点的 DSL 会 TimeOut
                    //提示编译时间过长。分开则完全没有问题。这种情况在 SwiftUI 中也会遇到
                    .entry(content:content,includeCode: includeCode)
                ])
            )
            let result = xml.render()
            do {
                try content.createFile(at: Path("/Output/search.xml")).write(result)
            }
            catch {
                print("Failed to make search index file error:\(error)")
            }
        }
    }
}

extension Node {
    //这个 xml 文件的格式是 local-search-engin 确定的,这里使用 Plot 把网站内容转换成 xml
    static func entry<Site: Website>(content:PublishingContext<Site>,includeCode:Bool) -> Node{
        let items = content.allItems(sortedBy: \.date)
        return  .forEach(items.enumerated()){ index,item in
            .element(named: "entry",nodes: [
                .element(named: "title", text: item.title),
                .selfClosedElement(named: "link", attributes: [.init(name: "href", value: "/" + item.path.string)] ),
                .element(named: "url", text: "/" + item.path.string),
                .element(named: "content", nodes: [
                    .attribute(named: "type", value: "html"),
                    //为 Item 增加了 htmlForSearch 方法
                    //由于我的 Blog 的文章中包含不少代码范例,所以让使用者选择是否在检索文件中包含 Code。
                    .raw("<![CDATA[" + item.htmlForSearch(includeCode: includeCode) + "]]>")
                ]),
                .forEach(item.tags){ tag in
                    .element(named:"tag",text:tag.string)
                }
            ])
        }
    }
}
我需要再称赞一下 Plot,它让我非常轻松地完成了 xml 的创建工作。
extension Item{
    public func htmlForSearch(includeCode:Bool = true) -> String{
        var result = body.html
        result = result.replacingOccurrences(of: "]]>", with: "]>")
        if !includeCode {
        var search = true
        var check = false
        while search{
            check = false
            //使用 Ink 来获取配对内容
            result.scan(using: [.init(identifier: "<code>", terminator: "</code>", allowMultipleMatches: false, handler: { match,range in
                result.removeSubrange(range)
                check = true
            })])
            if !check {search = false}
        }
        return result
    }
}
创建 搜索框 和 搜索结果容器:
//里面的 id 和 class 由于要和 javascript 配合,需保持现状
extension Node where Context == HTML.BodyContext {
    //显示搜索结果的 Node
    public static func searchResult() -> Node{
        .div(
            .id("local-search-result"),
            .class("local-search-result-cls")
        )
    }

    //显示搜索框的 Node
    public static func searchInput() -> Node{
        .div(
        .form(
            .class("site-search-form"),
            .input(
                .class("st-search-input"),
                .attribute(named: "type", value: "text"),
                .id("local-search-input"),
                .required(true)
                ),
            .a(
                .class("clearSearchInput"),
                .href("javascript:"),
                .onclick("document.getElementById('local-search-input').value = '';")
            )
        ),
        .script(
            .id("local.search.active"),
            .raw(
            """
            var inputArea       = document.querySelector("#local-search-input");
            inputArea.onclick   = function(){ getSearchFile(); this.onclick = null }
            inputArea.onkeydown = function(){ if(event.keyCode == 13) return false }
            """
            )
        ),
            .script(
                .raw(searchJS) //完整的代码后面可以下载
            )
        )
    }
}
本例中,我将搜索功能设置在标签列表的页面中(更多信息查看 主题开发),因此在 makeTagListHTML 中将上面两个 Node 放到自己认为合适的地方。
由于搜索用的 javascript 需要用到 jQuery,所以在 head 中添加了 jQuery 的引用(通过覆写了 head,当前只为 makeTagListHTML 添加了引用)。
在 Pipeline 中加入
.makeSearchIndex(includeCode: false), //根据自己需要决定是否索引文章中的代码完整的代码可以在 Github 下载。
实战 5:部署
最后这个实例略微有点牵强,主要是为了介绍 Publish 套件中的另外一员 ShellOut。
ShellOut 是一个很轻量的库,它的作用是方便开发者从 Swift 代码中调用脚本或命令行工具。在 Publish 中,使用 publish deploy 进行 Github 部署的代码便使用了这个库。
import Foundation
import Publish
import ShellOut

extension PublishingStep where Site == FatbobmanBlog{
    static func uploadToServer() -> Self{
        step(named: "update files to fatbobman.com"){ content in
            print("uploading......")
            do {
                try shellOut(to: "scp -i ~/.ssh/id_rsa -r  ~/myBlog/Output web@112.239.210.139:/var/www")
                //我是采用 scp 部署的,你可以用任何你习惯的方式
            }
            catch {
                print(error)
            }
        }
    }
}
在 main.swift 添加:
var command:String = ""
if CommandLine.arguments.count > 1 {
    command = CommandLine.arguments[1]
}

try MyBlog().publish(
  .addMarkdownFiles(),
  ...
  .if(command == "--upload", .uploadToServer())
]
执行 swift run MyBlog --upload 即可完成网站生成+上传(MyBlog 为你的项目名称)
其他的插件资源
目前 Publish 的插件和主题在互联网上能够找到的并不很多,主要集中在 Github 的#publish-plugin 上。
其中使用量比较大的有:
- SplashPublishPlugin 代码高亮
- HighlightJSPublishPlugin 代码高亮
- ColorfulTagsPublishPlugin 给 Tag 添加颜色
如果想在 Github 上分享你制作的 plugin,请务必打上 publish-plugin 标签以便于大家查找
最后
就在即将完成这篇稿件的时候,手机上收到了 赵英俊 因病过世的新闻。英年早逝,令人唏嘘。回想到自己这些年经历的治疗过程,由衷地感觉平静、幸福的生活真好。
在使用 Publish 的这些天,让我找到了装修房子的感觉。虽然不一定做的多好,但网站能按自己的想法逐步变化真是乐趣无穷。