Foundation 框架为 Swift 开发者提供了一套声明式的现代 Formatter API(常被称为 FormatStyle)。相比于传统的 NSFormatter 子类,这套基于协议的 API 更加契合 Swift 的语言特性。本文将深入探讨其设计机制,并通过实例演示如何创建自定义的 Formatter。
本文的演示代码可以在 Github 上下载
新旧交替或风格转换
现代 Formatter API 可以做什么
新 Formatter 提供了一个便捷的接口,让 Swift 程序员以更熟悉方式在应用程序中呈现本地化的格式字符串。
Swift 原生 API 的优势与局限
好和坏都是相对的,对于以 Swift 开发为主或者只会 Swift 的程序员(比如我本人),新 Formatter 不仅学习和使用起来更容易,同时也更适合日益流行的声明式编程风格。不过从整体功能和效率上讲,新 Formatter 并不具备优势。
新旧 API 比较
调用方便度
如果说现代 Formatter API 相较传统的 NSFormatter 的最大优势,便是在调用上更符合直觉、更方便了。
传统的 NSFormatter:
      let number = 3.147
      let numberFormat = NumberFormatter()
      numberFormat.numberStyle = .decimal
      numberFormat.maximumFractionDigits = 2
      numberFormat.roundingMode = .halfUp
      let numString = numberFormat.string(from: NSNumber(3.147))!
      // 3.15
现代 Formatter API:
      let number = 3.147
      let numString = number.formatted(.number.precision(.fractionLength(2)).rounded(rule: .up))
      // 3.15
传统的 NSFormatter:
      let numberlist = [3.345,534.3412,4546.4254]
      let numberFormat = NumberFormatter()
              numberFormat.numberStyle = .decimal
              numberFormat.maximumFractionDigits = 2
              numberFormat.roundingMode = .halfUp
      let listFormat = ListFormatter()
      let listString = listFormat
                  .string(from:
                              numberlist
                              .compactMap{numberFormat.string(from:NSNumber(value: $0))}
                  ) ?? ""
      // 3.35, 534.35, and 4,546.43
现代 Formatter API:
        let numString1 = numberlist.formatted(
            .list(
                memberStyle: .number.precision(.fractionLength(2)).rounded(rule: .up),
                type: .and
            )
        )
    // 3.35, 534.35, and 4,546.43
即使你对现代 Formatter API 并不很了解,仅凭代码的自动提示你就可以快速组合出想要的格式化结果。
运行效率
虽然官方强调了性能提升,不过苹果并没有告诉你全部的真相。
从我个人的测试数据来看,现代 API 的效率相较于仅使用一次的 Formatter 实例来说,提升还是比较明显的(30% —— 300%),不过同可复用的 Formatter 实例比较,仍有数量级上的差距。
传统的 NSFormatter,每次都重新创建实例
    func testDateFormatterLong() throws {
        measure {
            for _ in 0..<count {
                let date = Date()
                let formatter = DateFormatter()
                formatter.dateStyle = .full
                formatter.timeStyle = .full
                _ = formatter.string(from: date)
            }
        }
    }
// 0.121
传统的 NSFormatter,只创建一次实例
    func testDateFormatterLongCreateOnce() throws {
        let formatter = DateFormatter()
        measure {
            for _ in 0..<count {
                let date = Date()
                formatter.dateStyle = .full
                formatter.timeStyle = .full
                _ = formatter.string(from: date)
            }
        }
    }
// 0.005
现代 Formatter API
    func testDateFormatStyleLong() throws {
        measure {
            for _ in 0..<count {
                _ = Date().formatted(.dateTime.year().month(.wide).day().weekday(.wide).hour(.conversationalTwoDigits(amPM: .wide)).minute(.defaultDigits).second(.twoDigits).timeZone(.genericName(.long)))
            }
        }
    }
// 0.085
使用这套 API,配置的内容越多,执行所需时间也会相应增长。不过除非是对性能有非常高要求的场景,否则现代 Formatter API 的执行效率还是有可以令人满意的。
本文的 Demo 中,附带了部分 Unit Test 代码,大家可以自行测试。
统一性
传统的 NSFormatter 中,针对不同的格式化类型,我们需要创建不同的 Formatter 实例。比如使用 NumberFormatter 格式化数字、DateFormatter 格式化日期。
现代 Formatter API 针对每个支持的类型都提供了统一的调用接口,尽量减少代码层面的复杂度
Date.now.formatted()
// 9/30/2021, 2:12 PM
345.formatted(.number.precision(.integerLength(5)))
// 00,345
Date.now.addingTimeInterval(100000).formatted(.relative(presentation: .named))
// tomorrow
自定义难度
现代 Formatter API 的调用便利性是建立在大量繁杂工作的基础之上的。相较于传统的 NSFormatter 通过属性直接设置,现代 Formatter API 采用函数式编程方式,针对每个属性单独编写设置方法。虽然并不复杂,但工作量明显提高。
AttributedString
现代 Formatter API 为每个可转换类型都提供 AttributedString 格式支持。通过 AttributedString 中的 Field,可以方便的生成想要的显示样式。
比如:
    var dateString: AttributedString {
        var attributedString = Date.now.formatted(.dateTime
            .hour()
            .minute()
            .weekday()
            .attributed
        )
        let weekContainer = AttributeContainer()
            .dateField(.weekday)
        let colorContainer = AttributeContainer()
            .foregroundColor(.red)
        attributedString.replaceAttributes(weekContainer, with: colorContainer)
        return attributedString
    }

Text(dateString)
代码出错率
在现代 Formatter API 中,一切都是类型安全的,开发者无需反复的查阅文档,你的代码可以享受编译时检查的好处。
比如下面的代码
传统的 NSFormatter
let dateFormatter:DateFormatter = {
    let formatter = DateFormatter()
    formatter.dateFormat = "yyyy-MM-dd HH:mm:ss"
    return formatter
}()

let dateString = dateFormatter.string(from: Date.now)
现代 Formatter API
let dateString = Date.now.formatted(.iso8601.year().month().day().dateSeparator(.dash).dateTimeSeparator(.space).time(includingFractionalSeconds: false) .timeSeparator(.colon))如果单从代码量上来看,在本例中,现代 Formatter API 不占据任何优势。不过你无需在 yyyy 和 YYYY 或者 MM 还是 mm 中犹豫,也不用反复查看 令人头痛的文档,减少了在代码中犯错的可能性。在现代 Swift 开发中,这种类型安全的配置已成为最佳实践。
面向协议的声明式风格
传统的 NSFormatter 是 Objectiv-C 的产物,它十分高效且好用,但在 Swift 中使用难免有不协调感。
现代 Formatter API 是完全为 Swift 开发的,它采用了当前流行的声明式的风格。开发者只需要声明需要显示的字段,系统将以合适的格式进行呈现。
两种风格将在苹果的开发生态中长期共存,开发者可以选择适合自己的方式来实现同一个目标。
因此不存在风格转换的问题,这是 Foundation 框架向 Swift 现代化迈进的重要一步,目前已成为 SwiftUI 等框架的首选格式化方案。
结论
现代 Formatter API 并非用来替换旧的 NSFormatter API,应该算是旧 NSFormatter 的 Swift 实现版本。现代 Formatter API 基本涵盖了 NSFormatter API 绝大多数的功能,着重改善了开发者的使用体验。
类似的情况在最近几年中将不断上演,苹果在 Swift 语言层面基本完善的情况下,将逐步提供其核心框架的 Swift 版本。随之而来的 AttributedString 也是这一体系的重要组成部分。
如何自定义现代 Formatter API
新老 API 在自定义方面的不同
传统的 NSFormatter 是用类实现的,在创建自定义格式化器时,我们需要创建一个 Formatter 的子类,并至少实现以下两个方法:
class MyFormatter:Formatter {
   // 将被格式化类型转换成格式类型(字符串)
    override func string(for obj: Any?) -> String?{
        guard let value = obj as? Double else {return nil}
        return String(value)
    }

   // 将格式化类型(字符串)转换回被格式化类型
    override func getObjectValue(_ obj: AutoreleasingUnsafeMutablePointer<AnyObject?>?, for string: String, errorDescription error: AutoreleasingUnsafeMutablePointer<NSString?>?) -> Bool{
        guard let value = Double(string) else {return false}
        obj?.pointee = value as AnyObject
        return true
    }
}
需要的情况下,我们也可以提供 NSAttributedString 的格式化实现
    override func attributedString(for obj: Any, withDefaultAttributes attrs: [NSAttributedString.Key : Any]? = nil) -> NSAttributedString? {
        nil
}数据的格式转换都是在一个类定义中完成的。
现代 Formatter API 充分体现了 Swift 作为面向协议语言的特点,使用两个协议(FormatStyle、ParseStrategy),分别定义了格式化数据和从格式化转换两个方向的实现。
新协议
FormatStyle
将被格式化类型转换成格式化类型。
public protocol FormatStyle : Decodable, Encodable, Hashable {

    /// The type of data to format.
    associatedtype FormatInput

    /// The type of the formatted data.
    associatedtype FormatOutput

    /// Creates a `FormatOutput` instance from `value`.
    func format(_ value: Self.FormatInput) -> Self.FormatOutput

    /// If the format allows selecting a locale, returns a copy of this format with the new locale set. Default implementation returns an unmodified self.
    func locale(_ locale: Locale) -> Self
}
尽管在导出类型上使用了泛型,不过由于现代 Formatter API 着重于格式化(而不是类型转换),因此通常 FormatOutput 为 String 或者 AttributedString。
func format(_ value: Self.FormatInput) -> Self.FormatOutput 是必须实现的方法,locale 用来为 Formatter 设置区域信息,其返回值中的 format 方法的输出类型同原结构一致。因此,尽管 Formatter 会针对不同区域提供不同语言的返回结果,但为了兼容性,返回结果仍为 String。
FormatStyle 协议同时约定了必须满足 Codable 和 Hashable。
ParseStrategy
将格式化后的数据转换成被格式化类型
public protocol ParseStrategy : Decodable, Encodable, Hashable {

    /// The type of the representation describing the data.
    associatedtype ParseInput

    /// The type of the data type.
    associatedtype ParseOutput

    /// Creates an instance of the `ParseOutput` type from `value`.
    func parse(_ value: Self.ParseInput) throws -> Self.ParseOutput
}
parse 的定义可比传统的 NSFormatter 的 getObjectValue 容易理解多了。
ParseableFromatStyle
由于 FormatStyle 和 ParseStrategy 是两个独立的协议,因此苹果又提供了 ParseableFromatStyle 协议,方便我们在一个结构体中实现两个协议的方法。
public protocol ParseableFormatStyle : FormatStyle {

    associatedtype Strategy : ParseStrategy where Self.FormatInput == Self.Strategy.ParseOutput, Self.FormatOutput == Self.Strategy.ParseInput

    /// A `ParseStrategy` that can be used to parse this `FormatStyle`'s output
    var parseStrategy: Self.Strategy { get }
}
尽管理论上也可以通过
FormatStyle&ParseStrategy在一个结构体中实现双向转换,不过官方框架只支持通过ParseableFromatStyle协议实现的 Formatter。
其他
尽管 ParseableFromatStyle 协议并没有要求一定要输出 AttributedString,不过在官方的现代 Formatter API 中还是为每个类型都提供了 AttributedString 的输出。
为了方便 Formatter 的调用,所有的官方 Formatter 都利用 Swift 的**静态成员查找(Static Member Lookup)**特性,我们可以为自定义 Formatter 提供极佳的链式调用体验。
例如
extension FormatStyle where Self == IntegerFormatStyle<Int> {
    public static var number: IntegerFormatStyle<Int> { get }
}
我们最好也为自定义的 Formatter 提供类似的定义
实战
目标
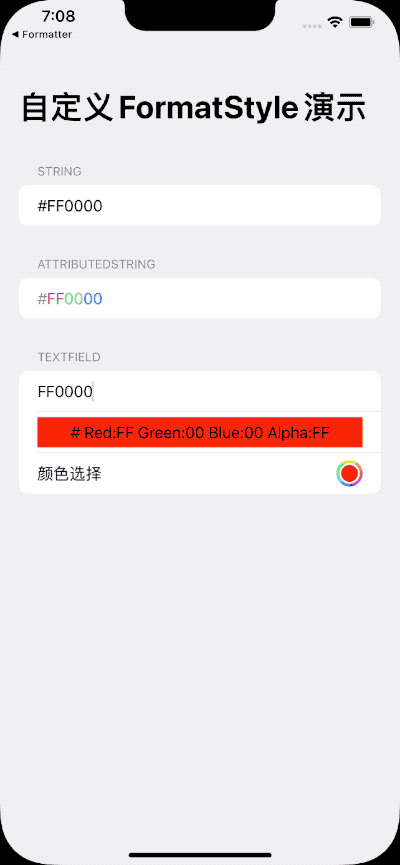
本节中,我们将用新的协议来实现针对 UIColor 的 Formatter,它将实现如下功能:
- 转换成 String
UIColor.red.formatted()
// #FFFFFF- 转换成 AttributedString
UIColor.red.formatted(.uiColor.attributed)
- 从 String 转换成 UIColor
let color = try! UIColor("#FFFFFFCC")
// UIExtendedSRGBColorSpace 1 1 1 0.8- 支持链式配置(前缀、标记符号、是否显示透明度)
Text(color, format: .uiColor.alpha().mark().prefix)
- localized

实现 ParseStrategy
将字符串转换成 UIColor。
struct UIColorParseStrategy: ParseStrategy {
    func parse(_ value: String) throws -> UIColor {
        var hexColor = value
        if value.hasPrefix("#") {
            let start = value.index(value.startIndex, offsetBy: 1)
            hexColor = String(value[start...])
        }

        if hexColor.count == 6 {
            hexColor += "FF"
        }

        if hexColor.count == 8 {
            let scanner = Scanner(string: hexColor)
            var hexNumber: UInt64 = 0

            if scanner.scanHexInt64(&hexNumber) {
                return UIColor(red: CGFloat((hexNumber & 0xff000000) >> 24) / 255,
                               green: CGFloat((hexNumber & 0x00ff0000) >> 16) / 255,
                               blue: CGFloat((hexNumber & 0x0000ff00) >> 8) / 255,
                               alpha: CGFloat(hexNumber & 0x000000ff) / 255)
            }
        }

        throw Err.wrongColor
    }

    enum Err: Error {
        case wrongColor
    }
}
在 Demo 中,我们并没有实现一个要求非常严格的 ParseStrategy。任何长度为 6 或 8 的十六进制字符串都将被转换成 UIColor。
实现 ParseableFromatStyle
struct UIColorFormatStyle: ParseableFormatStyle {
    var parseStrategy: UIColorParseStrategy {
        UIColorParseStrategy()
    }

    private var alpha: Alpha = .none
    private var prefix: Prefix = .hashtag
    private var mark: Mark = .none
    private var locale: Locale = .current

    enum Prefix: Codable {
        case hashtag
        case none
    }

    enum Alpha: Codable {
        case show
        case none
    }

    enum Mark: Codable {
        case show
        case none
    }

    init(prefix: Prefix = .hashtag, alpha: Alpha = .none, mark: Mark = .none, locale: Locale = .current) {
        self.prefix = prefix
        self.alpha = alpha
        self.mark = mark
        self.locale = locale
    }

    func format(_ value: UIColor) -> String {
        let (prefix, red, green, blue, alpha, redMark, greenMark, blueMark, alphaMark) = Self.getField(value, prefix: prefix, alpha: alpha, mark: mark, locale: locale)
        return prefix + redMark + red + greenMark + green + blueMark + blue + alphaMark + alpha
    }
}

extension UIColorFormatStyle {
    static func getField(_ color: UIColor, prefix: Prefix, alpha: Alpha, mark: Mark, locale: Locale) -> (prefix: String, red: String, green: String, blue: String, alpha: String, redMask: String, greenMark: String, blueMark: String, alphaMark: String) {
        var r: CGFloat = 0
        var g: CGFloat = 0
        var b: CGFloat = 0
        var a: CGFloat = 0
        color.getRed(&r, green: &g, blue: &b, alpha: &a)
        let formatString = "%02X"
        let prefix = prefix == .hashtag ? "#" : ""
        let red = String(format: formatString, Int(r * 0xff))
        let green = String(format: formatString, Int(g * 0xff))
        let blue = String(format: formatString, Int(b * 0xff))
        let alphaString = alpha == .show ? String(format: formatString, Int(a * 0xff)) : ""

        var redMark = ""
        var greenMark = ""
        var blueMark = ""
        var alphaMark = ""

        if mark == .show {
            redMark = "Red: "
            greenMark = "Green: "
            blueMark = "Blue: "
            alphaMark = alpha == .show ? "Alpha: " : ""
        }

        return (prefix, red, green, blue, alphaString, redMark, greenMark, blueMark, alphaMark)
    }
}
在 ParseableFromatStyle 中,除了实现 format 方法外,我们为不同的配置声明了属性。
将
getField方法声明为结构方法,便于之后的Attributed调用
在完成了上述代码后,我们已经可以使用代码在 UIColor 和 String 之间进行转换:
let colorString = UIColorFormatStyle().format(UIColor.blue)
// #0000FF

let colorString = UIColorFormatStyle(prefix: .none, alpha: .show, mark: .show).format(UIColor.blue)
// Red:00 Green:00 Blue:FF Alpha:FF

let color = try! UIColorFormatStyle().parseStrategy.parse("#FF3322")
// UIExtendedSRGBColorSpace 1 0.2 0.133333 1
链式配置
extension UIColorFormatStyle {
    func prefix(_ value: Prefix = .hashtag) -> Self {
        guard prefix != value else { return self }
        var result = self
        result.prefix = value
        return result
    }

    func alpha(_ value: Alpha = .show) -> Self {
        guard alpha != value else { return self }
        var result = self
        result.alpha = value
        return result
    }

    func mark(_ value: Mark = .show) -> Self {
        guard mark != value else { return self }
        var result = self
        result.mark = value
        return result
    }

    func locale(_ locale: Locale) -> UIColorFormatStyle {
        guard self.locale != locale else { return self }
        var result = self
        result.locale = locale
        return result
    }
}
现在我们获得了链式配置的能力。
let colorString = UIColorFormatStyle().alpha(.show).prefix(.none).format(UIColor.blue)
// 0000FFFF
localized 支持
由于 format 的输出类型为 String,因此,我们需要在 getField 中将 Mark 转换成对应区域的文字。在 getField 中做如下修改:
        if mark == .show {
            redMark = getLocalizedString(.red, locale: locale)
            greenMark = getLocalizedString(.green, locale: locale)
            blueMark = getLocalizedString(.blue, locale: locale)
            alphaMark = alpha == .show ? getLocalizedString(.alpha, locale: locale) : ""
        }
在 UIColorFormatStyle 添加如下代码:
enum MarkTag:String{
        case red
        case green
        case blue
        case alpha
    }

    static let localeString:[String:String] = [
        "EN-red":" Red:",
        "EN-green":" Green:",
        "EN-blue" : " Blue:",
        "EN-alpha" : " Alpha:",
        "ZH-red" : " 红:",
        "ZH-green" : " 绿:",
        "ZH-blue" : " 蓝",
        "ZH-alpha" : " 透明度:"
    ]
至此,当系统切换到拥有对应语言包的地区时,Mark 将显示对应的内容
# Red:00 Green:00 Blue:FF Alpha:FF
# 红:00 绿:00 蓝:FF 透明度:FF
建议方案: “需要注意的是,
String(localized: locale:)中的locale参数主要用于影响字符串插值(Interpolation)中的格式化行为。因此,在自定义 Formatter 时,我们需要显式地处理区域信息的传递。”
let colorString = UIColorFormatStyle().mark().locale(Locale(identifier: "zh-cn")).format(UIColor.blue)在 SwiftUI 中设置
// Text 将自动调用 Formatter 的 locale 方法
Text(color, format: .uiColor.mark())
    .environment(\.locale, Locale(identifier: "zh-cn"))
AttributedString 支持
创建自定义 Field,便于使用者修改 AttributedString 不同区域的 Style
enum UIColorAttirbute: CodableAttributedStringKey, MarkdownDecodableAttributedStringKey {
    enum Value: String, Codable {
        case red
        case green
        case blue
        case alpha
        case prefix
        case mark
    }

    static var name: String = "colorPart"
}

extension AttributeScopes {
    public struct UIColorAttributes: AttributeScope {
        let colorPart: UIColorAttirbute
    }

    var myApp: UIColorAttributes.Type { UIColorAttributes.self }
}

extension AttributeDynamicLookup {
    subscript<T>(dynamicMember keyPath: KeyPath<AttributeScopes.UIColorAttributes, T>) -> T where T: AttributedStringKey { self[T.self] }
}
关于 AttributedString 的深度用法,可以参考我的另一篇文章 AttributedString 详解。
由于将 UIColor 格式化成 AttributedString 是单向的(无需从 AttribuedString 转换回 UIColor),因此 Attributed 只需遵循 FormatStyle 协议
extension UIColorFormatStyle {
    var attributed: Attributed {
        Attributed(prefix: prefix, alpha: alpha,mark: mark,locale: locale)
    }

    struct Attributed: Codable, Hashable, FormatStyle {
        private var alpha: Alpha = .none
        private var prefix: Prefix = .hashtag
        private var mark: Mark = .none
        private var locale: Locale = .current

        init(prefix: Prefix = .hashtag, alpha: Alpha = .none, mark: Mark = .none, locale: Locale = .current) {
            self.prefix = prefix
            self.alpha = alpha
            self.mark = mark
            self.locale = locale
        }

        func format(_ value: UIColor) -> AttributedString {
            let (prefix, red, green, blue, alpha, redMark, greenMark, blueMark, alphaMark) = UIColorFormatStyle.getField(value, prefix: prefix, alpha: alpha, mark: mark, locale: locale)
            let prefixString = AttributedString(localized: "^[\(prefix)](colorPart:'prefix')", including: \.myApp)
            let redString = AttributedString(localized: "^[\(red)](colorPart:'red')", including: \.myApp)
            let greenString = AttributedString(localized: "^[\(green)](colorPart:'green')", including: \.myApp)
            let blueString = AttributedString(localized: "^[\(blue)](colorPart:'blue')", including: \.myApp)
            let alphaString = AttributedString(localized: "^[\(alpha)](colorPart:'alpha')", including: \.myApp)

            let redMarkString = AttributedString(localized: "^[\(redMark)](colorPart:'mark')",  including: \.myApp)
            let greenMarkString = AttributedString(localized: "^[\(greenMark)](colorPart:'mark')" ,including: \.myApp)
            let blueMarkString = AttributedString(localized: "^[\(blueMark)](colorPart:'mark')" ,including: \.myApp)
            let alphaMarkString = AttributedString(localized: "^[\(alphaMark)](colorPart:'mark')" ,including: \.myApp)

            let result = prefixString + redMarkString + redString + greenMarkString + greenString + blueMarkString + blueString + alphaMarkString + alphaString
            return result
        }

        func prefix(_ value: Prefix = .hashtag) -> Self {
            guard prefix != value else { return self }
            var result = self
            result.prefix = value
            return result
        }

        func alpha(_ value: Alpha = .show) -> Self {
            guard alpha != value else { return self }
            var result = self
            result.alpha = value
            return result
        }

        func mark(_ value: Mark = .show) -> Self {
            guard mark != value else { return self }
            var result = self
            result.mark = value
            return result
        }

        func locale<T:FormatStyle>(_ locale: Locale) -> T {
            guard self.locale != locale else { return self as! T }
            var result = self
            result.locale = locale
            return result as! T
        }
    }
}
统一性支持
为 UIColorFormatStyle 添加 FormatStyle 扩展,方便在 Xcode 中使用
extension FormatStyle where Self == UIColorFormatStyle.Attributed {
    static var uiColor: UIColorFormatStyle.Attributed {
        UIColorFormatStyle().attributed
    }
}

extension FormatStyle where Self == UIColorFormatStyle {
    static var uiColor: UIColorFormatStyle {
        UIColorFormatStyle()
    }
}
为 UIColor 添加便捷构造方法和 formatted 方法,保持同官方 Formatter 一致的使用体验。
extension UIColor {
    func formatted<F>(_ format: F) -> F.FormatOutput where F: FormatStyle, F.FormatInput == UIColor, F.FormatOutput == String {
        format.format(self)
    }

    func formatted<F>(_ format: F) -> F.FormatOutput where F: FormatStyle, F.FormatInput == UIColor, F.FormatOutput == AttributedString {
        format.format(self)
    }

    func formatted() -> String {
        UIColorFormatStyle().format(self)
    }

    convenience init<T:ParseStrategy>(_ value: String, strategy: T = UIColorParseStrategy() as! T  ) throws where T.ParseOutput == UIColor {
        try self.init(cgColor: strategy.parse(value as! T.ParseInput).cgColor)
    }

    convenience init(_ value: String) throws  {
        try self.init(cgColor: UIColorParseStrategy().parse(value).cgColor)
    }
}
完成品
可以在 Github 上下载全部代码。
总结
鉴于官方已经提供了大量种类齐全、功能丰富的 Formatter,大多数的开发者可能都不会碰到需要自定义 Formatter 的场景。不过通过对自定义 Formatter 协议的了解,可以加强我们对原生 Formatter 的认识,在代码中更好地使用它们。