TipKit 是苹果在 WWDC 2023 上新推出的一个框架,可轻松在你的应用程序中显示提示。它可用于向用户介绍新功能,帮助他们发现隐藏的选项或展示完成任务更快的途径等场景。TipKit 可以运行在苹果生态系统的不同硬件环境和操作系统上,包括 iPhone、iPad、Mac、Apple Watch 和 Apple TV。
开发者不仅可以通过设定规则、显示频次策略等方式控制 Tip 显示的时机和频率,还可以通过 API 获取 Tip 的状态以及与 Tip 绑定的事件等信息。尽管 TipKit 是以展示提示为主要目的而创建的框架,但其功能不限于此。
我将用两篇文章探讨 TipKit 框架。在本文中,我们首先学习 TipKit 的用法;在 下篇 中,我们将讨论更多使用技巧、注意事项、实现原理,以及在其他场景中使用 TipKit 等扩展话题。
2024 年 9 月更新:在 WWDC 2024 上,TipKit 框架的功能得到了显著扩展。本系列文章已针对最新更新进行了修订。
如何定义一个 Tip
在 TipKit 中,定义一个 Tip 就是声明一个遵循 Tip 协议的结构体。Tip 协议定义了用于 Tip 显示的标题、图像、信息以及用于判断是否满足出现条件的规则。
struct InlineTip: Tip {
    var title: Text {
        Text("Save as a Favorite")
    }
    var message: Text? {
        Text("Your favorite backyards always appear at the top of the list.")
    }
    var image: Image? {
        Image(systemName: "star")
    }
}
让 Tip 达到应有的效果
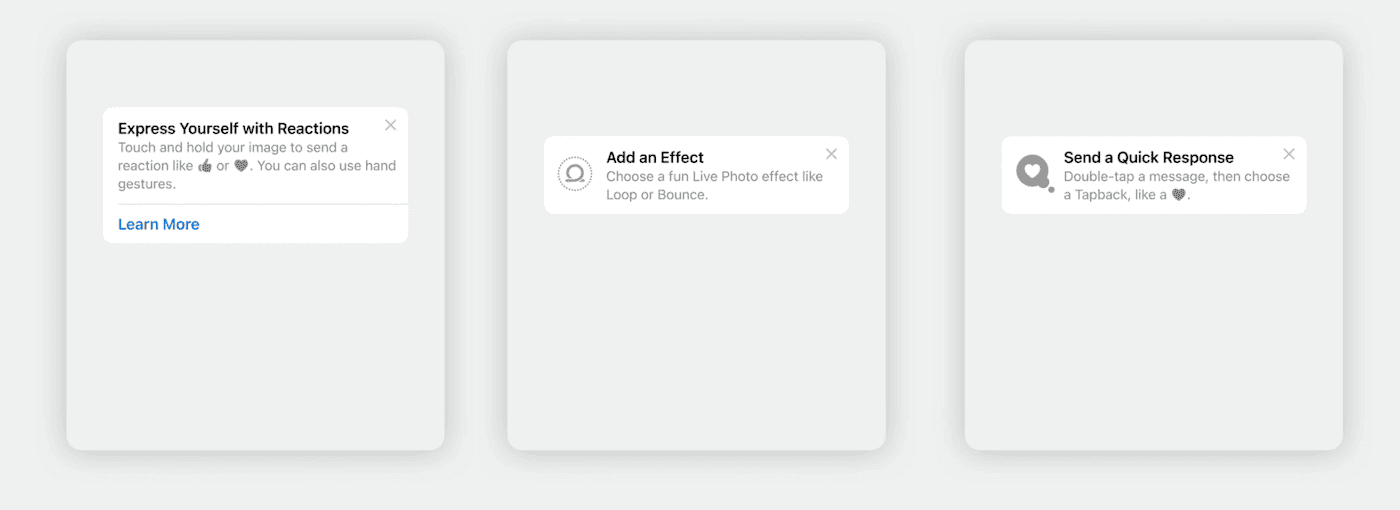
下图中的提示具备可操作性、有指导性并且易于记忆的特点,因此是推荐的提示展示方式。
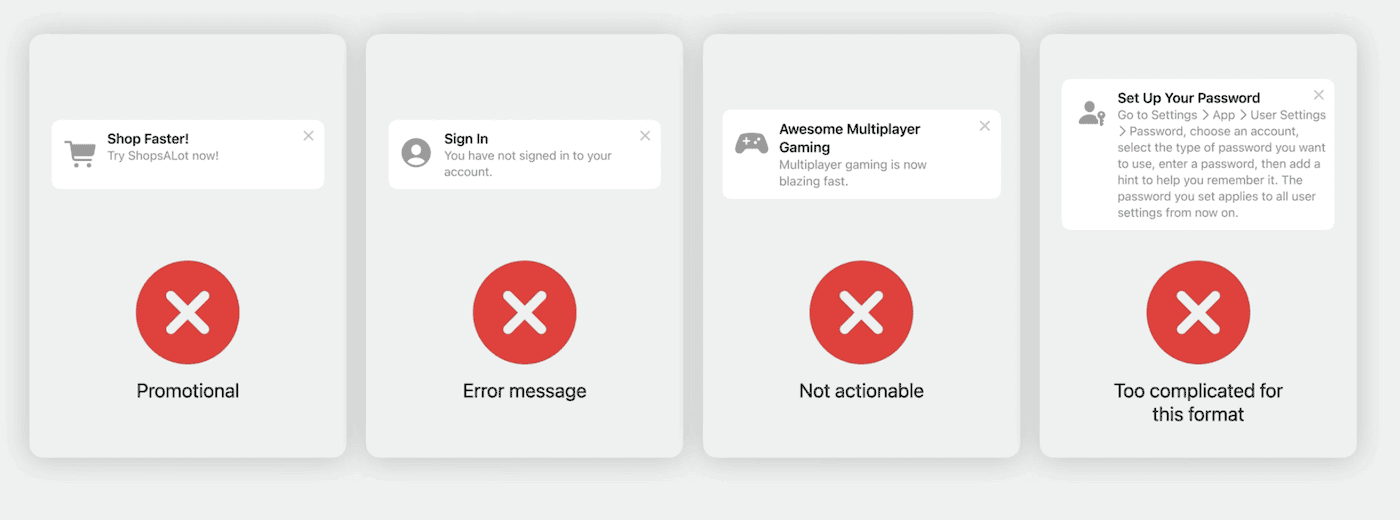
以下是不适合使用 Tip 展示的信息:
- 促销信息
- 错误信息
- 没有操作性的信息
- 内容过于复杂,无法立即阅读的信息
初始化 Tip 容器
要让 TipKit 框架在应用中发挥作用,需要在第一个 Tip 出现的场景之前执行一次 Tip 容器的配置指令,通常会在应用的初始阶段进行。例如:
import TipKit

@main
struct TipKitExamplesApp: App {
    init() {
      // Configure Tip's data container
      try? Tips.configure()
    }
    var body: some Scene {
        WindowGroup {
            ContentView()
        }
    }
}
Tips.configure 用于初始化数据容器,在其中,TipKit 保存了 Tip 和与之相关的事件信息。并支持通过参数对 Tip 的全局显示频次策略进行调整(下文中详述)。
在 SwiftUI 视图中添加 Tip
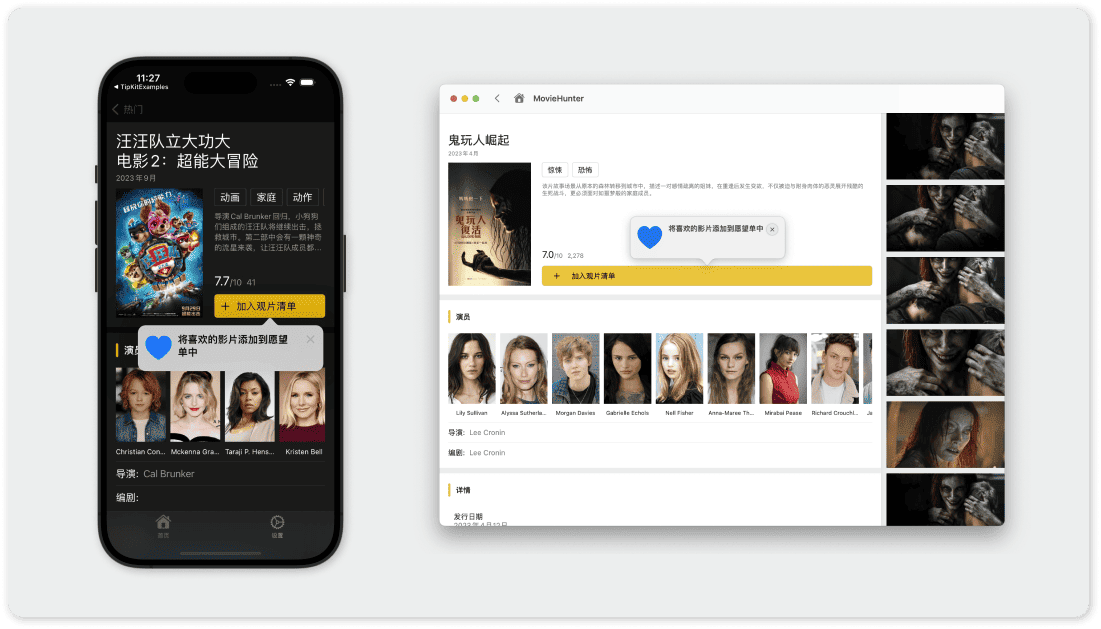
TipKit 提供了两种 Tip 的显示方式:内联(TipView)和弹出窗口(popoverTip)。
苹果官方提供了展示 Tip 各种功能的 Demo,本文采用了该 Demo 提供的部分代码。
內联
通过 TipKit 提供的 TipView 视图,可以在视图中使用内联方式添加 Tip。苹果建议尽量采用这种风格来显示 Tip,以避免覆盖人们可能想要查看的内容,以及要与之交互的 UI 元素。
struct InlineView: View {
    // Create an instance of your tip content.
    var tip = InlineTip()

    var body: some View {
        VStack(spacing: 20) {
            Text("A TipView embeds itself directly in the view. Make this style of tip your first choice as it doesn't obscure or hide any underlying UI elements.")

            // Place your tip near the feature you want to highlight.
            TipView(tip, arrowEdge: .bottom)
            Button {
                // Invalidate the tip when someone uses the feature.
                tip.invalidate(reason: .actionPerformed)
            } label: {
                Label("Favorite", systemImage: "star")
            }

            Text("To dismiss the tip, tap the close button in the upper right-hand corner of the tip or tap the Favorite button to use the feature, which then invalidates the tip programmatically.")
            Spacer()
        }
        .padding()
        .navigationTitle("TipView")
    }
}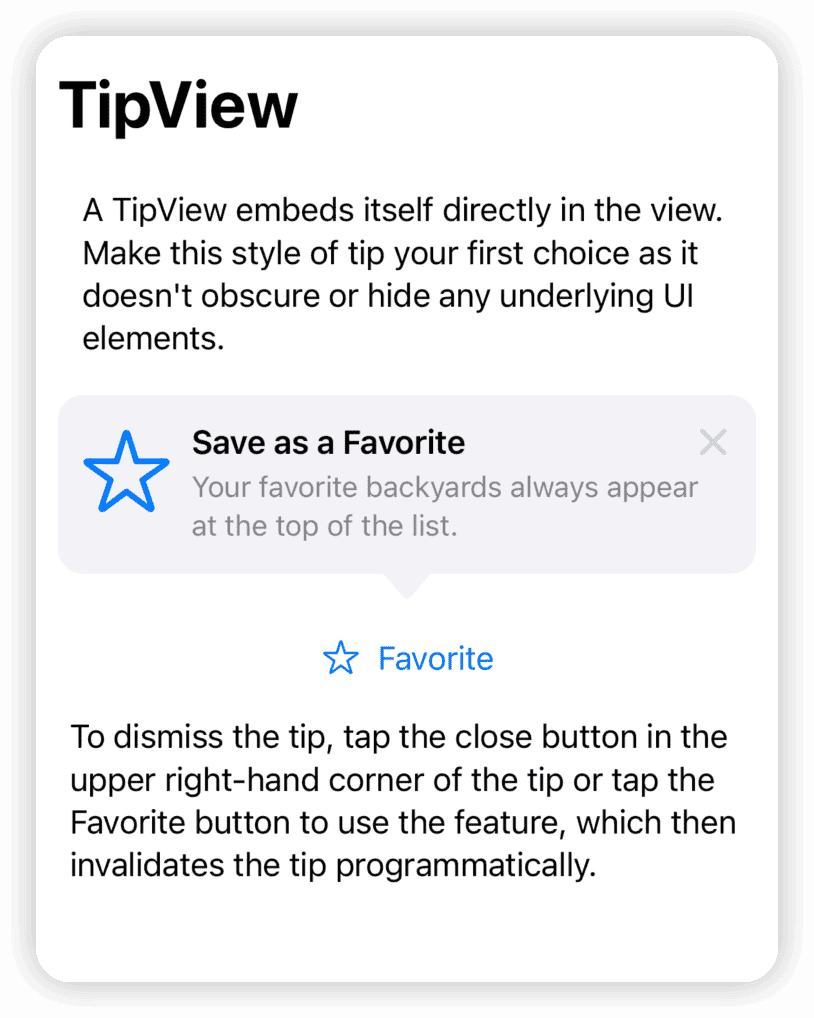
在上面的代码中,我们首先在视图中创建一个 InlineTip 实例,然后将 TipView 放置在希望出现 Tip 的位置。开发者可以通过 arrowEdge 参数来设置箭头的指示方向,当设置为 nil 时,箭头将不显示。
TipView 与其他的 SwiftUI 视图没有什么不同,它以标准的 SwiftUI 视图的方式参与布局,并在显示时对原有的布局产生影响。换句话说,开发者可以将其放入任何布局容器中,并且可以对其应用各种视图修饰器。
TipView(tip)
    .frame(width:250)
    .symbolRenderingMode(.multicolor)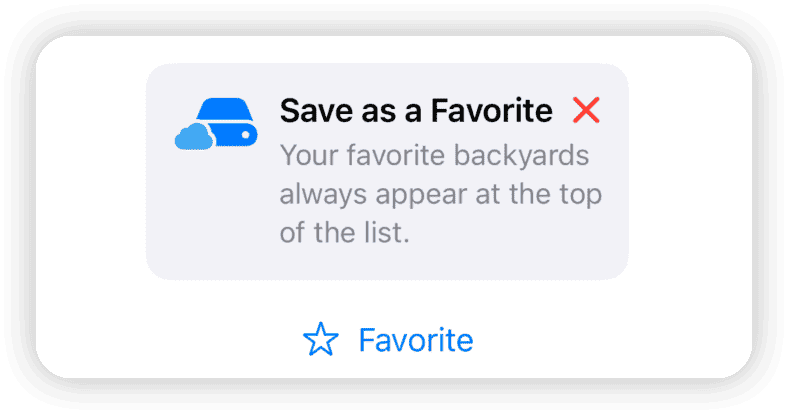
弹出窗口
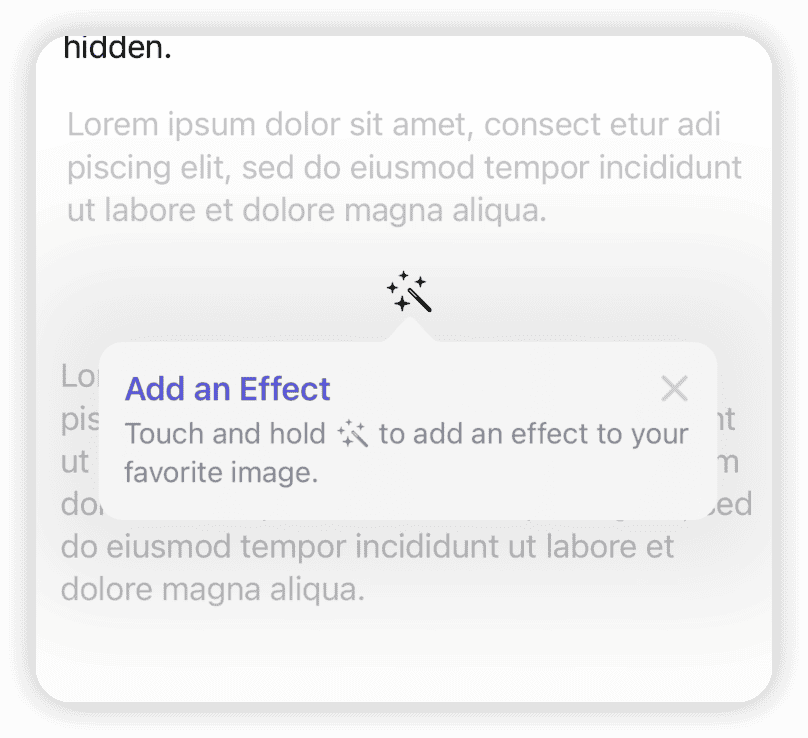
使用 popoverTip 视图修饰器,在视图中以顶层视图的方式来展示 Tip。
struct PopoverTip: Tip {
    var title: Text {
        Text("Add an Effect")
            .foregroundStyle(.indigo)
    }
    var message: Text? {
        Text("Touch and hold \(Image(systemName: "wand.and.stars")) to add an effect to your favorite image.")
    }
}

struct PopoverView: View {
    // Create an instance of your tip content.
    var tip = PopoverTip()

    var body: some View {
        VStack(spacing: 20) {
            ....
            Image(systemName: "wand.and.stars")
                .imageScale(.large)
                // Add the popover to the feature you want to highlight.
                .popoverTip(tip)
                .onTapGesture {
                    // Invalidate the tip when someone uses the feature.
                    tip.invalidate(reason: .actionPerformed)
                }
            ....
        }
    }
}
可以通过 arrowEdge 调整 Tip 相对于其所应用的视图的摆放位置,不能将其设置为 nil:
.popoverTip(tip,arrowEdge: .leading)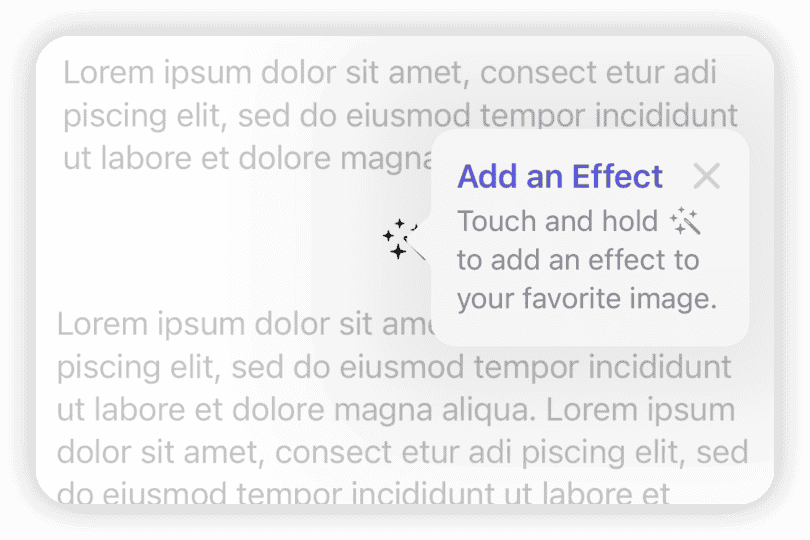
在 iOS 下,弹出窗口将以模态视图的方式呈现,只有在关闭或隐藏 Tip 后才能与其他元素进行交互。另外,开发者无法对通过 popoverTip 弹出的 Tip 视图应用视图修饰器。
如何调整 Tip 外观
对于 TipKit 提供的 TipView 和 popoverTip ,我们可以通过以下方式来调整它的显示效果:
为 Text 和 Image 应用不改变其类型的修饰器
在不破坏 Text 和 Image 类型的前提下,我们可以采用适当的修饰器来改善文字和图片的显示效果。例如:
struct InlineTip: Tip {
    var title: Text {
        Text("Save \(Image(systemName: "book.closed.fill")) as a Favorite")
    }
    var message: Text? {
        Text("Your ") +
        Text("favorite")
            .bold()
            .foregroundStyle(.red) +
        Text(" backyards always appear at the \(Text("top").textScale(.secondary)) of the list.")
    }
    var image: Image? {
        Image(systemName: "externaldrive.fill.badge.icloud")
            .symbolRenderingMode(.multicolor)
    }
}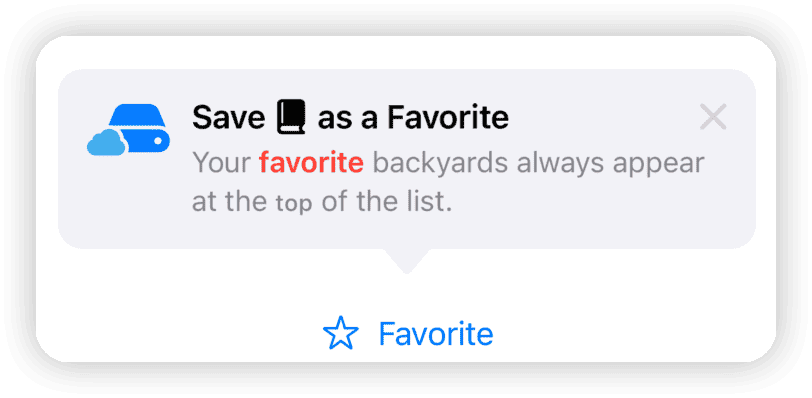
这种方法对于TipView和popoverTip两种展示视图都有效。
使用 TipView 特有的修饰器
TipView(tip,arrowEdge: .bottom)
    .tipImageSize(.init(width: 30, height: 30))
    .tipCornerRadius(0)
    .tipBackground(.red)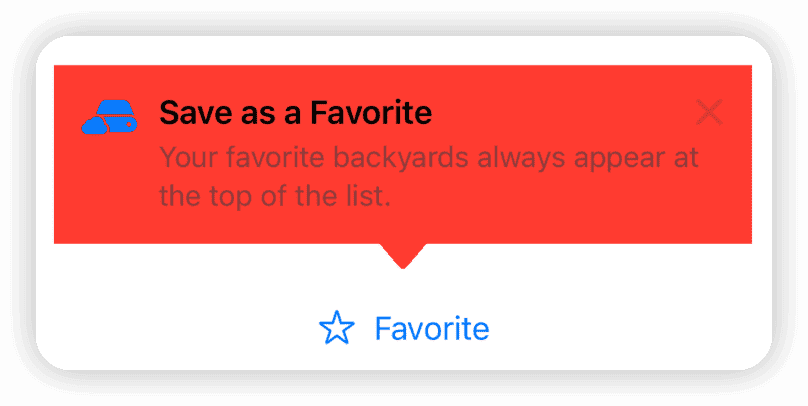
这种方式仅对 TipView 有效。
可以将特有修饰器、标准视图修饰器,以及包含更多信息的 Text 和 Image 结合在一起使用。
使用 TipViewStyle 自定义 TipView 的外观
与许多 SwiftUI 组件一样,TipKit 同样为 TipView 提供了通过风格来自定义外观的功能。
struct MyTipStyle: TipViewStyle {
    func makeBody(configuration: Configuration) -> some View {
        VStack {
            if let image = configuration.image {
                image
                    .font(.title2)
                    .foregroundStyle(.green)
            }
            if let title = configuration.title {
                title
                    .bold()
                    .font(.headline)
                    .textCase(.uppercase)
            }
            if let message = configuration.message {
                message
                    .foregroundStyle(.secondary)
            }
        }
        .frame(maxWidth: .infinity)
        .backgroundStyle(.thinMaterial)
        .overlay(alignment: .topTrailing) {
            // Close Button
            Image(systemName: "multiply")
                .font(.title2)
                .alignmentGuide(.top) { $0[.top] - 5 }
                .alignmentGuide(.trailing) { $0[.trailing] + 5 }
                .foregroundStyle(.secondary)
                .onTapGesture {
                    // Invalidate Reason
                    configuration.tip.invalidate(reason: .tipClosed)
                }
        }
        .padding()
    }
}

TipView(tip, arrowEdge: .bottom)
    .tipViewStyle(MyTipStyle())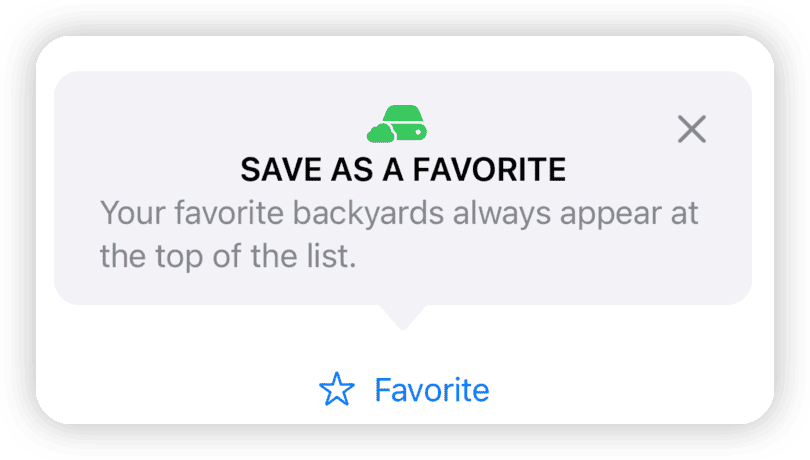
开发者可以选择不在自定义样式中添加关闭按钮,以阻止使用者通过该途径使提示失效。
此外,开发者还可以完全舍弃
TipView和popoverTip,通过响应 Tip 状态的方式实现对 Tip 展示方式的完全掌控(下篇文章中会详细介绍)。
为 Tip 添加 Action Button
到目前为止,我们创建的 Tip 都是纯展示性的。通过添加 actions,我们可以让 Tip 具备更强的可操作性,实现更多的交互功能。
struct PasswordTip: Tip {
    var title: Text {
        Text("Need Help?")
    }
    var message: Text? {
        Text("Do you need help logging in to your account?")
    }
    var image: Image? {
        Image(systemName: "lock.shield")
    }
    var actions: [Action] {
        // Define a reset password button.
        Action(id: "reset-password", title: "Reset Password")
        // Define a FAQ button.
        Action(id: "faq", title: "View our FAQ")
    }
}

// In View
struct PasswordResetView: View {
    @Environment(\.openURL) private var openURL

    // Create an instance of your tip content.
    private var tip = PasswordTip()

    var body: some View {
        VStack(spacing: 20) {
            Text("Use action buttons to link to more options. In this example, two actions buttons are provided. One takes the user to the Reset Password feature. The other sends them to an FAQ page.")

            // Place your tip near the feature you want to highlight.
            TipView(tip, arrowEdge: .bottom) { action in
                // Define the closure that executes when someone presses the reset button.
                if action.id == "reset-password", let url = URL(string: "https://iforgot.apple.com") {
                    openURL(url) { accepted in
                        print(accepted ? "Success Reset" : "Failure")
                    }
                }
                // Define the closure that executes when someone presses the FAQ button.
                if action.id == "faq", let url = URL(string: "https://appleid.apple.com/faq") {
                    openURL(url) { accepted in
                        print(accepted ? "Success FAQ" : "Failure")
                    }
                }
            }
            Button("Login") {}
            Spacer()
        }
        .padding()
        .navigationTitle("Password reset")
    }
}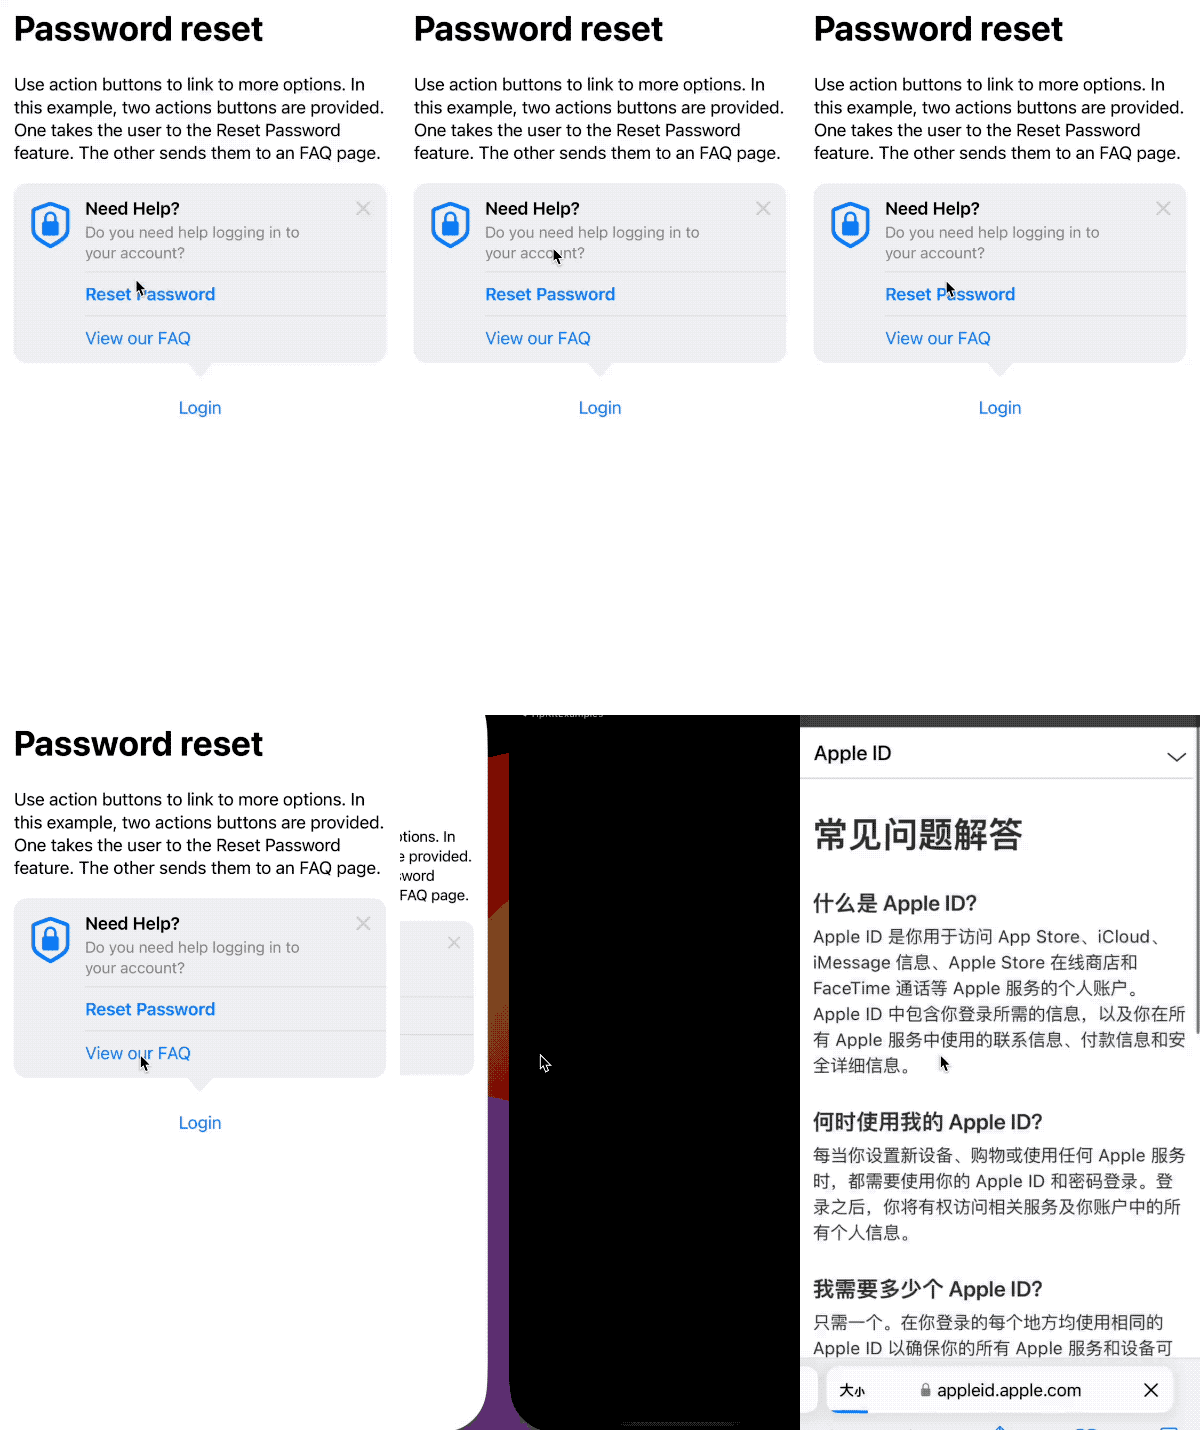
在上面的代码中,我们首先在 PasswordTip 中添加 Action 数据。其中,id 用于在回调闭包中识别不同的 Action 来源。
var actions: [Action] {
    Action(id: "reset-password", title: "Reset Password")
    Action(id: "faq", title: "View our FAQ")
}
在 Tip 协议中,actions 的定义为 @Tips.OptionsBuilder var options: [TipOption] { get },它是一个 Result builders,因此可以用上述方式合成并返回 Action 数组。
在视图中,通过在 TipView 后面添加闭包来判断 Action 的来源,并实现相应的操作。
TipView(tip, arrowEdge: .bottom) { action in
    if action.id == "reset-password", let url = URL(string: "https://iforgot.apple.com") {
        openURL(url) { accepted in
            print(accepted ? "Success Reset" : "Failure")
        }
    }
    if action.id == "faq", let url = URL(string: "https://appleid.apple.com/faq") {
        openURL(url) { accepted in
            print(accepted ? "Success FAQ" : "Failure")
        }
    }
}
popoverTip 也提供了支持 Action 的版本。
.popoverTip(tip){ action in
   // ....
}
在本例中,由于需要使用视图环境值提供的 openURL ,因此对 Action 的操作实现是在视图中进行的。如果不需要使用视图中的信息,可以直接在 Action 的定义中添加对应的操作代码。
Action(id: "faq", title: "View our FAQ", perform: {
    if let url = URL(string: "https://appleid.apple.com/faq") {
        UIApplication.shared.open(url)
    }
})

TipView(tip, arrowEdge: .bottom)
为 Tip 制定显示规则
如果只是为了提供上文中提到的 Tip 视图模板,那么苹果就完全没有创建 TipKit 框架的必要。TipKit 框架的强大之处在于,开发者可以为每个 Tip 创建独立的规则,并应用该规则来决定是否显示 Tip。
规则用来判断显示与否的依据来源于某些状态( 参数 )或用户事件,因此我们首先需要在 Tip 类型中定义所需的参数和事件。
为 Tip 定义参数( Parameter)
我们可以通过 @Parameter 宏,定义一个变量,用来表示要跟踪的应用程序状态。
struct ParameterRuleTip: Tip {
    // Define the app state you want to track.
    @Parameter
    static var isLoggedIn: Bool = false
}
通过展开宏,我们可以看到 @Parameter 生成的完整代码:
static var $isLoggedIn: Tips.Parameter<Bool> = Tips.Parameter(Self.self, "isLoggedIn", false)
static var isLoggedIn: Bool = false
{
    get {
        $isLoggedIn.wrappedValue
    }

    set {
        $isLoggedIn.wrappedValue = newValue
    }
}
$isLoggedIn 的类型是 Tips.Parameter<Bool>,它提供了对 ParameterRuleTip.isLoggedIn 的值进行持续化的能力。
TipKit 为 @Parameter 提供了一个
@Parameter(.transient)选项。在开启后,TipKit 将在应用重启时,使用 Tip 定义中提供的默认值而不使用持久化的值。与 Core Data 或 SwiftData 中的transient选项性质略有不同,在 TipKit 中,即使开启transient选项,数据仍会被持久化。这主要是为了方便在使用同一个 TipKit 数据源的不同应用和组件之间保持该参数的动态同步。
参数的定义不必局限于 Tip 的声明中。实际上,参数可以在任何类型中声明,例如:
struct ContentView: View {
  @Parameter static var isLoggedIn: Bool = false
}
将参数声明在 Tip 外部,可以有效提升 Tip 的可复用性。
创建规则(Rule),根据状态决定是否显示提示(Tip)
现在,我们可以利用之前定义的 isLoggedIn 属性来创建规则,以判断是否满足显示 ParameterRuleTip 的条件。
struct ParameterRuleTip: Tip {
    // Define the app state you want to track.
    @Parameter
    static var isLoggedIn: Bool = false

    var rules: [Rule] {
        [
            // Define a rule based on the app state.
            #Rule(Self.$isLoggedIn) {
                // Set the conditions for when the tip displays.
                $0 == true
            }
        ]
    }
    // ...
}
对于在其他类型中声明的参数,编写规则时需要明确指定参数的位置,例如:
#Rule(ContentView.$isLoggedIn) {#Rule(Self.$isLoggedIn) 表示该条规则将观察 ParameterRuleTip.isLoggedIn 属性,并将 isLoggedIn 作为参数传递到闭包中。
#Rule也是一个宏,展开后会发现 TipKit 的规则是基于 Predicate 构建的。
Tip.Rule(Self.$isLoggedIn) {
    PredicateExpressions.build_Equal(
        lhs: PredicateExpressions.build_Arg($0),
        rhs: PredicateExpressions.build_Arg(true)
    )
}
在视图中,我们可以通过修改 isLoggedIn 的值来显示或隐藏 Tip:
struct ParameterView: View {
    // Create an instance of your tip content.
    private var tip = ParameterRuleTip()

    var body: some View {
        VStack(spacing: 20) {
            Text("Use the parameter property wrapper and rules to track app state and control where and when your tip appears.")

            // Place your tip near the feature you want to highlight.
            TipView(tip, arrowEdge: .bottom)
            Image(systemName: "photo.on.rectangle")
                .imageScale(.large)

            Button("Tap") {
                // Trigger a change in app state to make the tip appear or disappear.
                ParameterRuleTip.isLoggedIn.toggle()
            }

            Text("Tap the button to toggle the app state and display the tip accordingly.")
            Spacer()
        }
        .padding()
        .navigationTitle("Parameters")
    }
}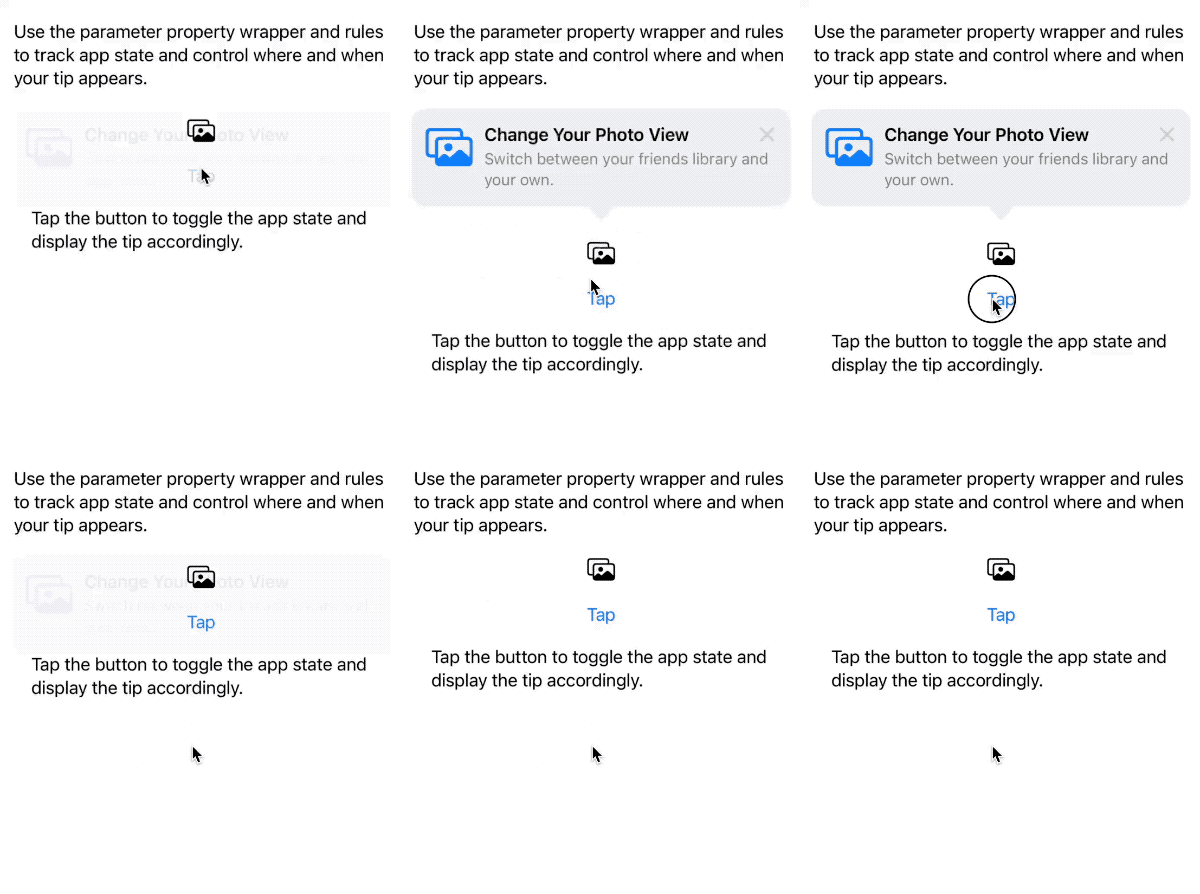
在上面的代码中,为了便于演示,我们通过点击按钮的方式来修改 isLoggedIn 的值。当然,我们也可以通过构造方法来传递值的变化,比如:
struct ParameterRuleTip: Tip {
    init(isLoggedIn:Bool){
        Self.isLoggedIn = isLoggedIn
    }

    ....
}

struct ParameterView: View {
    private var tip: ParameterRuleTip
    init(isLoggedIn: Bool) {
        tip = ParameterRuleTip(isLoggedIn: isLoggedIn)
    }
    ....
}
实际上,开发者可以在应用程序的任何位置通过 ParameterRuleTip.isLoggedIn 来读取或设置 ParameterRuleTip.$isLoggedIn 的值,无论是否在视图中。TipKit 将观察该值的变化,以决定是否显示 ParameterRuleTip。
ParameterRuleTip.isLoggedIn 的状态只能被 TipKit 实时观察,不能作为 SwiftUI 视图的数据源。
为 Tip 定义事件( Event )
除了通过观察某个特定状态来判断是否显示 Tip 的途径外,TipKit 还提供了另外一种利用统计分析的方式制定规则的方法。
首先,我们需要为 Tip 定义一个事件,然后根据该事件发生的数量和频率来决定是否显示 Tip。
struct EventRuleTip: Tip {
    // Define the user interaction you want to track.
    static let didTriggerControlEvent = Event(id: "didTriggerControlEvent")
    ....

    var rules: [Rule] {
        [
            // Define a rule based on the user-interaction state.
            #Rule(Self.didTriggerControlEvent) {
                // Set the conditions for when the tip displays.
                $0.donations.count >= 3
            }
        ]
    }
}与参数一样,事件也是一个静态属性。id 是事件的标识。
下面规则的含义是,只有在 didTriggerControlEvent 这个事件触发了至少三次后才显示 EventRuleTip。
#Rule(Self.didTriggerControlEvent) {
    // Set the conditions for when the tip displays.
    $0.donations.count >= 3
}
我们可以在应用程序的任何地方通过 事件属性.donate() 的方式生成事件。TipKit 将记录每次事件生成的时间,并以此作为判断和筛选的依据。
struct EventView: View {
    // Create an instance of your tip content.
    private var tip = EventRuleTip()

    var body: some View {
        VStack(spacing: 20) {
            Text("Use events to track user interactions in your app. Then define rules based on those interactions to control when your tips appear.")

            // Place your tip near the feature you want to highlight.
            TipView(tip)
            Button(action: {
                // Donate to the event when the user action occurs.
                Task { await EventRuleTip.didTriggerControlEvent.donate() }
            }, label: {
                Label("Tap three times", systemImage: "lock")
            })

            Text("Tap the button above three times to make the tip appear.")
            Spacer()
        }
        .padding()
        .navigationTitle("Events")
    }
}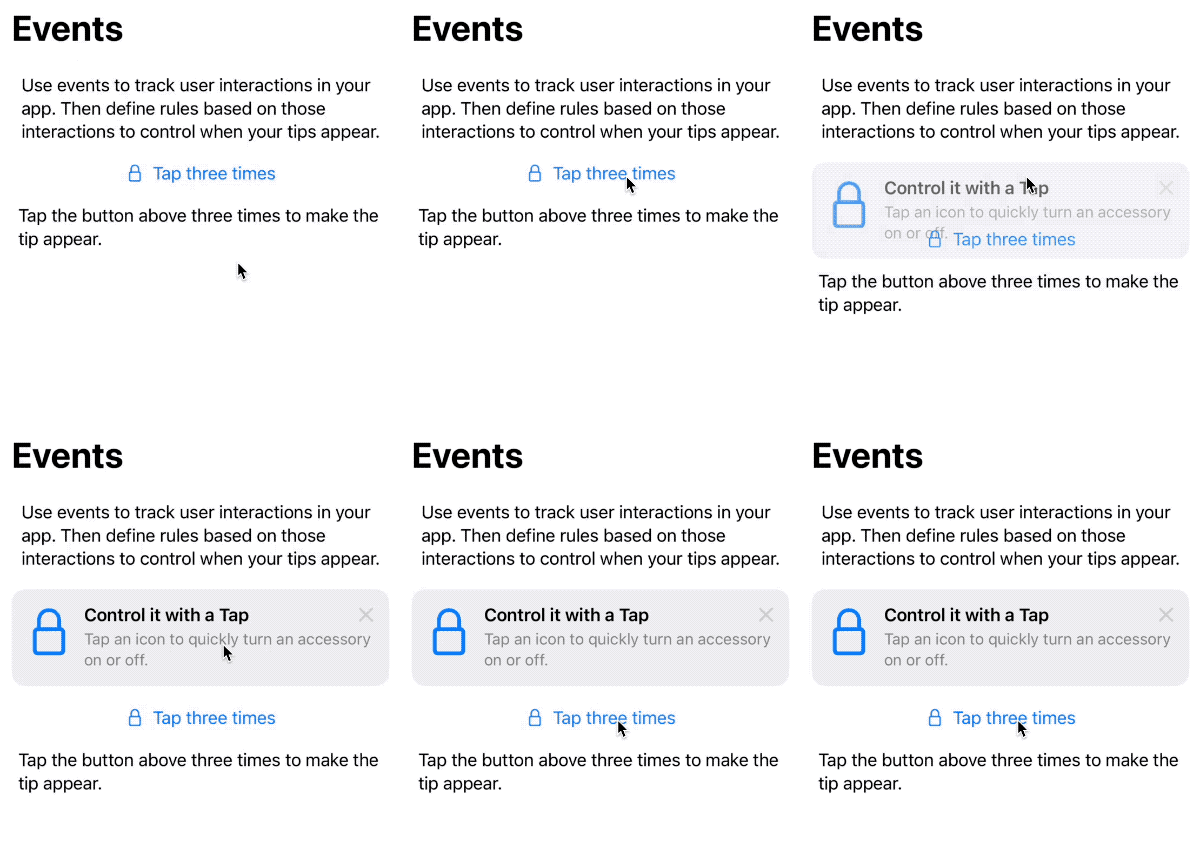
在上面的演示中,我们通过单击按钮生成了相应的事件。当事件数量达到三条时,满足规则的条件,EventRuleTip 被显示出来。
Button(action: {
    // Donate to the event when the user action occurs.
    Task { await EventRuleTip.didTriggerControlEvent.donate() }
}, label: {
    Label("Tap three times", systemImage: "lock")
})
TipKit 还提供了一个包含回调函数的同步版本的事件产生方法( sendDonation )。
Button(action: {
    // Donate to the event when the user action occurs.
    EventRuleTip.didTriggerControlEvent.sendDonation{
        print("donate a didTriggerControlEvent")
    }
}, label: {
    Label("Tap three times", systemImage: "lock")
})
我们可以从多个维度依据事件进行判断:
// 事件总数 >= 3
$0.donations.count >= 3
// 在一周内事件次数 < 3
$0.donations.donatedWithin(.week).count < 3
// 在三天内事件次数 > 3
$0.donations.donatedWithin(.days(3)).count > 3
目前在每次产生的 Event 中,TipKit 只记录了事件创建的时间,尚未开放自定义 DonationInfo。如果开放了自定义 DonationInfo,我们便可以在创建事件时添加更多的附加信息,从而进行一些更有针对性的规则设定。
public func donate(_ donation: DonationInfo) async我们可以定义各种事件,例如进入特定视图、点击按钮、应用接收到网络数据等等。将 TipKit 的事件作为记录和筛选的一种手段,并应用于其他场景中。
与参数的定义类似,事件的定义亦无需局限于 Tip 的声明中。TipKit 通过事件的 id 进行区分,而不关注其声明的具体位置。这意味着,尽管以下代码中的事件在两个不同的位置声明,但 donate 操作触发的是同一事件:
struct ContentView: View {
  static let didTriggerControlEvent = Tips.Event(id: "didTriggerControlEvent")
}

struct EventRuleTip: Tip {
    static let didTriggerControlEvent = Event(id: "didTriggerControlEvent")
}

await EventRuleTip.didTriggerControlEvent.donate()
await ContentView.didTriggerControlEvent.donate()
关于事件与其 id 的关系,我们将在 进阶篇 中进行更深入的讨论。
规则适用
如果我们没有为某个 Tip 设定规则,可以将其视为拥有一个默认规则,该规则永远为真。
我们还可以在一个 Tip 中创建多个规则。在 Tip 协议中,rules 的定义为 @Tips.RuleBuilder var rules: [Self.Rule] { get },同样是一个 Result Builder。多条规则之间使用 AND 的关系,必须全部满足才会显示。例如,我们可以将上文中的两条规则用以下方式进行合并。
var rules: [Rule] {
    #Rule(Self.didTriggerControlEvent) {
        $0.donations.count > 3
    }
    #Rule(Self.$isLoggedIn) {
        $0 == true
    }
}
只有当 isLoggedIn 为真且 didTriggerControlEvent 事件数量超过三个时,才显示 Tip。
让 Tip 失效( invalidate )的方法
在上文的代码中,出现了两次以下的代码:
tip.invalidate(reason: .actionPerformed)
configuration.tip.invalidate(reason: .tipClosed)
这两行代码的作用相同,都是使某个 Tip 失效并记录原因。
目前 TipKit 提供了三种 Tip 失效原因:
actionPerformed:主要用于开发者在代码中主动产生的失效操作。tipClosed:点击 Tip 视图的关闭按钮(x)时会记录该原因。displayCountExceeded:当 Tip 显示的次数超过设定的阈值时,TipKit 会自动让该 Tip 失效,并记录该原因(下文详解)。
请特别注意,让 Tip 失效和不让 Tip 显示是两个不同的概念。
我们通过规则来决定一个 Tip 是否满足了显示条件,但有一个前提是该 Tip 不能已经失效。否则即使满足了显示规则,如果 Tip 已经失效,TipKit 也不会显示该 Tip。
通过 Option 设置 Tip 的最大显示次数
在上文中,我们提到了另一种导致 Tip 失效的原因:displayCountExceeded。通过在 Tip 中定义选项,我们可以控制其最大显示次数。
struct OptionTip: Tip {
    var title: Text {
        Text("Edit Actions in One Place")
    }

    var options: [Option] {
        // Show this tip once.
        Tips.MaxDisplayCount(1)
    }
}
在上面的代码中,我们通过 Tips.MaxDisplayCount(1) 的设置,使得该 Tip 的视图(无论是 TipView 还是 popoverTip)只能被显示一次。一旦显示过后,TipKit 会将该 Tip 设置为失效状态。
TipKit 还提供了另一个选项,用于忽略全局的显示频次策略(见下文):
Tips.IgnoresDisplayFrequency(true)设置 Tip 的最大显示时长
在 iOS 18+ 版本中,TipKit 引入了一个新的 TipOption:MaxDisplayDuration。此选项允许在 Tip 的显示时间累积到预设的时长后,自动使其失效。
该时长为累积计算。例如,若设置 Tip 的最大显示时长为 300 秒,当该 Tip 在多个不同时间点显示,累积时长超过 300 秒后,将不再显示。
Tip 的最短持续显示时间设定为 60 秒,以防止 Tip 显示后过快消失。默认情况下,Tip 没有设置最大显示时长限制。
struct FavoriteBackyardTip: Tip {
    var options: [any Option] {
        // Tip will automatically be invalidated
        // after it has been displayed for 5 minutes.
        MaxDisplayDuration(300.0)
    }
}
通过 Configuration 设置 Tip 的全局显示频次策略
也许有人会奇怪,如果一个 Tip 的规则判断结果为真,在其未失效的情况下,难道会一直显示吗?这样不会引起用户的反感吗?
TipKit 已经提前考虑到了这一点,因此它允许开发者通过 Configuration 设置全局的 Tip 显示频率策略。
struct TipKitExamplesApp: App {
    init() {
        try? Tips.configure([
            // The system shows no more than one tip per day.
            .displayFrequency(.daily)
        ])
    }
    var body: some Scene {
        WindowGroup {
            ContentView()
        }
    }
}
通过为 configure 设置 .displayFrequency(.daily) ,我们可以让尚未失效的 Tip 在规则为真的情况下,每天只显示一次。其他设置还有:hourly、weekly、monthly、immediate(不限制显示频次)。
当某个 Tip 的 options 设置为 Tips.IgnoresDisplayFrequency(true) 后,将会忽略全局的显示频次设定。
重置 TipKit 的所有数据
我们可以使用下面的代码重置当前应用已保存的所有 Tip 数据,包括事件、失效状态、显示次数等。通常在进行测试或对应用进行重大改动时使用该命令。
try Tips.resetDatastore()此方法应运行在
try? Tips.configure()之前。
用于测试的配置指令
为了方便测试,您可以使用以下 API 强制显示或隐藏 Tip:
// 显示所有的 Tip,无论其是否失效或规则是否为真
try? Tips.showAllTipsForTesting()

// 显示特定的 Tip,无论其是否失效或规则是否为真
try? Tips.showTipsForTesting([EventRuleTip.self, ParameterRuleTip.self])

// 隐藏所有的 Tip,即使其尚未失效且规则为真
try? Tips.hideAllTipsForTesting()
设置 TipKit 数据保存的位置
我们还可以修改 TipKit 保存数据的位置。使用 App Group 时,可以让多个应用或组件共享同一个 TipKit 数据源。例如,在 A 应用中让某个 Tip 失效了,失效状态同样也会在应用 B 中反映出来。
try? Tips.configure([
    .datastoreLocation(.groupContainer(identifier: "appGroup-id"))
])
或者将数据保存到指定目录中。
try? Tips.configure([
    .datastoreLocation(.url(URL.documentsDirectory))
])
默认情况下,TipKit 的数据保存在
Application Support目录中。
跨设备共享 Tip 数据
在 iOS 18+ 版本中,TipKit 提供了在多个设备间同步 Tip 的状态数据的功能。例如,如果为某个 Tip 设置了最多显示三次的规则,那么当用户在不同的设备上(使用同一 iCloud 账户)查看该 Tip 三次后,该 Tip 将自动失效。
启用此同步功能需类似于配置 Core Data 与 CloudKit 的过程,包括添加 CloudKit 容器和开启接受远程通知的权限。详细信息请参见Core Data 与 CloudKit(二)——同步本地数据库至 iCloud 私有数据库。
为了避免数据冲突,TipKit 建议为其事件配置专用的 CloudKit 容器,容器名建议以 .tips 为后缀,例如:iCloud.com.apple.TipKitTrails.tips。
开发者需在 Tips.configure 中指定所使用的 CloudKit 容器:
@main
struct TipKitTrails: App {
    init() {
        do {
            // Sync the TipKit datastore using CloudKit.
            try Tips.configure([
                .cloudKitContainer(.named("iCloud.com.apple.TipKitTrails.tips"))
            ])
        }
        catch {
            // Handle TipKit errors
            print("Error initializing TipKit \(error.localizedDescription)")
        }
    }
}
若使用 automatic 选项,TipKit 将搜索项目中第一个带 .tips 后缀的容器,若无此类容器则使用主容器:
.cloudKitContainer(.automatic)使用 TipGroup 管理并逐步展示多个提示
从之前的描述中可以看出,虽然每个 Tip 在 TipKit 中都有详尽的定义,但在一个视图中同时存在多个 Tip 时,开发者很难有效控制这些提示的显示顺序和关系,使得提示难以按既定规则逐个展示。
在 iOS 18+ 版本中,TipKit 引入了 TipGroup 概念。通过 TipGroup,开发者现在可以将多个 Tip 组合在一起,确保只有符合条件的 Tip 被展示。
struct Tip1: Tip {
  @Parameter static var show: Bool = false
  var title: Text {
    Text("Tip1")
  }

  var rules: [Rule] {
    #Rule(Self.$show){
      $0
    }
  }
}

struct Tip2: Tip {
  var title: Text {
    Text("Tip2")
  }
}

struct TipGroupDemo: View {
  @State var tips = TipGroup(.ordered) { // 声明 TipGroup,类型为按顺序显示
    Tip1()
    Tip2()
  }

  var body: some View {
    VStack {
      Text("Hello World")
        .popoverTip(tips.currentTip) // 显示满足条件的 Tip

      Button("Start Show Tips"){
        Tip1.show = true // 激活 Tip1
      }
      .buttonStyle(.bordered)
    }
  }
}
此外,开发者也可以在多个组件中使用同一个 TipGroup,这样只有满足条件的组件才能显示相应的 Tip:
var body: some View {
  VStack(spacing:80) {
    Text("Hello World")
      .popoverTip(tips.currentTip as? Tip1) // 仅对应 Tip1

    Text("Fatbobman's Blog")
      .popoverTip(tips.currentTip as? Tip2) // 仅对应 Tip2

    Button("Start Show Tips"){
      Tip1.show = true
    }
    .buttonStyle(.bordered)
  }
}
在使用有序优先级的 TipGroup 中,只有在所有前置的提示被无效化后,后续的提示才会显示。
firstAvailable 优先级会展示第一个满足显示规则的提示,这在视图中包含多个不相关的提示时非常有用,但你只想一次显示一个提示。
struct Tip1: Tip {
  @Parameter static var show: Bool = false
  var title: Text {
    Text("Tip1")
  }

  var rules: [Rule] {
    #Rule(Self.$show){
      $0
    }
  }
}

struct Tip2: Tip {
  @Parameter static var show: Bool = false
  var title: Text {
    Text("Tip2")
  }

  var rules: [Rule] {
    #Rule(Self.$show){
      $0
    }
  }
}

struct TipGroupDemo: View {
  @State var tips = TipGroup(.firstAvailable) { // 显示第一个满足其显示规则的提示
    Tip1()
    Tip2()
  }

  var body: some View {
    VStack(spacing:80) {
      Text("Hello World")
        .popoverTip(tips.currentTip) // 显示第一个满足其显示规则的提示


      Button("Show Tip1"){
        Tip1.show = true
      }
      .buttonStyle(.bordered)

      Button("Show Tip2"){
        Tip2.show = true
      }
      .buttonStyle(.bordered)
    }
  }
}
在这篇 推文 中,我分享了一个在 iOS 17 中实现 Tip 按顺序展示的解决方案。
TipGroup 是一种强大的工具,通过与显示规则和显示频率结合使用,可以有效地引导用户逐步发现应用功能,而不会因提示过多而使应用负担过重。
接下来
在本文中,我们介绍了 TipKit 的基本用法。在下篇文章中,我们将探讨更多关于 TipKit 的内容,包括 TipKit 的数据保存机制、在 UIKit 中使用 TipKit、将 TipKit 作为非提示领域的统计工具使用,以及如何实现完全的自定义视图(不使用 TipView 和 popoverView)等进阶话题。