This article introduces several ways to open URLs in SwiftUI views. It also covers how to automatically recognize and convert content in text into clickable links and how to customize the behavior before and after opening a URL.
The example code in this article was completed in Swift Playgrounds 4.1 (macOS version), and can be downloaded here. To learn more about Swift Playgrounds, you can refer to the article Swift Playgrounds 4: Entertainment or Productivity.

SwiftUI 1.0 (iOS 13, Catalina)
In views, developers typically need to handle two different scenarios for opening URLs:
- Clicking a button (or similar widget) to open a specified URL
- Making parts of the text into clickable areas that open a specified URL
Unfortunately, SwiftUI in its 1.0 era was quite immature and did not offer any native methods to handle these scenarios.
For the first scenario, a common approach is:
// iOS
Button("Wikipedia"){
    UIApplication.shared.open(URL(string:"https://www.wikipedia.org")!)
}

// macOS
Button("Wikipedia"){
    NSWorkspace.shared.open(URL(string:"https://www.wikipedia.org")!)
}
The second scenario is quite troublesome to implement, involving wrapping UITextView (or UILabel) and combining it with NSAttributedString, with SwiftUI serving merely as a layout tool.
SwiftUI 2.0 (iOS 14, Big Sur)
SwiftUI 2.0 provides a perfect native solution for the first scenario but still cannot handle the second scenario natively.
openURL
openURL is a new EnvironmentValue introduced in SwiftUI 2.0, which serves two purposes:
- By calling its callFunction method, it implements the action of opening a URL.
In a Button, we can now directly use openURL to accomplish what in SwiftUI 1.0 had to be done by calling other framework APIs.
struct Demo: View {
    @Environment(\.openURL) private var openURL // Introducing the environment value

    var body: some View {
        Button {
            if let url = URL(string: "https://www.example.com") {
                openURL(url) { accepted in  // By setting a completion closure, you can check if the URL opening has been completed. The status is provided by OpenURLAction
                    print(accepted ? "Success" : "Failure")
                }
            }
        } label: {
            Label("Get Help", systemImage: "person.fill.questionmark")
        }
    }
}- By providing an OpenURLAction, customize the behavior of opening links through openURL (explained in detail later in the article).
Link
SwiftUI 2.0 offers a Link control that combines Button and openURL, helping developers further simplify their code:
Link(destination: URL(string: "mailto:feedback@fatbobman.com")!, label: {
    Image(systemName: "envelope.fill")
    Text("Send Email")
})
SwiftUI 3.0 (iOS 15, Monterey)
In the 3.0 era, with the enhancement of Text functionality and the advent of AttributedString, SwiftUI finally made up for another shortcoming – turning parts of the text into clickable areas that open a specified URL.
Text Use Case 1: Automatically Recognizing URLs in LocalizedStringKey
Text created with the constructor supporting LocalizedStringKey automatically recognizes URLs in the text (no additional settings by the developer required), and clicking on them opens the corresponding URL.
Text("www.wikipedia.org 13900000000 feedback@fatbobman.com") // Defaults to the constructor with LocalizedStringKey as a parameter type
This method can only recognize web addresses (such as website URLs, email addresses), so the phone number in the code cannot be automatically identified.
Note that the following code uses a constructor with a String parameter type, so the Text will not automatically recognize URLs in the content:
let text = "www.wikipedia.org 13900000000 feedback@fatbobman.com" // Type is String
Text(text) // Constructor with String as a parameter type does not support automatic recognition
Text Use Case 2: Recognizing URL Tags in Markdown Syntax
SwiftUI 3.0’s Text, when the content type is LocalizedStringKey, can parse some Markdown syntax tags:
Text("[Wikipedia](https://www.wikipedia.org) ~~Hi~~ [13900000000](tel://13900000000)")In this way, we can use any type of URI (not limited to web addresses), such as the phone call URI in the code.

Text Use Case 3: AttributedString Containing Link Information
At WWDC 2021, Apple introduced the value type version of NSAttributedString, AttributedString, which can be directly used in Text. By setting different attributes for different parts of the AttributedString, you can implement the functionality of opening URLs in Text.
let attributedString: AttributedString = {
    var fatbobman = AttributedString("肘子的 Swift 记事本")
    fatbobman.link = URL(string: "https://fatbobman.com")!
    fatbobman.font = .title
    fatbobman.foregroundColor = .green // A Run with a non-nil link automatically blocks custom foreground color and underline
    var tel = AttributedString("电话号码")
    tel.link = URL(string:"tel://13900000000")
    tel.backgroundColor = .yellow
    var and = AttributedString(" and ")
    and.foregroundColor = .red
    return fatbobman + and + tel
}()

Text(attributedString)
For more information about AttributedString, please refer to AttributedString: Making Text More Beautiful Than Ever.
Text Use Case 4: Identifying URL Information in Strings and Converting to AttributedString
In the three use cases mentioned above, except for Use Case 1 which automatically identifies web addresses in text, the other two require developers to explicitly add URL information in some way.
Developers can use a combination of NSDataDetector and AttributedString to automatically recognize different types of content in text, similar to system messaging, email, or WeChat apps, and set corresponding URLs.
NSDataDetector is a subclass of NSRegularExpression that can detect semi-structured information in natural language text, such as dates, addresses, links, phone numbers, transit information, etc. It is widely used in various Apple system applications.
let text = "https://www.wikipedia.org 13900000000 feedback@fatbobman.com"
// Setting the types to recognize
let types = NSTextCheckingResult.CheckingType.link.rawValue | NSTextCheckingResult.CheckingType.phoneNumber.rawValue
// Creating the detector
let detector = try! NSDataDetector(types: types)
// Getting the detection results
let matches = detector.matches(in: text, options: [], range: NSRange(location: 0, length: text.count))
// Processing each detection result
for match in matches {
    if match.resultType == .date {
        ...
    }
}
You can consider NSDataDetector as a package of regular expressions with very high complexity.
The complete code is as follows:
extension String {
func toDetectedAttributedString() -> AttributedString {
var attributedString = AttributedString(self)
let types = NSTextCheckingResult.CheckingType.link.rawValue | NSTextCheckingResult.CheckingType.phoneNumber.rawValue
guard let detector = try? NSDataDetector(types: types) else {
return attributedString
}
let matches = detector.matches(in: self, options: [], range: NSRange(location: 0, length: count))
for match in matches {
let range = match.range
let startIndex = attributedString.index(attributedString.startIndex, offsetByCharacters: range.lowerBound)
let endIndex = attributedString.index(startIndex, offsetByCharacters: range.length)
// Setting URL for link
if match.resultType == .link, let url = match.url {
attributedString[startIndex..<endIndex].link = url
// If it's an email, set a background color
if url.scheme == "mailto" {
attributedString[startIndex..<endIndex].backgroundColor = .red.opacity(0.3)
}
}
// Setting URL for phone number
if match.resultType == .phoneNumber, let phoneNumber = match.phoneNumber {
let url = URL(string: "tel:\(phoneNumber)")
attributedString[startIndex..<endIndex].link = url
}
}
return attributedString
}
}
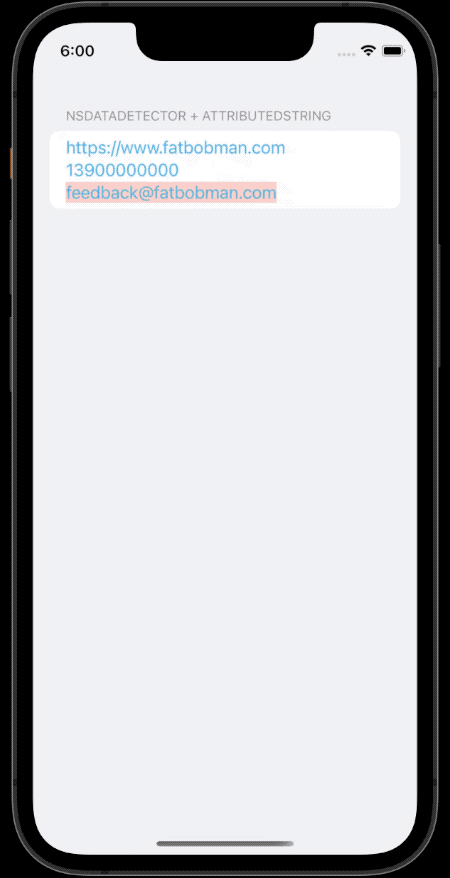
Text("https://www.wikipedia.org 13900000000 feedback@fatbobman.com".toDetectedAttributedString())
Customizing Link Colors in Text
Unfortunately, even if we set a foreground color for AttributedString, when a text segment’s link attribute is not nil, Text automatically ignores its foreground color and underline settings, using the system’s default link rendering settings instead.
Currently, you can change the color of all links in Text by setting a tint:
Text("www.wikipedia.org 13900000000 feedback@fatbobman.com")
    .tint(.green)

Link("Wikipedia", destination: URL(string: "https://www.wikipedia.org")!)
    .tint(.pink)
Compared to the fixed style of links in Text, you can create freely customizable link buttons using Button or Link:
Button(action: {
    openURL(URL(string: "https://www.wikipedia.org")!)
}, label: {
    Circle().fill(.angularGradient(.init(colors: [.red,.orange,.pink]), center: .center, startAngle: .degrees(0), endAngle: .degrees(360)))
})
Customizing the Behavior of openURL
In a Button, we can customize the behavior before and after opening a URL by adding logic to the closure.
Button("Open Webpage") {
    if let url = URL(string: "https://www.example.com") {
        // Behavior before opening the URL
        print(url)
        openURL(url) { accepted in  // Defining the behavior after clicking the URL by setting a completion closure
            print(accepted ? "Open success" : "Open failure")
        }
    }
}
However, in Link and Text, we need to customize the behavior of opening links by providing a handling code for the openURL environment value.
Text("Visit [Example Company](https://www.example.com) for details.")
    .environment(\.openURL, OpenURLAction { url in
        handleURL(url)
        return .handled
    })
The structure of OpenURLAction is as follows:
public struct OpenURLAction {
    @available(iOS 15.0, macOS 12.0, tvOS 15.0, watchOS 8.0, *)
    public init(handler: @escaping (URL) -> OpenURLAction.Result)

    public struct Result {
        public static let handled: OpenURLAction.Result  // The current code has handled the URL, and the behavior will not be passed down
        public static let discarded: OpenURLAction.Result  // The current code will discard the URL, and the behavior will not be passed down
        public static let systemAction: OpenURLAction.Result  // The current code does not handle it, and the behavior is passed down (if there is no custom OpenURLAction by the user at the outer layer, the system default is used)
        public static func systemAction(_ url: URL) -> OpenURLAction.Result  // The current code does not handle it, passing a new URL down (if there is no custom OpenURLAction by the user at the outer layer, the system default is used)
    }
}
For example:
Text("fatbobman.com feedback@fatbobman.com 13900000000".toDetectedAttributedString()) // Creates three links: https, mailto, tel
    .environment(\.openURL, OpenURLAction { url in
        switch url.scheme {
        case "mailto":
            return .discarded // Emails are discarded directly, not processed
        default:
            return .systemAction // Other types of URIs are passed to the next layer (outer layer)
        }
    })
    .environment(\.openURL, OpenURLAction { url in
        switch url.scheme {
        case "tel":
            print("call number \(url.absoluteString)") // Print the phone number
            return .handled  // Indicates that it has been processed and will not continue to pass to the next layer
        default:
            return .systemAction // Other types of URIs are not handled by the current code, directly passed to the next layer
        }
    })
    .environment(\.openURL, OpenURLAction { _ in
        .systemAction(URL(string: "https://www.apple.com")!) // Since we have not set OpenURLAction after this layer, the system implementation will eventually be called to open Apple's official website
    })
This method of setting up handling through environment values layer by layer gives developers a great deal of freedom. In SwiftUI, similar logic is used in onSubmit. For information on onSubmit, please refer to Advanced SwiftUI TextField: Events, Focus, Keyboard.
The handled and discarded return results from the handler both prevent the URL from being passed down further, and their difference is only evident when explicitly calling openURL.
// Definition of callAsFunction
public struct OpenURLAction {
  public func callAsFunction(_ url: URL, completion: @escaping (_ accepted: Bool) -> Void)
}

// When 'handled', 'accepted' is true; when 'discarded', 'accepted' is false
openURL(url) { accepted in
      print(accepted ? "Success" : "Failure")
}
Combining the above introduction, the following code will implement: after clicking a link, users can choose to open the link or copy it to the clipboard:
struct ContentView: View {
    @Environment(\.openURL) var openURL
    @State var url:URL?
    var show:Binding<Bool>{
        Binding<Bool>(get: { url != nil }, set: {_ in url = nil})
    }

    let attributedString:AttributedString = {
        var fatbobman = AttributedString("肘子的 Swift 记事本")
        fatbobman.link = URL(string: "https://fatbobman.com")!
        fatbobman.font = .

title
        var tel = AttributedString("电话号码")
        tel.link = URL(string:"tel://13900000000")
        tel.backgroundColor = .yellow
        var and = AttributedString(" and ")
        and.foregroundColor = .red
        return fatbobman + and + tel
    }()

    var body: some View {
        Form {
            Section("NSDataDetector + AttributedString"){
                // Using NSDataDetector for conversion
                Text("https://fatbobman.com 13900000000 feedback@fatbobman.com".toDetectedAttributedString())
            }
        }
        .environment(\.openURL, .init(handler: { url in
            switch url.scheme {
            case "tel","http","https","mailto":
                self.url = url
                return .handled
            default:
                return .systemAction
            }
        }))
        .confirmationDialog("", isPresented: show){
            if let url = url {
                Button("Copy to Clipboard"){
                    let str:String
                    switch url.scheme {
                    case "tel":
                        str = url.absoluteString.replacingOccurrences(of: "tel://", with: "")
                    default:
                        str = url.absoluteString
                    }
                    UIPasteboard.general.string = str
                }
                Button("Open URL"){openURL(url)}
            }
        }
        .tint(.cyan)
    }
}
Conclusion
Although the main purpose of this article is to introduce various ways to open URLs in SwiftUI views, readers should also be able to sense the continuous progress of SwiftUI over the past three years. It is believed that the upcoming WWDC 2022 will bring more surprises for developers.