When using an English app, many people immediately check for a Chinese version. This highlights the importance of displaying text in the user’s preferred language in apps. For a significant number of apps, localizing the text displayed in the UI essentially completes the app’s localization. In this article, we will explore how to localize display text in iOS development. The Demo for this article is written using SwiftUI.
The Principle of Text Localization
As a programmer, when considering how to design a logic to localize original text for different languages, most would think of using a dictionary (key-value pairs). Apple uses a similar approach, creating multiple dictionaries for different languages, allowing the system to easily find the localized text (value) corresponding to the original text (key). For example:
//en
"hello" = "Hello";
//zh
"hello" = "你好";
This method is the main approach for text localization discussed in this article.
During compilation, the system marks text that can be localized. When the app runs in a different language environment (like French), the system tries to find the corresponding content from the French text key-value file for replacement. If it can’t find it, it continues searching in the order of language preferences. For some types like LocalizedStringKey, this process is automatic, but for commonly used String, it needs to be explicitly done in the code.
Fortunately, most of SwiftUI’s controls (some currently have bugs) prefer to use the constructor with LocalizedStringKey, greatly reducing manual workload for developers.
Adding Languages
For modern programming languages and development environments, internationalization capabilities are essential. When creating a project in Xcode, by default, the app is developed only for its corresponding Development Language.
Therefore, we must first inform the project that we will perform localization and select the corresponding languages.
In Project Navigation, click PROJECT, and choose Info to add languages in Localizations.

Click the + sign and select the languages to be added.


Here we are only telling the project that we may perform localization for the languages listed. But how to localize and which files/resources to localize requires individual settings.
Enabling Use Base Internationalization, Xcode modifies your project folder structure. xib and storyboard files are moved to Base. lproj folder, and string elements are extracted to project locale folders. This option is for storyboard-based development, and if you use SwiftUI, you don’t need to worry about it.
For UIKit framework, Xcode will let you choose the association method for storyboard. However, the Demo project used in this article is entirely SwiftUI-based, so there will not be the following screen.

Creating Text String Files
In Apple’s development environment, the file type for string files (text key-value pair files) mentioned above is .strings. We can create multiple string files in an app, some with special meanings.
-
Localizable.strings
The default string file for UI. If the string file name is not specifically mentioned, the app will retrieve the corresponding localized text content from Localizable.strings.
-
InfoPlist.strings
The string file corresponding to Info.plist. Typically used for localizing app names, permission warning messages, etc.
In Project Navigation, we choose to create a new file.

Select Strings File for the file type, and name it Localizable.strings.


At this point, the Localizable.strings file is not yet localized. Currently, there’s only one file in your project, and defining text key-value pairs in this file will only target the project’s development language. Using the Localize... button on the right, we can choose to generate language-specific Localizable.strings files (the
language list is from the project’s added language settings).

After selecting both languages on the right,

The Localizable.strings in the left Project Navigation will look like this:

English and Chinese are currently empty files, and we can now create the corresponding text key-value pairs.
You can download the Demo project here.
Practical Example 1: Localizing Column Names of a Bill Table

In this section, we will attempt to provide Chinese localization for the column names ITEM, QUANTITY, UNIT PRICE, and AMOUNT.
Following the key-value declaration rules mentioned above, we add the following content to the Localizable.Strings(Chinese) file:
"ITEM" = "种类";
"QUANTITY" = "数量";
"UNIT PRICE" = "单价";
"AMOUNT" = "合计";
Open TableView and add localization environment configuration in the preview:
TableView()
    .environmentObject(Order.sampleOrder)
    .previewLayout(.sizeThatFits)
    .environment(\.locale, Locale(identifier: "zh"))
What changes do we see in the Preview area now? Nothing has changed!
The reason is that the keys we set in the string file are incorrect. The ITEM we see in the app corresponds to the following code in TableView:
HStack{
    Text("Item")
        .frame(maxWidth:.infinity)
    Text("Quantity")
        .frame(maxWidth:.infinity)
    Text("Unit Price")
        .frame(maxWidth:.infinity)
    Text("Amount")
        .frame(maxWidth:.infinity)
}
.foregroundStyle(.primary)
.textCase(.uppercase) // Convert to uppercase
The Text uses Item as the key for lookup, but we defined ITEM, so the corresponding value wasn’t found. Note: The keys in the string file are case sensitive.
Modify the Chinese file as follows:
"Item" = "种类";
"Quantity" = "数量";
"Unit Price" = "单价";
"Amount" = "合计";
Now, in the preview window, we can see the localized results:

Congratulations, at this point, you have mastered most of the content for text localization.
Note that currently the English file is empty, and the Chinese file only has localization for four items. All content not set will display the original text set in the code.
When defining in the string file, it’s easy to make two errors: 1) Incorrectly inputting Chinese punctuation, 2) Forgetting the trailing semicolon.
Practical Example 2: Localizing the Payment Button

In this section, we attempt to localize the text “Pay for 4 drinks” in Chinese.
This button is defined in ButtonGroupView as follows:
Button {
    showPayResult.toggle()
} label: {
    Text("Pay for \(order.totalQuantity) drinks")
}
How should we set the corresponding key for “Pay for (order.totalQuantity) drinks” in the Localizable.strings file?
For such LocalizedString using string interpolation, we need to use string format specifiers. Apple’s official documentation provides detailed usage guidelines.
In the code, order.totalQuantity corresponds to Int (In 64-bit systems, Int in Swift corresponds to Int64), so we need to use %lld in the key-value pair to replace it. Define as follows in the Chinese file:
"Pay for %lld drinks" = "为%lld 杯饮品付款";
This way, we get the desired result. When you try to add or reduce the number of drinks, the number in the text will change accordingly.
Please select the correct format specifier for your interpolation, e.g., in the example above, setting it as %d would be interpreted by the system as a different key and would not complete the conversion.
Practical Example 3: Localizing the App Name
In Xcode projects, we usually configure some specific system parameters in the Info.plist file, such as Bundle identifier, Bundle name, etc. If we need to localize some of these configurations, we can use InfoPlist.strings mentioned earlier.
Using the same steps as creating the Localizable.strings file, we create a
string file named InfoPlist.strings (don’t forget to localize the created file, ensuring both Chinese and English are selected).
Add the following content to the Chinese and English files in InfoPlist.strings respectively:
//chinese
"CFBundleDisplayName" = "肥嘟嘟酒吧";
//english
"CFBundleDisplayName" = "FatbobBar";
Now, when installing the app on a simulator or real device, the app’s name will display the corresponding text in different languages.
In the recent two versions of Xcode, you don’t need to set Info.plist directly; usually, you can view or modify values in the Target’s Info section.

The configurations we need to localize don’t necessarily have to appear in info or Info.plist. As long as we have set the localization key-value pair in InfoPlist.strings, the app will prioritize this setting. Usually, in addition to the app’s name
CFBundleDisplayName, we also localizeCFBundleName,CFBundleShortVersionString,NSHumanReadableCopyright, and various system permission descriptions, likeNSAppleMusicUsageDescription,NSCameraUsageDescription, etc. For more about info.plist parameters, please refer to the official documentation.
Practical Example 4: Localizing Drink Names
Add the following content in the Localizable(Chinese) string file:
"Orange Juice" = "橙汁";
"Tea" = "茶";
"Coffee" = "咖啡";
"Coke" = "快乐水";
"Sprite" = "透心凉";
For the definition of drinks, please refer to the code in Model/Drink.swift.
To preview the localized content, you can set the local environment variables, change the simulator language to Chinese, or change the App Language to Chinese in the Scheme.
After running the app, we don’t get the expected result. The names of the drinks are not in Chinese. The reason can be found by looking at Drink.swift: for explicitly defined String types, Text does not treat them as LocalizedStringKey.
Previously in ItemRowView, we displayed the drink names with the following code:
Text(item.drink.name)
    .padding(.leading,20)
    .frame(maxWidth:.infinity,alignment: .leading)
And the drink name in Drink is defined as follows:
struct Drink: Identifiable, Hashable, Comparable {
    let id = UUID()
    let name: String // String type
    let price: Double
    let calories: Double
So, the simplest method is to modify the code in ItemRowView:
Text(LocalizedStringKey(item.drink.name))
    .padding(.leading,20)
    .frame(maxWidth:.infinity,alignment: .leading)
In some cases, where we only have
Stringtype data, we might often need to do similar conversions.
Run the app again, and you’ll see the drink names in the table are now correctly displayed in Chinese.

Also, modify the code in ItemListView:
// Change
Button(drink.name)
// To
Button(LocalizedStringKey(drink.name))
The display of the drink addition list is now correct:

The modified code can now correctly display the drink names in Chinese.
The above method is a good solution in most cases, but it’s not suitable for projects that rely entirely on
Export Localizations...to generate localization key-value pairs.
To sort localized text more accurately, we can also modify the comparison function in Drink:
// Change
lhs.name < rhs.name
// To
NSLocalizedString(lhs.name,comment: "") < NSLocalizedString(rhs.name,comment: "")
NSLocalizedStringretrieves the localized textvaluefor a given textkey.
Change in InfoView:
var list: String {
    order.list.map(\.drink.name).joined(separator: " ")
}
To:
order.list.map{ NSLocalizedString($0.drink.name, comment: "") }.joined(separator: " ")
Can’t we just define
Drink’snameas aLocalizedStringKeytype directly?Since
LocalizedStringKeydoes not support theIdentifiable,Hashable,Comparableprotocols, and there is no official method to convertLocalizedStringKeytoString, definingnameasLocalizedStringKeyrequires special methods (which can be achieved through Mirror, but is beyond the scope of this article).
Adding Positional Indexes to Localization Placeholders
When declaring localized strings, the same type of placeholder may have different word orders in different languages. For example, the date and place:
// English
Go to the hospital on May 3
// Chinese
五月三日去医院
We can facilitate adjusting the word order in different language versions of Localizable.strings by adding positional indexes to placeholders. For example:
// Localizable.strings - en
"GO %1$@ ON %2$@" = "Go to %1$@ on %2$@";
"HOSPITAL" = "the hospital";

// Localizable.strings - zh
"GO %1$@ ON %2$@" = "%2$@去%1$@";
"HOSPITAL" = "医院";
For now, we can only add interpolation content according to the positional index order using the String.localizedStringWithFormat method:
var string

: String {
    let formatString = NSLocalizedString("GO %1$@ ON %2$@", comment: "")
    let location = String(localized: "HOSPITAL", comment: "")
    return String.localizedStringWithFormat(
        formatString,
        location,
        Date.now.formatted(.dateTime.month().day())
    )
}

Text(string)
This method does not allow for real-time preview changes by modifying environment values in the preview (it works correctly in the simulator or on a real device).
Creating String Dictionary Files
Some issues that are non-existent in Chinese can be significant in other languages, like plurals. For an English-only app with a limited number of nouns, you might hard-code plural rules like:
if cups <= 1 {
  cupstring = "cup"
} else {
  cupstring = "cups"
}
However, this is not only hard to maintain but also inflexible for languages with complex plural rules (like Russian or Arabic).
To solve how to define plural rules in different languages, Apple provided another solution apart from .strings files: .stringdict string dictionary files.
A .stringdict file is a property list file with a .stringsdict file extension, and it is edited just like any other property list (like Info.plist).
Originally introduced for handling pluralization, .stringsdict has been expanded to include functions for displaying different text for different numeric values (often used for screen size changes) and for specific platforms (iPhone, iPad, Mac, tvOS).

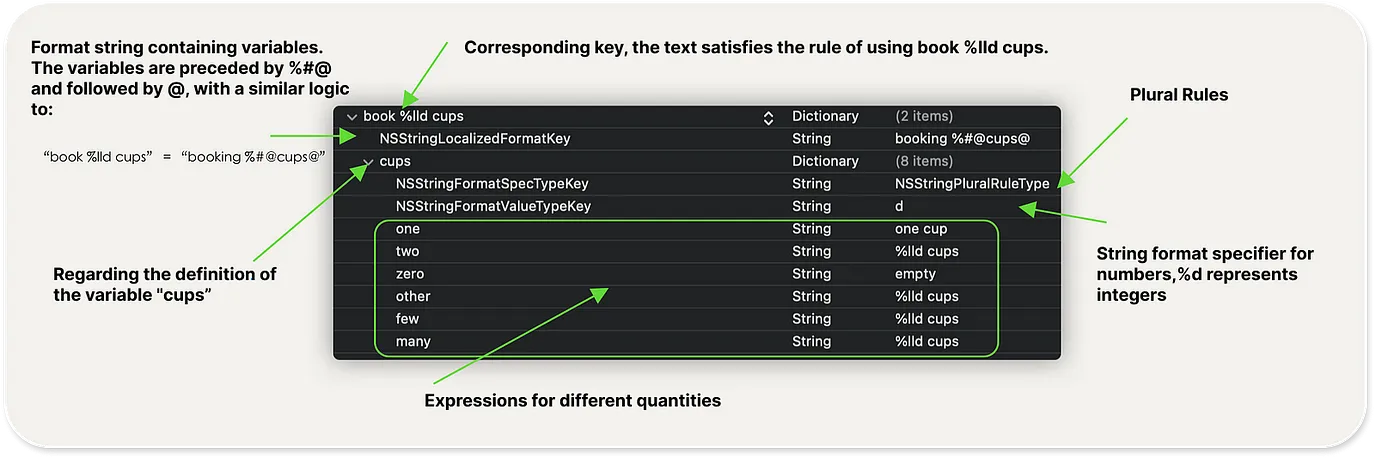
In the image above, we have specified rules using NSStringLocalizedFormatKey for pluralization, NSStringVariableWidthRuleType for variable width, and NSStringDeviceSpecificRuleType for device-specific content.
The root node of a .stringdict file is Strings Dictionary, under which all rules are established. Each rule requires a Dictionary. The three rules shown in the image correspond to the keys device %lld, GDP, and book %lld cups. The program generates the correct localized content using these rules when it encounters text matching these keys.
- We can specify any number of rules in a
.stringdictfile. - The default name for the string dictionary file is
Localizable.stringsdict. - The
.stringdictfile takes precedence over.strings. If both defineGDP, the content from.stringdictwill be used.
Defining Plural Rules
-
The meaning of quantity categories depends on the language, and not all languages have the same categories.
For example, English uses only
oneandotherfor plurals. Arabic has different plural forms forzero,one,two,few,many,other. Though Russian also usesmany, its rules formanydiffer from Arabic. -
All categories except
otherare optional.However, if you don’t provide rules for all specific language categories, your text might not be grammatically correct. Conversely, if you provide rules for unused categories in a language, they will be ignored, and
otherwill be used. -
Using
NSStringFormatValueTypeKeyformat specifiers inzero,one,two,few,many,otheris optional. For example, the above definition returns one cup when the number is 1, without needing to include %lld.
For how to define plural rules in various languages, refer to UNICODE’s official documentation.
Variable Width Rules
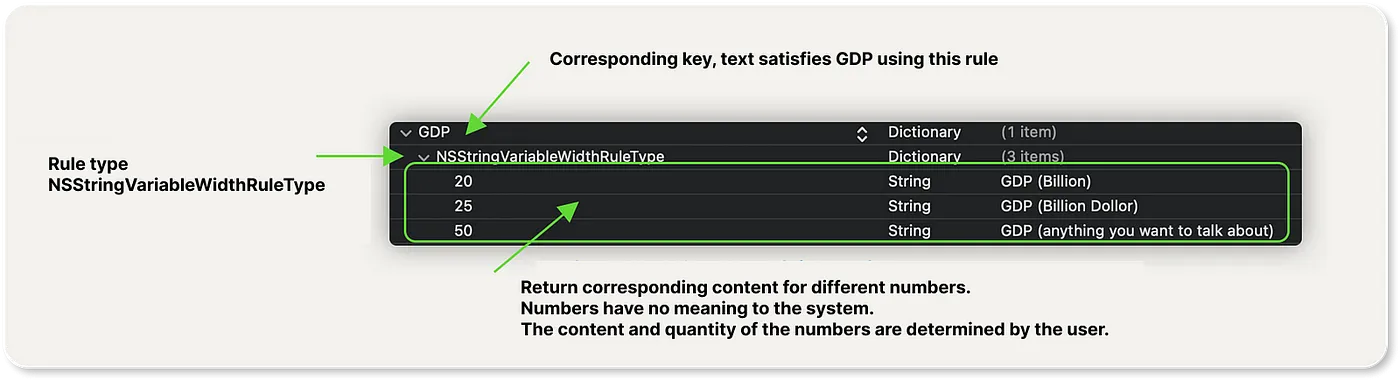
Unlike plural and device rules, the system doesn’t automatically adapt return values. Users need to explicitly mark them when defining localized text, like:
let gdp = (NSLocalizedString("GDP", comment: "") as NSString).variantFittingPresentationWidth(25)
Text(gdp) // Returns GDP(Billon Dollor)
let gdp = (NSLocalizedString("GDP", comment: "") as NSString).variantFittingPresentationWidth(100)
Text(gdp) // Returns GDP(anything you want to talk about)
If there’s no exact match, the closest content is returned.
Its use cases seem replaceable, as it requires more code involvement.
Device-Specific Rules
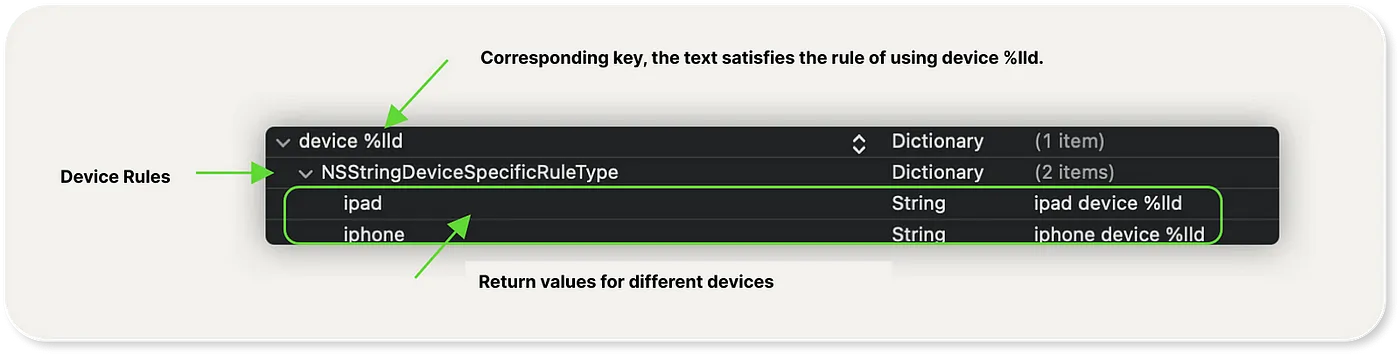
Currently supported device types include: appletv, apple watch, ipad, iphone, ipod, mac.
Users don’t need to intervene in the code; the system will return content based on the hardware device used.
Practical Example 5: Redefining the Payment Button
Enhance the payment button using plural rules.
The code for the payment button is in ButtonView:
Button {
    showPayResult.toggle()
} label: {
    Text("Pay for \(order.totalQuantity) drinks")
}
We need to set up Pay for \(order.totalQuantity) drinks.
First, create the Localizable.stringsdict file.


For English, we need to set conditions for zero, one, and other. In English, set it up as follows:

In Chinese, we only need to set zero and other.

Adjusting the order quantity, the button will return the corresponding localized text based on different languages and order quantities.

In Practical Example 2, we had set up key-value pairs for Pay for %lld drinks in Localizable.strings, but since .stringdict has a higher priority, the system will prioritize the NSStringPluralRuleType rule.
Practical Example 6: Tap or Click
Display different content on the button for adding drinks depending on the device.
For instance, we could display tap on iPhone and iPad, select on Apple TV, and click on Mac.
Add in Chinese:

Add in English:


With these settings, the button text changes dynamically according to the device used, offering a more intuitive and appropriate interaction term for each platform.
Formatter for Formatted Output
Localizing display labels is not enough. In applications, there’s a huge need for localizing numbers, dates, currency, units of measurement, names, and more.
Apple has invested significant resources to provide developers with a complete solution—Formatter. In 2021, Apple further upgraded Formatter, enhancing its ease of use in Swift and introducing the FormatStyle protocol, suitable for Swift.
Formatter covers a vast array of content, enough to fill a separate article. The following examples from the Demo will give a basic understanding.
Practical Example 7: Dates, Currency, and Percentages
Dates

Text(order.date, style: .date) // Displays year, month, and day
Text(order.date.formatted(.dateTime.weekday())) // Displays the day of the week
In the Demo, two methods are used to localize date display:
-
Text supports date formatting directly, but with limited customization.
-
Using the new FormatStyle for chain defining output:
order.date.formatted(.dateTime.weekday())displays only the day of the week.
Currency

- Creating NumberFormatter
      private func currencyFormatter() -> NumberFormatter {
          let formatter = NumberFormatter()
          formatter.numberStyle = .currency
          formatter.maximumFractionDigits = 2
          if locale.identifier != "zh_CN" {
              formatter.locale = Locale(identifier: "en-us")
          }
          return formatter
      }
The Demo provides prices in two currencies, defaulting to US dollars if the system’s region is not mainland China.
- Applying Formatter in Text
Text(NSNumber(value: item.amount), formatter: currencyFormatter())In Text, Formatter can only be used for NSObject, so Double is converted to NSNumber. Currently, FormatStyle’s Currency options are too limited for use.
Percentages

Text(order.tax.formatted(.percent))Directly using formatStyle.
Practical Example 8: Units of Measurement, Series
Calories
Use Measurement to define energy units. A Measurement object represents a quantity and a unit of measure. The Measurement type provides a programmatic interface for converting measurement values to different units and calculating sums or differences between two measurements.

init(name: String, price: Double, calories: Double) {
    this.name = String.localizedStringWithFormat(NSLocalizedString(name, comment: name))
    this.price = price
    this.calories = Measurement<UnitEnergy>(value: calories, unit: .calories) // Set the original data as calorie
}
Measurements can also be used for calculations:
var totalCalories: Measurement<UnitEnergy> {
    items.keys.map { drink in
        drink.calories * Double(items[drink] ?? 0)
    }.reduce(Measurement<UnitEnergy>(value: 0, unit: .calories), +)
}
Creating a Formatter for Measurement
var measureFormatter: MeasurementFormatter {
    let formatter = MeasurementFormatter()
    formatter.unitStyle = .medium
    return formatter
}
Displaying in SwiftUI
Text(order.totalCalories, formatter: measureFormatter)Series


Creating conjunction styles (punctuation, and/or, etc.) that comply with different language habits.
var list: String {
    order.list.map{ NSLocalizedString($0.drink.name, comment: "") }.formatted(.list(type: .and))
}
This approach allows for localized and grammatically correct series or list presentations in different languages.
Other Aspects
Using tableName to Specify a Specific String File
Multiple string files can be created. When the file name is not Localizable, we need to specify the file name, such as Other.strings.
Text("Item", tableName: "Other")tableName is also applicable to .stringdict.
Specifying String Files in Other Bundles
If your app uses other Bundles containing multilingual resources, you can specify the use of string files from those Bundles.
import MultiLanguPackage // ML
Text("some text", bundle: ML.self)
In Packages containing multilingual resources, the following code can specify the Bundle:
Text("some text", bundle: Self.self) Markdown Symbol Support
At WWDC 2021, Apple announced the direct use of some markdown symbols in Text. For example:
Text("**Hello** *\(year)*")Markdown symbols can also be used in string files:
"**Hello** *%lld*" = "**你好** *%lld*";Additionally, the new AttributedString type can bring more creativity to text.
Summary
This article was originally part of a series I wrote on iOS localization, but due to various distractions, it was never fully completed.
Other topics, such as resource localization, localization debugging, localization preview, localization file editing, and an in-depth study of Formatter, will be explored in the future.