The Safe Area refers to the content space that does not overlap with the navigation bar, tab bar, toolbar, or other views provided by the view controller.
In UIKit, developers need to use safeAreaInsets or safeAreaLayoutGuide to ensure that views are placed in the visible part of the interface.
SwiftUI simplifies the above process thoroughly. Unless developers explicitly request views to break through the limits of the safe area, SwiftUI will try its best to ensure that the views created by the developer are laid out in the safe area. SwiftUI also provides some methods and tools for developers to control the safe area.
This article will explore how to get SafeAreaInsets in SwiftUI, draw views outside the safe area, and modify the safe area of views.
How to get SafeAreaInsets
What are SafeAreaInsets
SafeAreaInsets are used to determine the inset values of the safe area in a view.
For the root view, safeAreaInsets reflect the amount of space taken up by elements such as the status bar, navigation bar, home indicator, and TabBar on each edge. For other views in the view hierarchy, safeAreaInsets only reflect the part of the view that is covered. If a view can fit completely within the safe area of its parent view, its safeAreaInsets are 0. When a view is not yet visible on the screen, its safeAreaInsets are also 0.
In SwiftUI, developers usually use safeAreaInsets only when they need to get the height of StatusBar + NavBar or HomeIndicator + TabBar.
Using GeometryReader to get it
The GeometryProxy provides the safeAreaInsets property, allowing developers to get the safeAreaInsets of a view through GeometryReader.
struct SafeAreaInsetsKey: PreferenceKey {
    static var defaultValue = EdgeInsets()
    static func reduce(value: inout EdgeInsets, nextValue: () -> EdgeInsets) {
        value = nextValue()
    }
}

extension View {
    func getSafeAreaInsets(_ safeInsets: Binding<EdgeInsets>) -> some View {
        background(
            GeometryReader { proxy in
                Color.clear
                    .preference(key: SafeAreaInsetsKey.self, value: proxy.safeAreaInsets)
            }
            .onPreferenceChange(SafeAreaInsetsKey.self) { value in
                safeInsets.wrappedValue = value
            }
        )
    }
}
Usage:
struct GetSafeArea: View {
    @State var safeAreaInsets: EdgeInsets = .init()
    var body: some View {
        NavigationView {
            VStack {
                Color.blue
            }
        }
        .getSafeAreaInsets($safeAreaInsets)
    }
}

// iphone 13
// EdgeInsets(top: 47.0, leading: 0.0, bottom: 34.0, trailing: 0.0)
From the obtained insets, we can see that the height of the HomeIndicator is 34.
You can also use the following code to further understand the state of safeAreaInsets in various hierarchical views.
extension View {
    func printSafeAreaInsets(id: String) -> some View {
        background(
            GeometryReader { proxy in
                Color.clear
                    .preference(key: SafeAreaInsetsKey.self, value: proxy.safeAreaInsets)
            }
            .onPreferenceChange(SafeAreaInsetsKey.self) { value in
                print("\(id) insets:\(value)")
            }
        )
    }
}
For example:
struct GetSafeArea: View {
    var body: some View {
        NavigationView {
            VStack {
                Text("Hello world")
                    .printSafeAreaInsets(id: "Text")
            }
        }
        .printSafeAreaInsets(id: "NavigationView")
    }
}

// iPhone 13 pro
// NavigationView insets:EdgeInsets(top: 47.0, leading: 0.0, bottom: 34.0, trailing: 0.0)
// Text insets:EdgeInsets(top: 0.0, leading: 0.0, bottom: 0.0, trailing: 0.0)
Get from KeyWindow
If we only need to get the safeAreaInsets of the root view, we can also use a more direct approach.
The following code is taken from the answer of Mirko, a StackOverFlow user.
extension UIApplication {
    var keyWindow: UIWindow? {
        connectedScenes
            .compactMap {
                $0 as? UIWindowScene
            }
            .flatMap {
                $0.windows
            }
            .first {
                $0.isKeyWindow
            }
    }
}

private struct SafeAreaInsetsKey: EnvironmentKey {
    static var defaultValue: EdgeInsets {
        UIApplication.shared.keyWindow?.safeAreaInsets.swiftUiInsets ?? EdgeInsets()
    }
}

extension EnvironmentValues {
    var safeAreaInsets: EdgeInsets {
        self[SafeAreaInsetsKey.self]
    }
}

private extension UIEdgeInsets {
    var swiftUiInsets: EdgeInsets {
        EdgeInsets(top: top, leading: left, bottom: bottom, trailing: right)
    }
}
Safe area insets of the root view can be obtained through environment values:
@Environment(\.safeAreaInsets) private var safeAreaInsetsUsing ignoresSafeArea to ignore the safe area
In iOS app development, it is often necessary to allow views to extend into the non-safe area. For example, you may want the background color to fill the entire screen.
struct FullScreenView: View {
    var body: some View {
        ZStack {
            Color.blue
            Text("Hello world").foregroundColor(.white)
        }
    }
}
Since SwiftUI by default places user views within the safe area, we can only get the following result:

SwiftUI offers the ignoresSafeArea modifier to enable views to extend beyond the safe area constraints.
struct FullScreenView: View {
    var body: some View {
        ZStack {
            Color.blue
            Text("Hello world").foregroundColor(.white)
        }
        .ignoresSafeArea() // Ignore safe area in all directions
    }
}

The edgesIgnoringSafeArea modifier provided in iOS 13 has been deprecated in iOS 14.5.
The definition of ignoresSafeArea is as follows:
@inlinable public func ignoresSafeArea(_ regions: SafeAreaRegions = .all, edges: Edge.Set = .all) -> some ViewBy default, .ignoresSafeArea() means that all SafeAreaRegions are ignored in all directions.
By specifying edges, we can allow one or more edges to break through the limitations of the safe area.
// Only extend to the bottom
.ignoresSafeArea(edges: .bottom)

// Extend to the top and bottom
.ignoresSafeArea(edges: [.bottom, .trailing])

// Horizontal expansion
.ignoresSafeArea(edges:.horizontal)
It is very intuitive and convenient to use, but why does the view behave unexpectedly when there is keyboard input? This is because we did not set another important parameter regions for ignoresSafeArea correctly.
Compared to the edgesIgnoringSafeArea provided in SwiftUI 1.0, the biggest improvement of ignoresSafeArea is that it allows us to set SafeAreaRegions.
SafeAreaRegions defines three types of safe area partitions:
-
container
The safe area defined by the device and the container within the user interface, including elements such as the top and bottom bars.
-
keyboard
The safe area that matches the current range of any soft keyboard displayed on the view content.
-
all (default)
The union of the above two safe area partitions.
iOS 13 did not provide automatic keyboard avoidance function, and developers need to write some additional code to solve the problem of improper coverage of views (such as TextField) by the soft keyboard.
Starting from iOS 14, when SwiftUI calculates the safe area of the view, it also considers the overlay area of the soft keyboard on the screen (under iPadOS, the overlay area of the keyboard will be ignored after the keyboard is minimized). Therefore, without using any additional code, the view automatically gains the ability to avoid the keyboard. However, sometimes not all views need to remove the overlay area of the soft keyboard from the safe area, so it is necessary to set SafeAreaRegions correctly.
struct IgnoresSafeAreaTest: View {
    var body: some View {
        ZStack {
            // Gradient background
            Rectangle()
                .fill(.linearGradient(.init(colors: [.red, .blue, .orange]), startPoint: .topLeading, endPoint: .bottomTrailing))
            VStack {
                // Logo
                Circle().fill(.regularMaterial).frame(width: 100, height: 100).padding(.vertical, 100)
                // Text input
                TextField("name", text: .constant(""))
                    .textFieldStyle(.roundedBorder)
                    .padding()
            }
        }
    }
}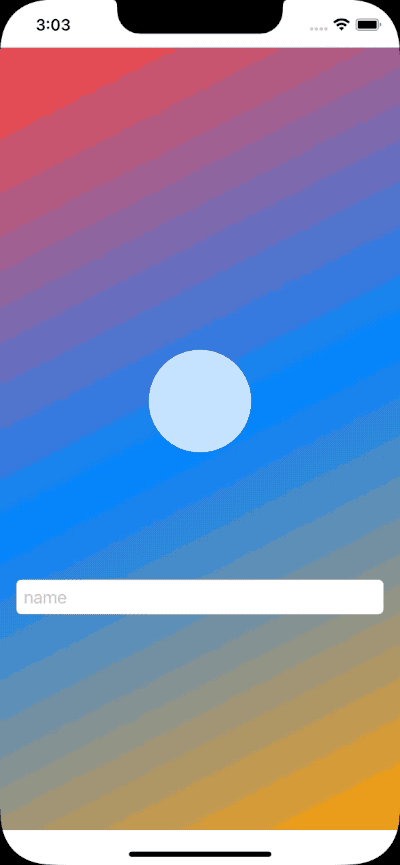
Although the above code implements automatic avoidance of the keyboard, it does not completely meet the expected behavior. First, the background does not fill the entire screen. Secondly, when the soft keyboard pops up, we do not want the background to change due to the change in the safe area. Although the above problems can be solved by adding ignoresSafeArea, there are still some details to consider such as where to add it and how to set it up.
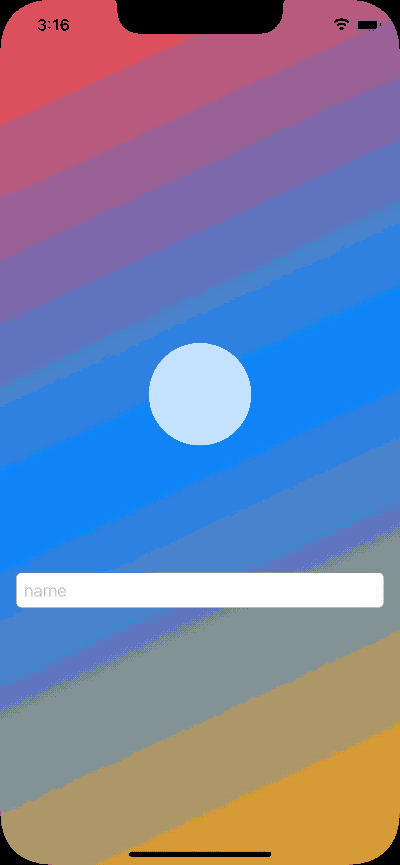
We add ignoresSafeArea to the ZStack:
ZStack {
    ...
}
.ignoresSafeArea()
At this point, the background fills the screen and is no longer affected by the pop-up of the software keyboard. However, the content in the foreground loses the ability to automatically avoid the keyboard.
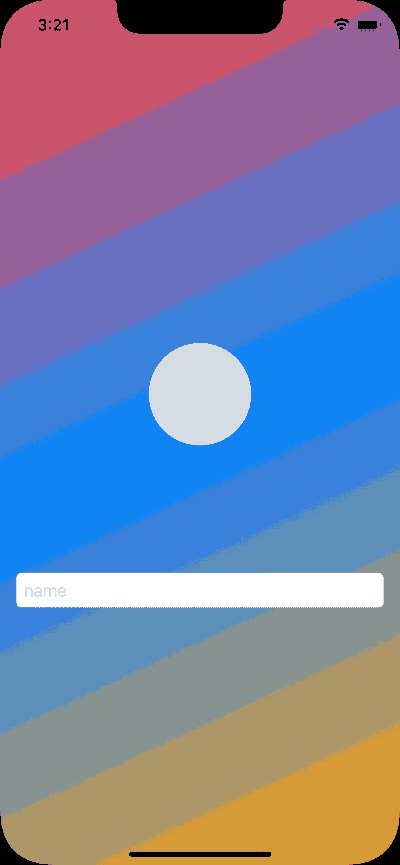
If you modify the code as follows:
ZStack {
    ...
}
.ignoresSafeArea(.container)
At this point, the background will fill the screen, the foreground will support keyboard avoidance, but the background will undergo undesired changes when the keyboard appears.
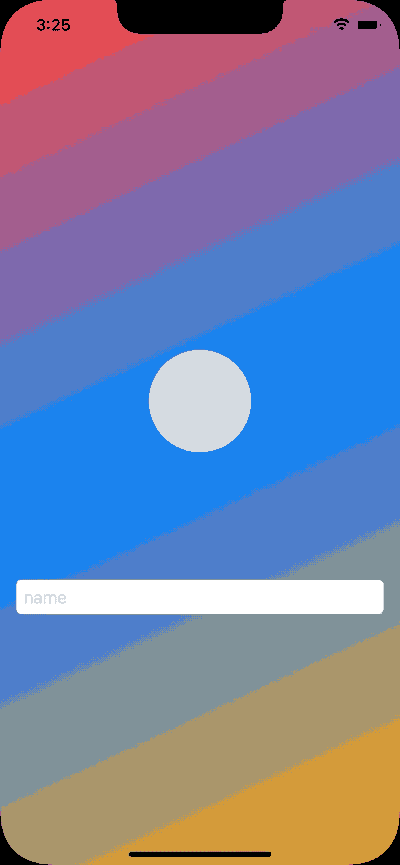
The correct way to handle it is to let only the background ignore the safe area:
struct IgnoresSafeAreaTest: View {
    var body: some View {
        ZStack {
            Rectangle()
                .fill(.linearGradient(.init(colors: [.red, .blue, .orange]), startPoint: .topLeading, endPoint: .bottomTrailing))
                .ignoresSafeArea(.all) // Only let the background ignore the safe area
            VStack {
                Circle().fill(.regularMaterial).frame(width: 100, height: 100).padding(.vertical, 100)
                TextField("name", text: .constant(""))
                    .textFieldStyle(.roundedBorder)
                    .padding()
            }
        }
    }
}
Aside from setting the correct ignoresSafeArea parameter for the correct view, sometimes adjusting the organization of the view can also be a good choice to achieve satisfactory results.
Using safeAreaInset to extend the safe area
In SwiftUI, all components based on UIScrollView (ScrollView, List, Form) will fill the entire screen by default, but we can still ensure that we can see all content within the safe area.
List(0..<100){ id in
    Text("id\(id)")
}
When embedded in TabView, TabView adjusts its internal safe area.

Unfortunately, before iOS 15, SwiftUI did not provide a way to adjust the view’s safe area. If we wanted to create a custom Tabbar using SwiftUI, the last item in the list would be obscured by the Tabbar.
The introduction of the safeAreaInset modifier solves this problem. With safeAreaInset, we can shrink the view’s safe area to ensure that all content is displayed as intended.
For example:
struct AddSafeAreaDemo: View {
    var body: some View {
        ZStack {
            Color.yellow.border(.red, width: 10)
        }
        .safeAreaInset(edge: .bottom, alignment: .center, spacing: 0) {
            Rectangle().fill(.blue)
                .frame(height: 100)
        }
        .ignoresSafeArea()
    }
}
We used safeAreaInset to shrink the safe area within the ZStack by 100 from the bottom and displayed a blue rectangle here.

By using safeAreaInset, you can make the List behave the same as the system TabBar in a custom TabBar.
struct AddSafeAreaDemo: View {
    var body: some View {
        NavigationView {
            List(0..<100) { i in
                Text("id:\(i)")
            }
            .safeAreaInset(edge: .bottom, spacing: 0) {
                Text("底部状态条")
                    .font(.title3)
                    .foregroundColor(.indigo)
                    .frame(minWidth: 0, maxWidth: .infinity, minHeight: 0, maxHeight: 40)
                    .padding()
                    .background(.green.opacity(0.6))

            }
        }
    }
}
Performance on iPhone 13
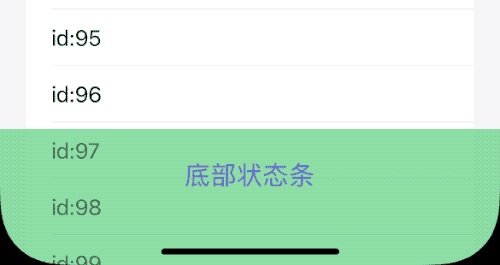
We only adjusted the safe area, and SwiftUI will automatically adapt on different devices (on iPhone 13, the height of the status bar is 40 + Home Indicator area height).
Automatic adaptation only works for the background.
The same code performs on iPhone 8:

Before iOS 15.2, there were issues with safeAreaInset support for List and Form (ScrollView behaved normally), making it impossible to display the entire contents of the list. This bug has been fixed in iOS 15.2. The code in this article will behave as expected on versions of Xcode 13.2 beta (13C5066c) and later.

safeAreaInset can be stacked, so we can adjust the safe area on multiple edges, for example:
ZStack {
    Color.yellow.border(.red, width: 10)
}
.safeAreaInset(edge: .bottom, alignment: .center, spacing: 0) {
    Rectangle().fill(.blue)
        .frame(height: 100)
}
.safeAreaInset(edge: .trailing, alignment: .center, spacing: 0) {
    Rectangle().fill(.blue)
        .frame(width: 50)
}
We can also set the alignment for the safe area insets using alignment, and add additional spacing between the content we want to display and the safe area using spacing.
While using safeAreaInset to add a status bar or a custom tab bar to the bottom of a list is very convenient, things get complicated if you are using a TextField in your list.
For example, below is an extreme example:
struct AddSafeAreaDemo: View {
    var body: some View {
        ScrollView {
            ForEach(0..<100) { i in
                TextField("input text for id:\(i)",text:.constant(""))
            }
        }
        .safeAreaInset(edge: .bottom, spacing: 0) {
            Text("底部状态条")
                .font(.title3)
                .foregroundColor(.indigo)
                .frame(minWidth: 0, maxWidth: .infinity, minHeight: 0, maxHeight: 40)
                .padding()
                .background(.green.opacity(0.6))
                .ignoresSafeArea(.all)
        }
    }
}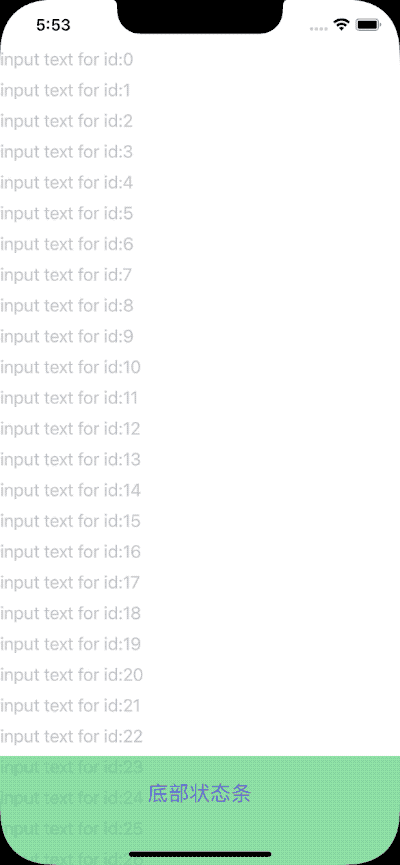
It is not possible to use ignoresSafeArea to fix the bottom status bar while keeping the TextField automatically avoiding the keyboard. In this case, the behavior of the bottom status bar will not meet the original design intention.
If you want to fix the bottom status bar while keeping the TextField’s ability to avoid the keyboard, you need to monitor the state of the keyboard and perform some additional operations.
final class KeyboardMonitor: ObservableObject {
    @Published var willShow: Bool = false
    private var cancellables = Set<AnyCancellable>()
    init() {
        NotificationCenter.default.publisher(for: UIResponder.keyboardWillShowNotification, object: nil)
            .sink { _ in
                self.willShow = true
            }
            .store(in: &cancellables)
        NotificationCenter.default.publisher(for: UIResponder.keyboardWillHideNotification, object: nil)
            .sink { _ in
                self.willShow = false
            }
            .store(in: &cancellables)
    }
}

struct AddSafeAreaDemo: View {
    @StateObject var monitor = KeyboardMonitor()
    var body: some View {
        ScrollView {
            ForEach(0..<100) { i in
                TextField("input text for id:\(i)", text: .constant(""))
            }
        }
        .safeAreaInset(edge: .bottom, spacing: 0) {
            if !monitor.willShow { // hidden when keyboard pop
                Text("底部状态条")
                    .font(.title3)
                    .foregroundColor(.indigo)
                    .frame(minWidth: 0, maxWidth: .infinity, minHeight: 0, maxHeight: 40)
                    .padding()
                    .background(.green.opacity(0.6))
                    .ignoresSafeArea(.all)
            }
        }
    }
}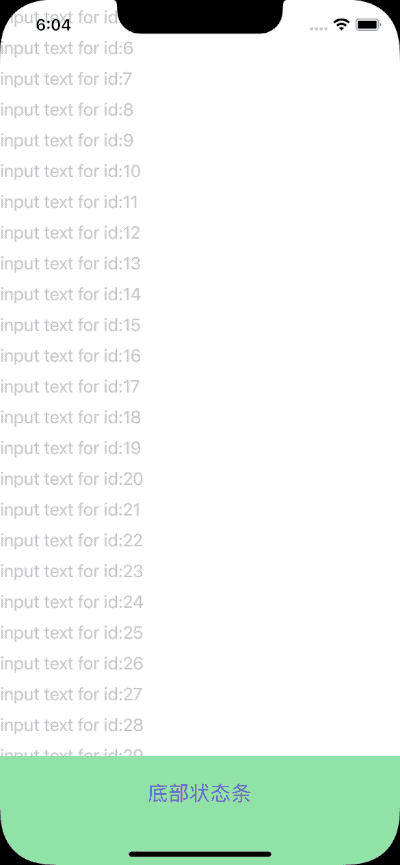
If the above code is placed in a NavigationView, more precise handling of the bottom status bar animation is needed.
Practice: Implementing a WeChat-like chat page using safeAreaInset
By using safeAreaInset, we can easily implement a WeChat-like chat page with very little code.
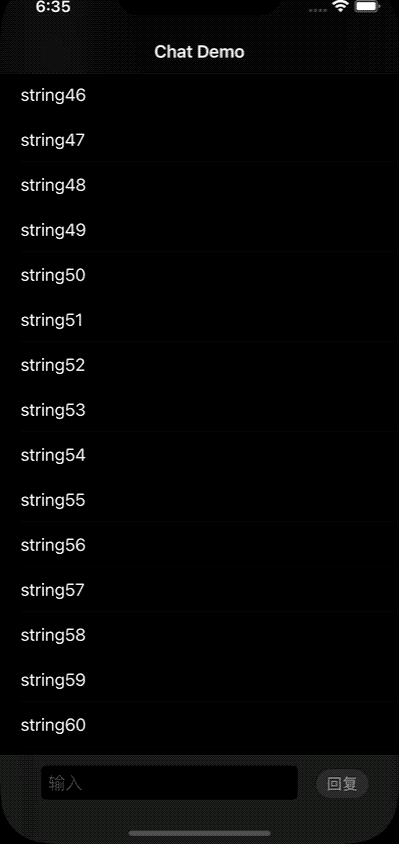
struct ChatBarDemo: View {
    @State var messages: [Message] = (0...60).map { Message(text: "message:\($0)") }
    @State var text = ""
    @FocusState var focused: Bool
    @State var bottomTrigger = false
    var body: some View {
        NavigationView {
            ScrollViewReader { proxy in
                List {
                    ForEach(messages) { message in
                        Text(message.text)
                            .id(message.id)
                    }
                }
                .listStyle(.inset)
                .safeAreaInset(edge: .bottom) {
                    ZStack(alignment: .top) {
                        Color.clear
                        Rectangle().fill(.secondary).opacity(0.3).frame(height: 0.6) // Top line
                        HStack(alignment: .firstTextBaseline) {
                            // Input box
                            TextField("Input", text: $text)
                                .focused($focused)
                                .textFieldStyle(.roundedBorder)
                                .padding(.horizontal, 10)
                                .padding(.top, 10)
                                .onSubmit {
                                    addMessage()
                                    scrollToBottom()
                                }
                                .onChange(of: focused) { value in
                                    if value {
                                        scrollToBottom()
                                    }
                                }
                            // Reply button
                            Button("Reply") {
                                addMessage()
                                scrollToBottom()
                                focused = false
                            }
                            .buttonStyle(.bordered)
                            .controlSize(.small)
                            .tint(.green)
                        }
                        .padding(.horizontal, 30)
                    }
                    .frame(minWidth: 0, maxWidth: .infinity, minHeight: 0, maxHeight: 53)
                    .background(.regularMaterial)
                }
                .onChange(of: bottomTrigger) { _ in
                    withAnimation(.spring()) {
                        if let last = messages.last {
                            proxy.scrollTo(last.id, anchor: .bottom)
                        }
                    }
                }
                .onAppear {
                    if let last = messages.last {
                        proxy.scrollTo(last.id, anchor: .bottom)
                    }
                }
            }
            .navigationBarTitle("SafeArea Chat Demo")
        }
    }

    func scrollToBottom() {
        DispatchQueue.main.asyncAfter(deadline: .now() + 0.25) {
            bottomTrigger.toggle()
        }
    }

    func addMessage() {
        if !text.isEmpty {
            withAnimation {
                messages.append(Message(text: text))
            }
            text = ""
        }
    }
}

struct Message: Identifiable, Hashable {
    let id = UUID()
    let text: String
}
Summary
In SwiftUI, there are many features that seem easy to use at first glance, but are actually difficult to implement. Even seemingly ordinary features can yield unexpected insights when examined in depth.
This article will explore how to obtain SafeAreaInsets in SwiftUI, draw views outside of the safe area, and modify the safe area of views.