With the continuous improvement of SPM (Swift Package Manager) functionality, more and more developers are starting to separate functionality and manage code in their projects by creating multiple packages. SPM itself provides the ability to manage various types of resources in packages (including localized resources), but it is mainly limited to using these resources within the package and it is difficult to share resources. In cases where multiple targets need to call the same resource, the original method is difficult to cope with. This article will introduce a method for uniformly managing resources in a project with multiple SPM packages.
Goal
Recently, the author has been using TCA (The Composable Architecture) combined with SwiftUI for development. In TCA, developers usually create a separate package for a feature or create a single target in a unified package (with multiple targets). A feature usually includes UI logic processing code (Reducer), unit test code, view code related to the feature, and preview code. Each feature can be considered a standalone small application (after injecting the required environment). Ultimately, developers need to import the required feature modules in the Xcode project and combine the complete app through chained code. In this case, almost every feature and Xcode project code needs to use localization and some other shared resources.
Suppose shared resources are copied to the Resource directory of different modules respectively. Then the following problems will occur:
- There are duplicate resources in each module, and the size of the application will increase.
- It is difficult to manage shared resources, and there may be unsynchronized updates.
If all modules are located in the same directory, shared resources can be imported into each Resources directory using relative paths. Although this can avoid the above unsynchronized update problem, it still faces two problems:
- There are duplicate resources in each module, and the size of the application will increase.
- The coupling between modules and resource files increases, which is not conducive to using multiple repositories to manage them separately.
In short, it is best to have a way to:
- Low coupling between resources, modules, and Xcode projects.
- Manage resources uniformly without synchronization issues.
- Only keep one copy of the resources in the final application, without causing storage waste.
Idea
Bundle provides a specific structure for organizing code and resources, aimed at enhancing developer experience. This structure not only allows for predictively loading code and resources, but also supports systemic features such as localization. Bundles exist as directories in storage and need to be represented in code using the Bundle class in the Foundation framework.
The Xcode project itself is already under a Bundle, and developers can use Bundle.main to access its resources.
In SPM, if we add resources to a target, Xcode will automatically create a Bundle for that target during compilation, named PackageName_TargetName.bundle (suffix is resources for non-Mac platforms). If we can obtain the URL of that Bundle in other targets and use it to create a Bundle instance, we can use the resources in that Bundle as follows:
Text("MAIN_APP", bundle: .i18n)
      .foregroundColor(Color("i18nColor", bundle: .i18n))
Therefore, creating a Bundle instance that can point to a specific directory in any state became the key to solving the problem. The reason for emphasizing any state is that Swift places the Bundle in different directory hierarchies depending on the compilation requirements of the project (such as compiling SPM Target separately, previewing in SPM, compiling the application after importing SPM Target in Xcode project, etc.).
Fortunately, Xcode provides us with an example code that demonstrates how to create a Bundle instance that can handle multiple compilation states.
In SPM, if you add at least one resource to the Target, Xcode will create a helper code for you (this code is not included in the project, but only works in Xcode), which generates an instance that points to the Target Bundle.
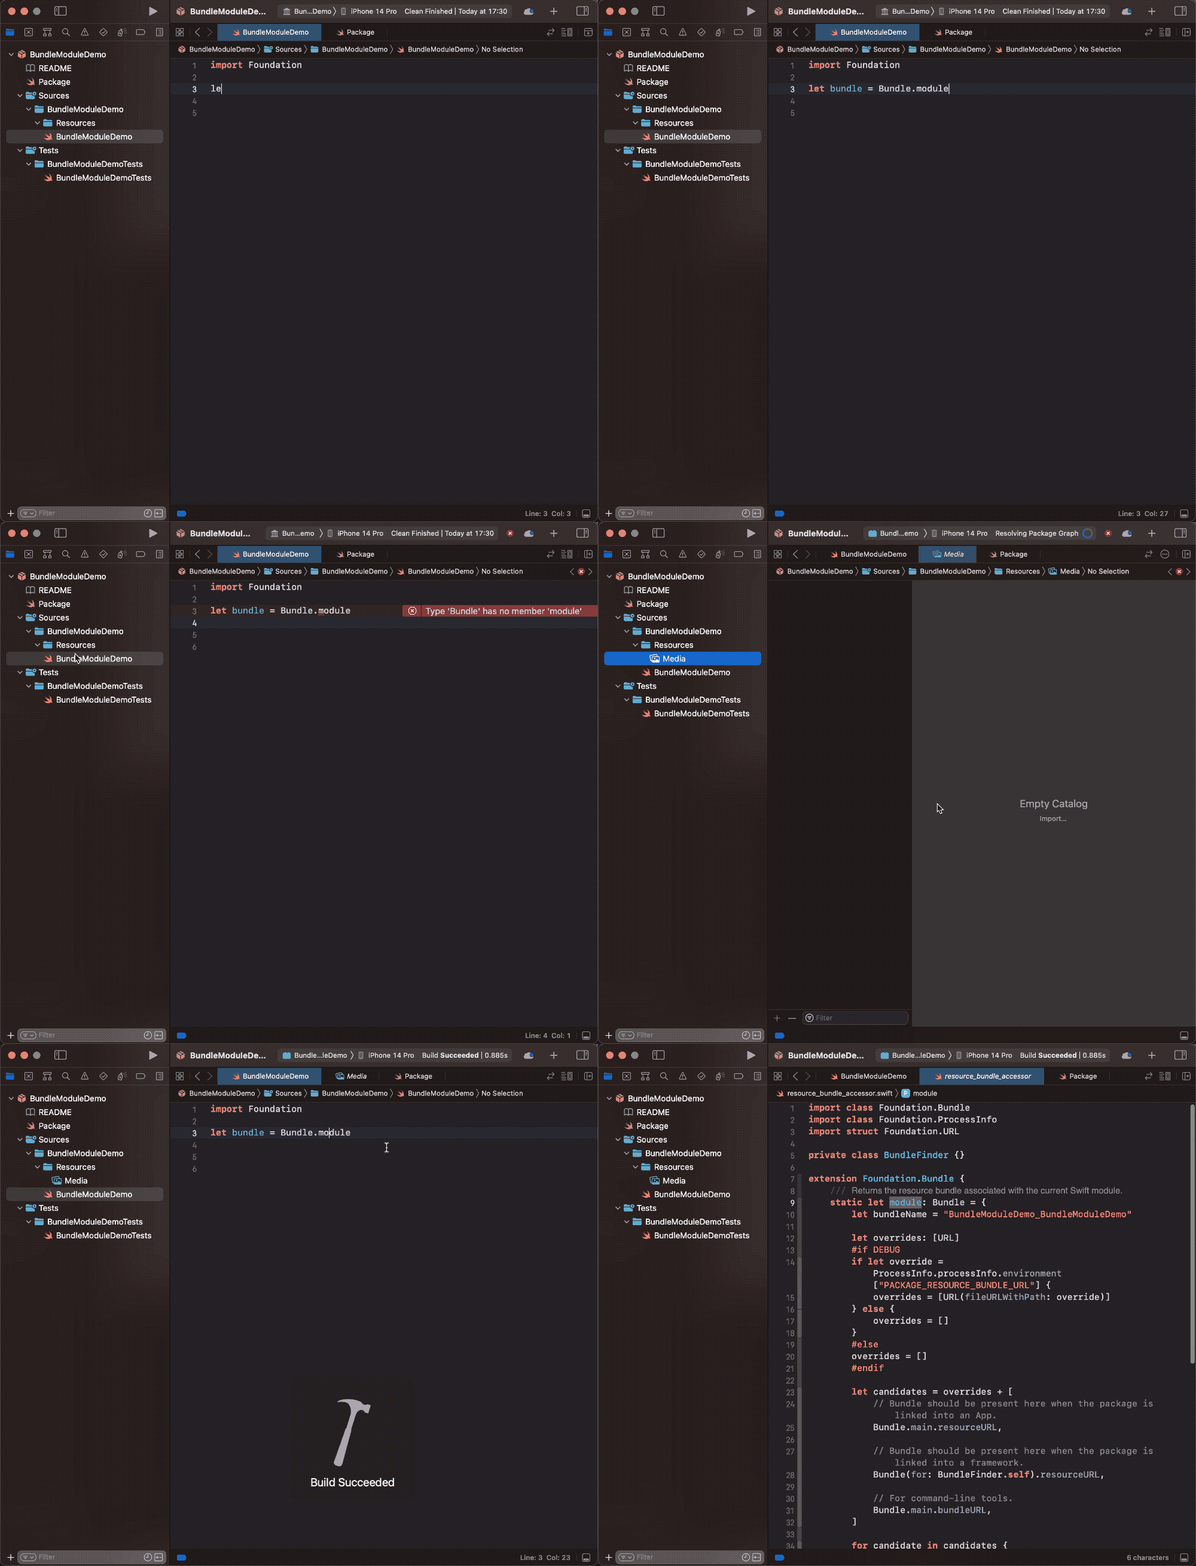
Code as follows:
private class BundleFinder {}

extension Foundation.Bundle {
    /// Returns the resource bundle associated with the current Swift module.
    static let module: Bundle = {
        let bundleName = "BundleModuleDemo_BundleModuleDemo" // PackageName_TargetName

        let overrides: [URL]
        #if DEBUG
        if let override = ProcessInfo.processInfo.environment["PACKAGE_RESOURCE_BUNDLE_URL"] {
            overrides = [URL(fileURLWithPath: override)]
        } else {
            overrides = []
        }
        #else
        overrides = []
        #endif

        let candidates = overrides + [
            // Bundle should be present here when the package is linked into an App.
            Bundle.main.resourceURL,

            // Bundle should be present here when the package is linked into a framework.
            Bundle(for: BundleFinder.self).resourceURL,

            // For command-line tools.
            Bundle.main.bundleURL,
        ]

        for candidate in candidates {
            let bundlePath = candidate?.appendingPathComponent(bundleName + ".bundle")
            if let bundle = bundlePath.flatMap(Bundle.init(url:)) {
                return bundle
            }
        }
        fatalError("unable to find bundle named BundleModuleDemo_BundleModuleDemo")
    }()
}
The basic logic of this code provides three possible locations for storing the Bundle:
- Bundle.main.resourceURL
- Bundle(for: BundleFinder.self).resourceURL
- Bundle.main.bundleURL
When creating a Bundle instance, it searches each location in turn until it finds the corresponding Bundle directory before creating the instance. Afterward, we can use this Bundle.module in our code.:
Text("Hello",bundle: .module)Unfortunately, the above code does not cover all possibilities, such as the situation where SwiftUI’s preview code is run in the current Target and the corresponding Bundle cannot be found. However, this has pointed us in the right direction. As long as the alternative locations provided are sufficient, there is a possibility of successfully creating a corresponding Bundle instance in any scenario.
Practice
In this section, we will demonstrate how to manage resources uniformly in an Xcode project with multiple packages through a concrete example. The project code can be found here.
In the demo project, we will create an Xcode project named UnifiedLocalizationResources and create three packages in it:
- I18NResource
It saves all the resources in the project and also contains a piece of code to create a Bundle instance.
- PackageA
It contains a piece of SwiftUI view code and a preview code. The view uses resources from I18NResource.
- PackageB
It contains a piece of SwiftUI view code and a preview code. The view uses resources from I18NResource.
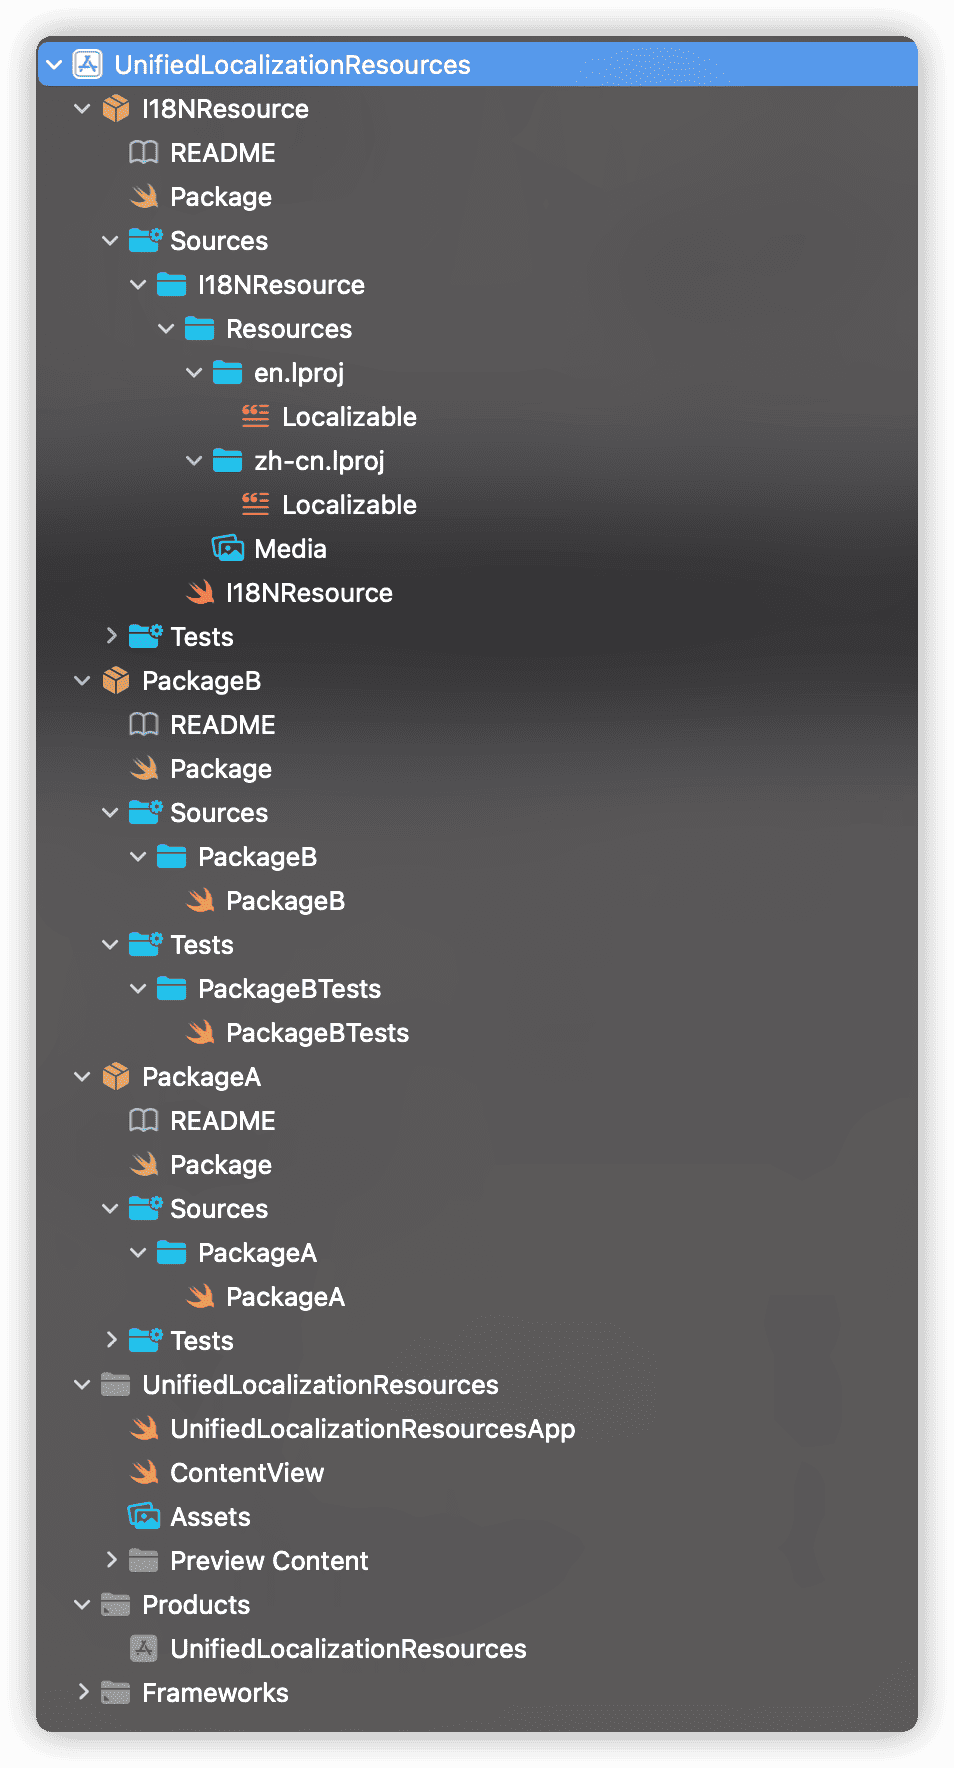
All resources are saved in the Resources directory of I18NResource. PackageA, PackageB, and the Xcode project code will all use the same content.
I18NResource
- Create a Resources directory in the corresponding directory of the Target.
- Modify Package.swift and add
defaultLocalization: "en",to enable localization support. - Add the following code to I18NResource.swift:
// https://developer.apple.com/forums/thread/664295

private class BundleFinder {}

public extension Foundation.Bundle {
    static let i18n: Bundle = {
        let bundleName = "I18NResource_I18NResource"
        let bundleResourceURL = Bundle(for: BundleFinder.self).resourceURL
        let candidates = [
            Bundle.main.resourceURL,
            bundleResourceURL,
            Bundle.main.bundleURL,
            // Bundle should be present here when running previews from a different package "…/Debug-iphonesimulator/"
            bundleResourceURL?.deletingLastPathComponent().deletingLastPathComponent().deletingLastPathComponent(),
            bundleResourceURL?.deletingLastPathComponent().deletingLastPathComponent(),
            // other Package
            bundleResourceURL?.deletingLastPathComponent()
        ]

        for candidate in candidates {
            // For non-mac Apple, you may need to use the resources suffix
            let bundlePath = candidate?.appendingPathComponent(bundleName + ".bundle")
            if let bundle = bundlePath.flatMap(Bundle.init(url:)) {
                return bundle
            }
        }
        fatalError("unable to find bundle named \(bundleName)")
    }()
}
The code is very similar to the module code generated by Xcode (with modifications made on top of it), but three new candidate options have been added to adapt to more scenarios. Now, simply calling Bundle.i18n will generate the correct Bundle instance based on the current environment.

- Add resource files
PackageA
- Modify Package.swift
Add defaultLocalization: "en", add .package(path: "I18NResource") in the dependencies of Package, and add .product(name: "I18NResource", package: "I18NResource") in the dependencies of PackageA target.
- Modify the code in PackageA.swift
import I18NResource // Import resource library
import SwiftUI

public struct ViewA: View {
    public init() {}
    public var body: some View {
        Text("HELLO_WORLD", bundle: .i18n) // Use Bundle.i18n
            .font(.title)
            .foregroundColor(Color("i18nColor", bundle: .i18n)) // Use Bundle.i18n
    }
}

struct ViewAPreview: PreviewProvider {
    static var previews: some View {
        VStack {
            ViewA()
                .environment(\.locale, .init(identifier: "zh-cn"))
            VStack {
                ViewA()
                    .environment(\.locale, .init(identifier: "zh-cn"))
            }
            .environment(\.colorScheme, .dark)
        }
    }
}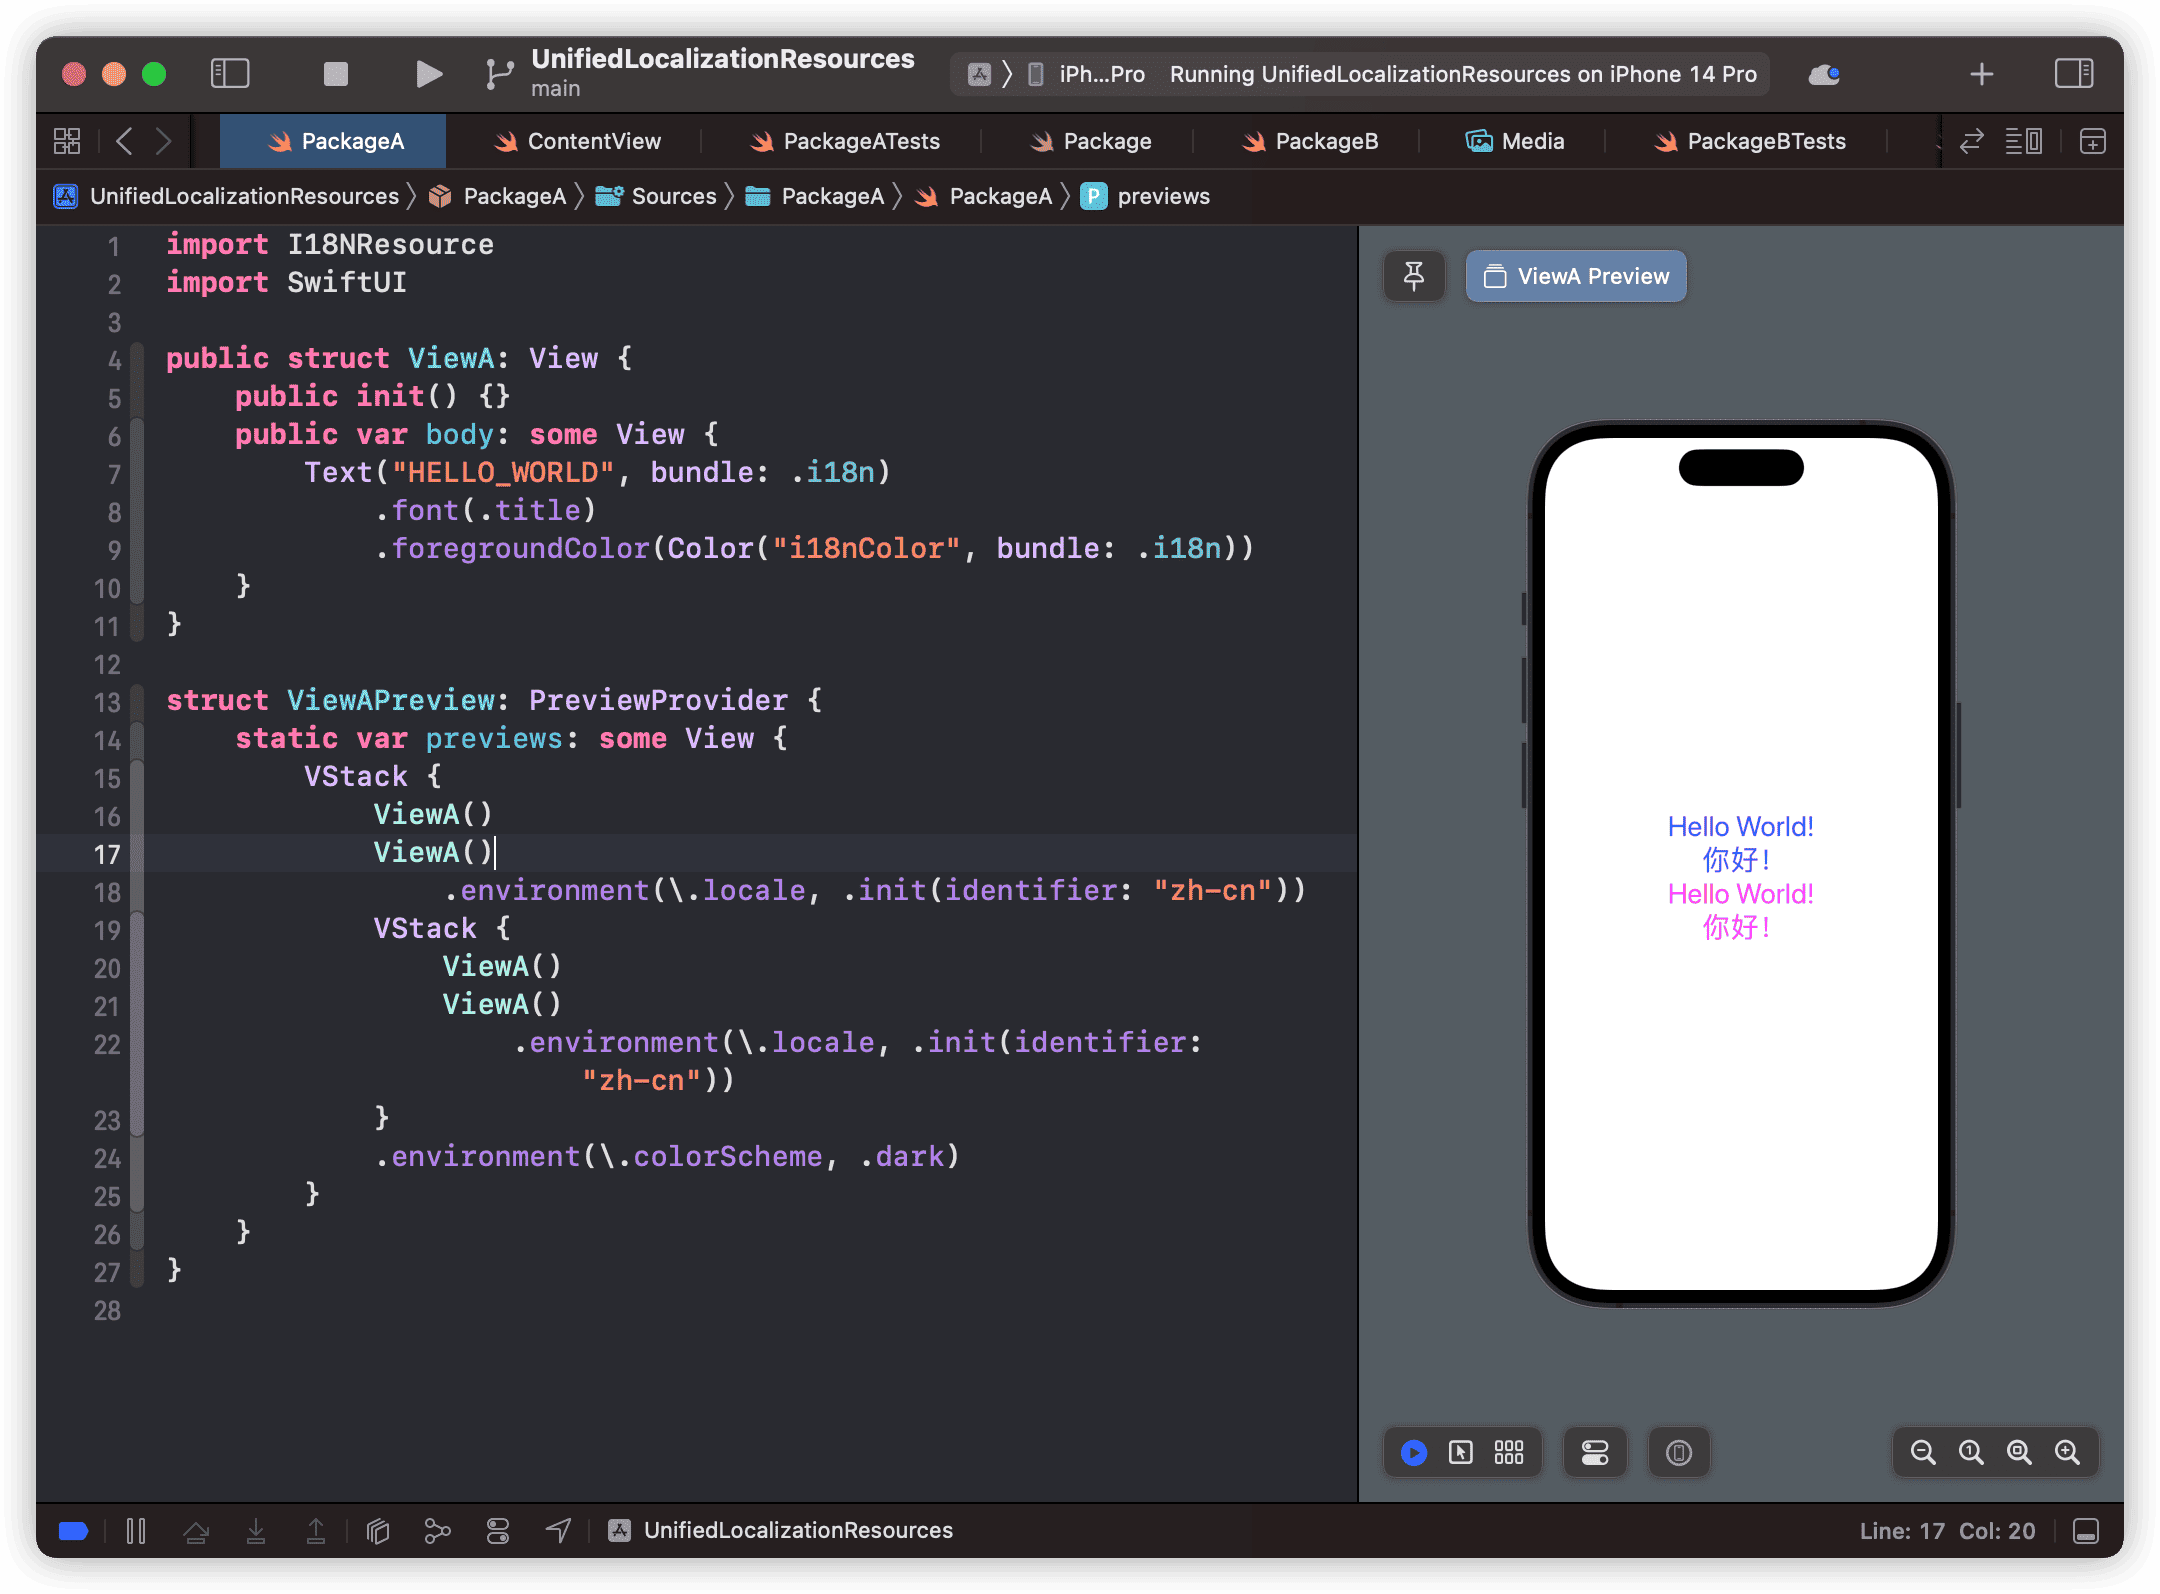
Now we can use the resources in I18NResource in PackageA.
The operations of PackageB are basically the same as PackageA.
Xcode Project
- Import PackageA and PackageB into the project.
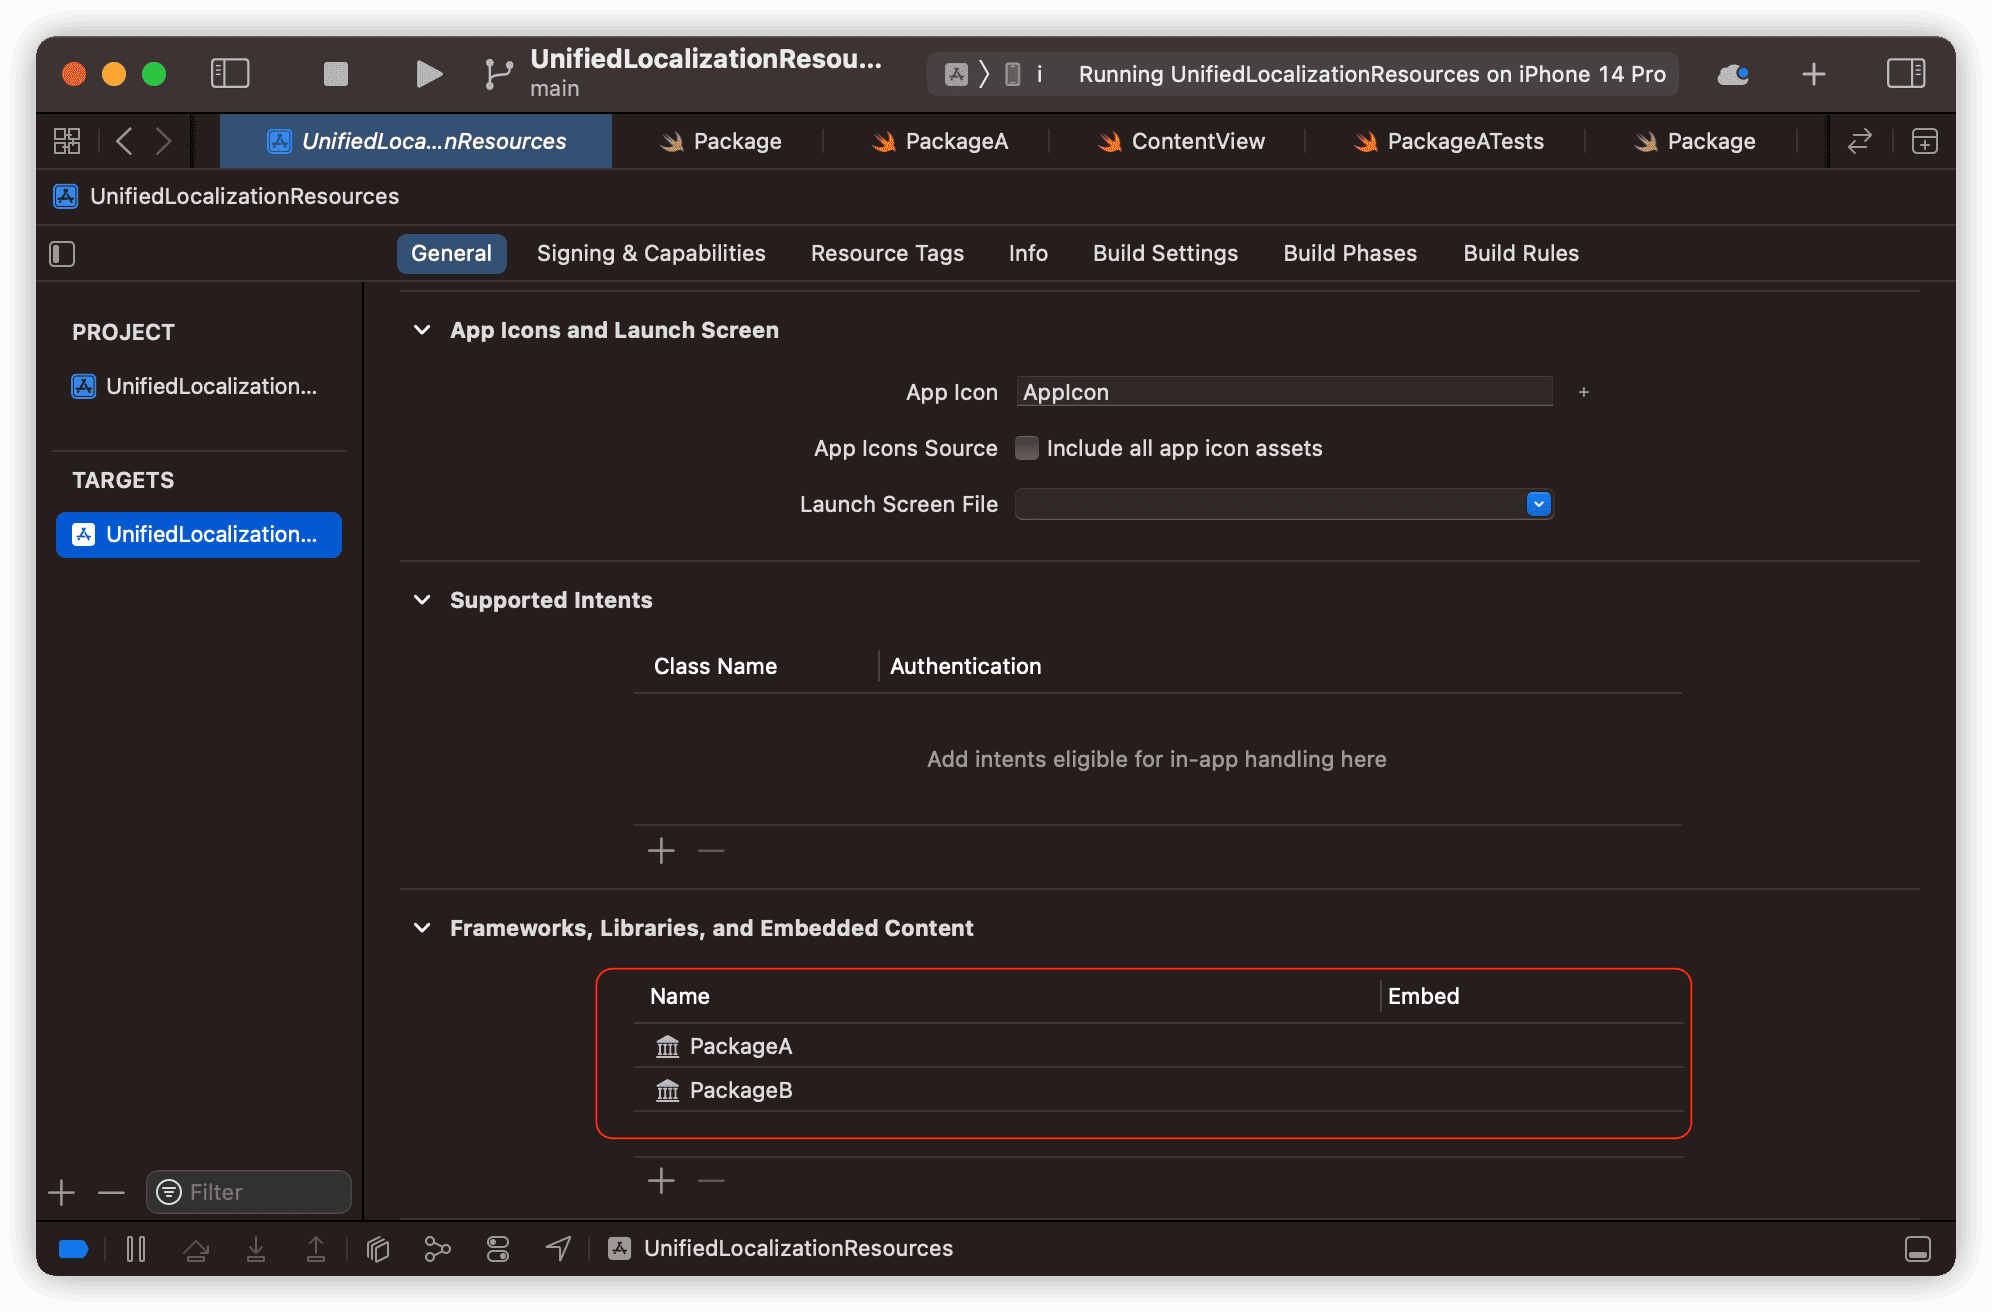
- Modify ContentView.swift
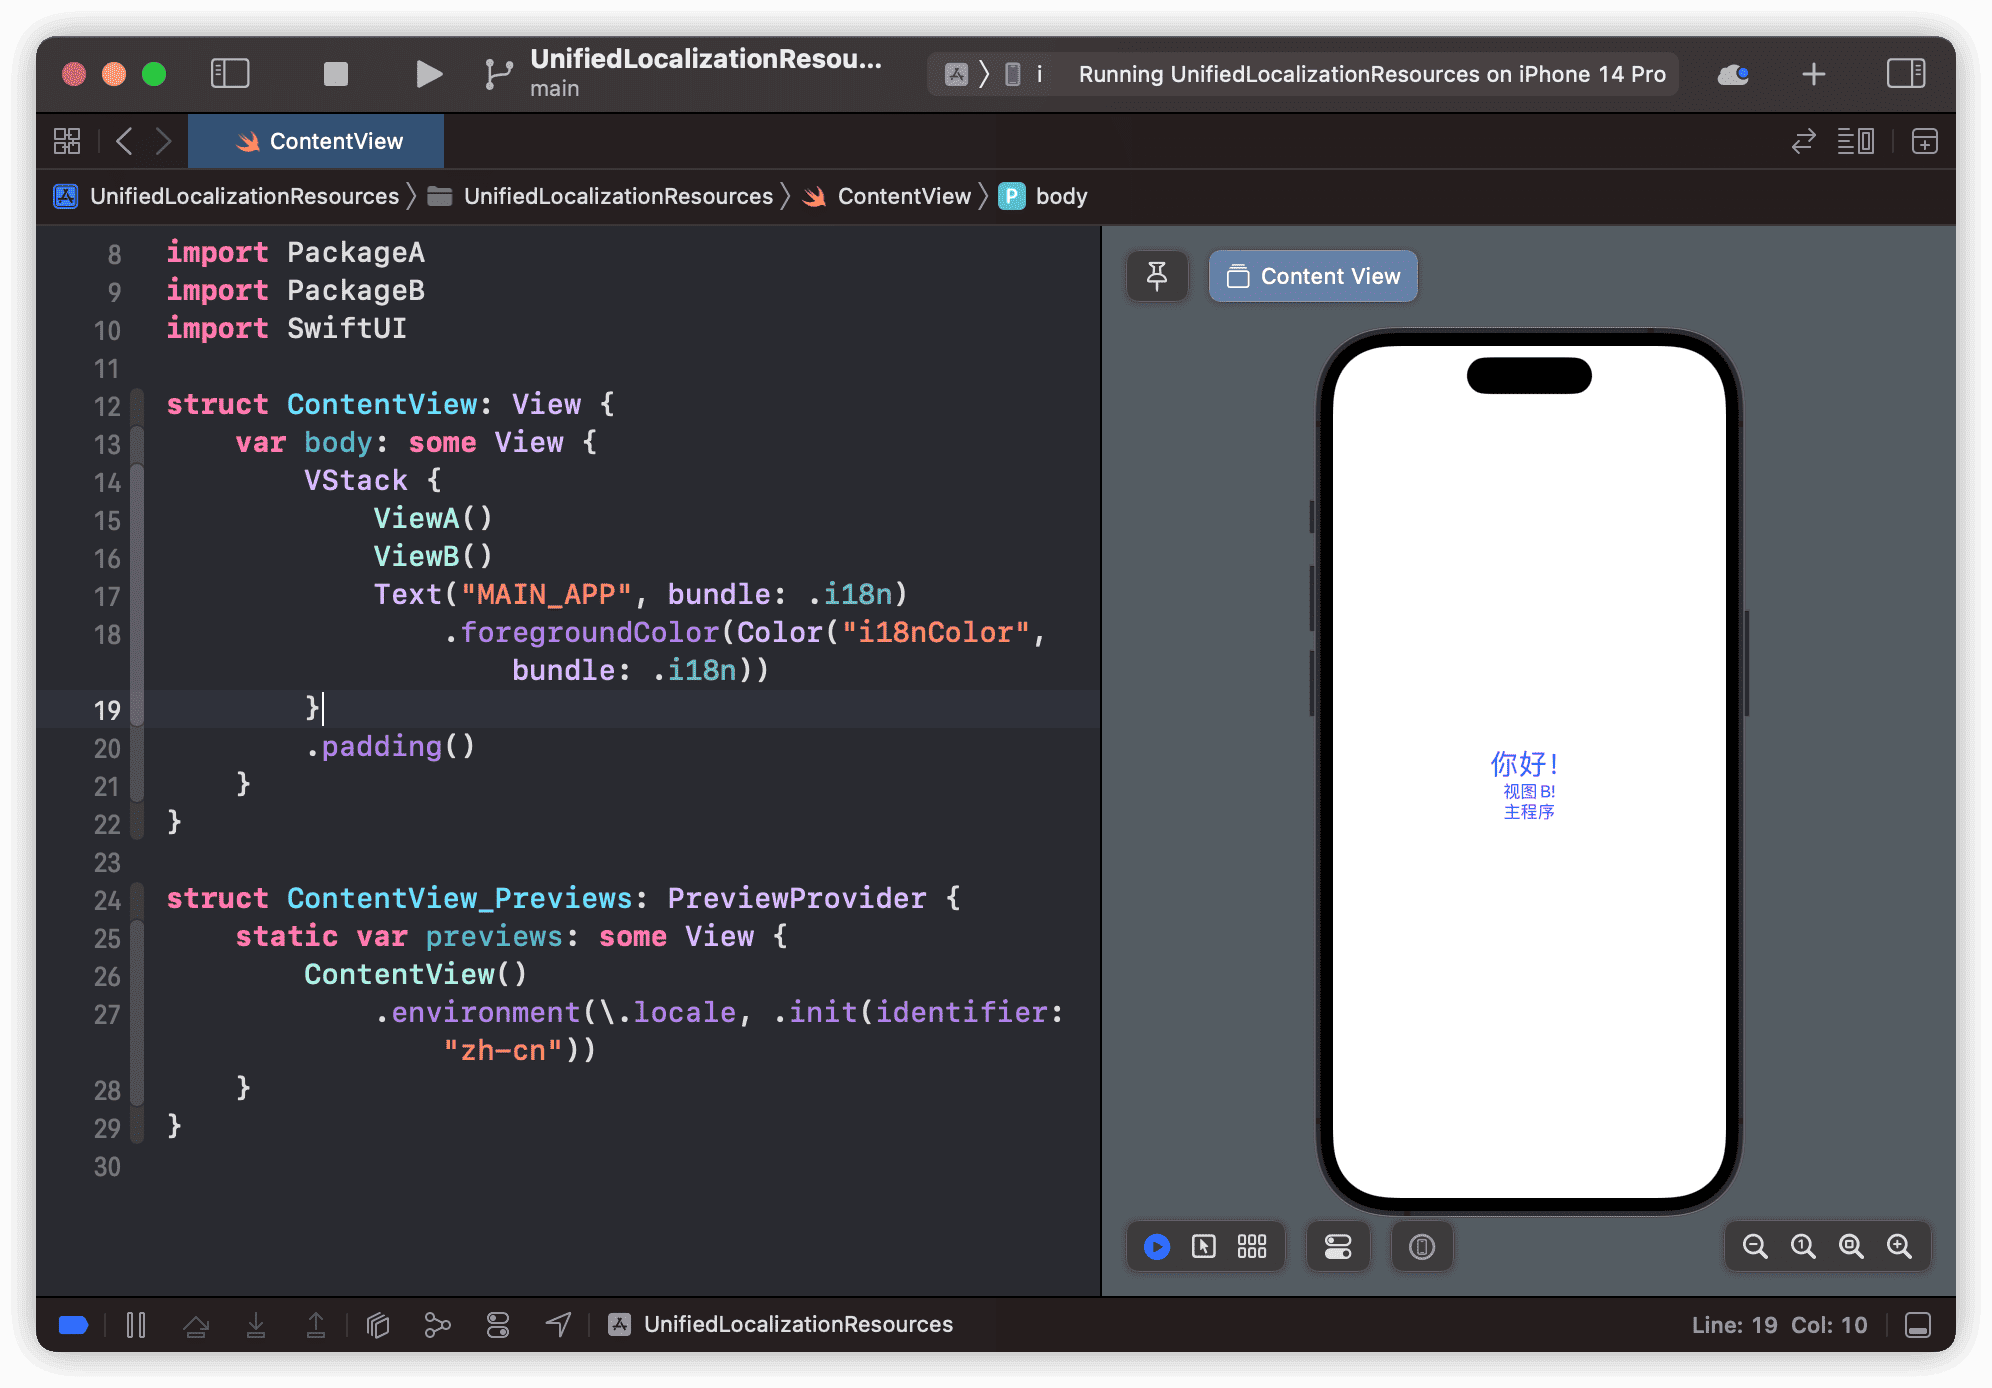
Thus, we have achieved the original goal of this article: a unified resource management method that is low in coupling, does not increase capacity, and will not result in errors in updated versions.
Conclusion
Developers should not only view SPM as a package tool, but as an opportunity to improve your project and development capabilities.