This article discusses some common issues encountered in developing Core Data with CloudKit projects, aiming to help everyone avoid detours and pitfalls.
Console Log Information

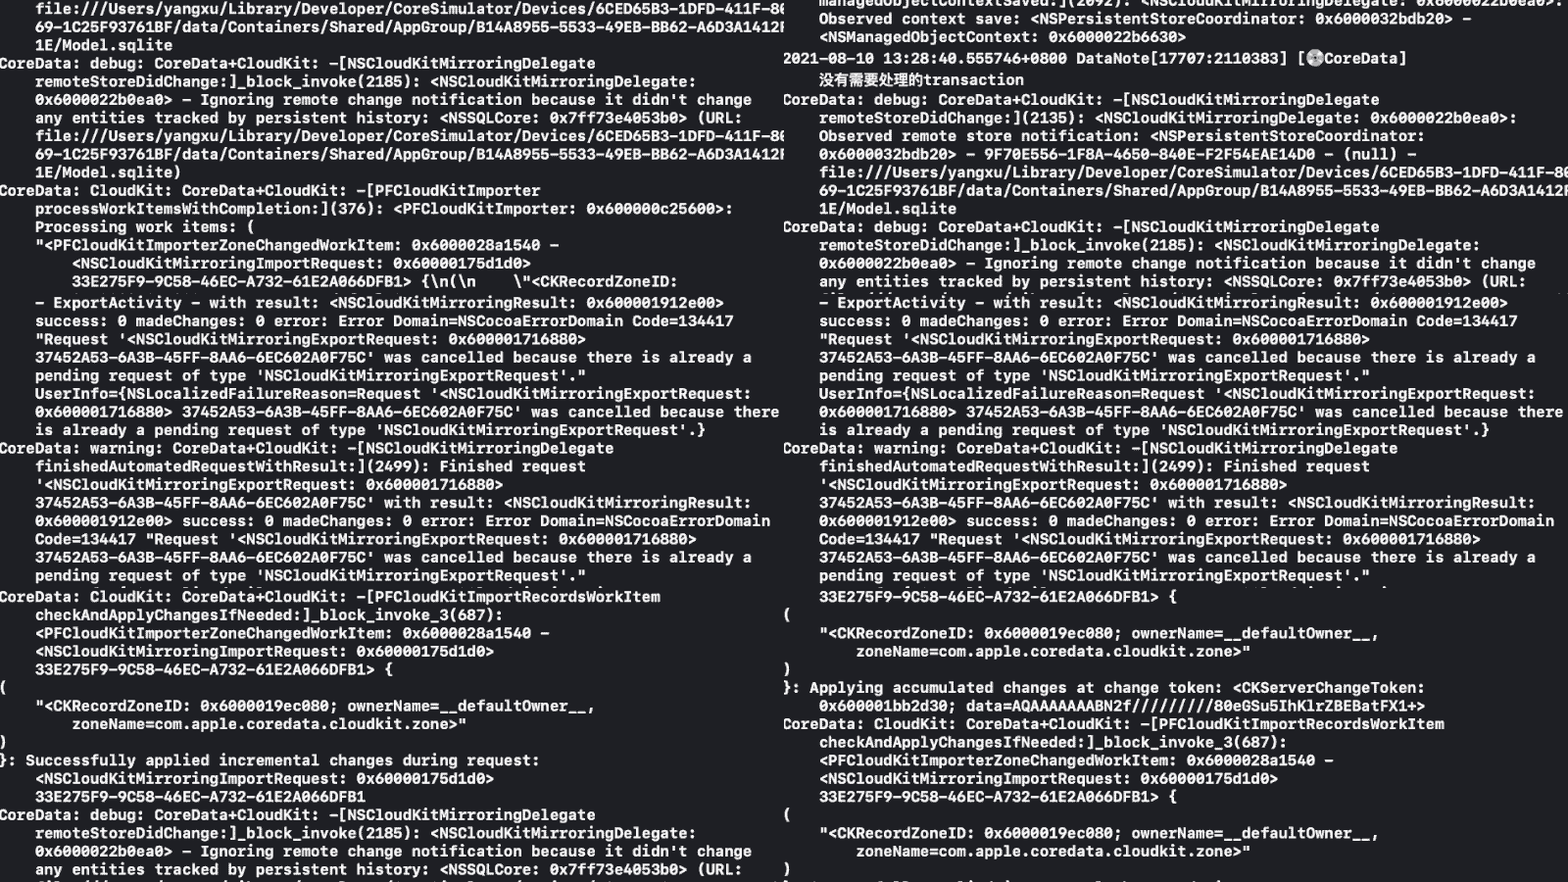
In a project supporting Core Data with CloudKit, console output will routinely look like the image above.
Each project faces different situations and the information in the logs often contains a lot of noise. Therefore, I will only summarize the possible types of information.
Information in Normal Situations
-
Initialization Information
Upon starting the code, the first thing that typically appears in the console is the initialization information displayed by
NSPersistentCloudKitContainer. This includes: successful container creation at the specifiedurl, successful activation ofNSCloudKitMirroringDelegatesynchronization responses, etc. If the project is run for the first time, there will also be prompts about successfully creating aSchemaoniCloud. -
Data Model Migration Information
Migration prompts appear if the local and server-side data models are inconsistent. Sometimes, even if the local
Core Datamodel and theiCloudmodel are consistent, messages likeSkipping migration for 'ANSCKDATABASEMETADATA' because it already has a column named 'ZLASTFETCHDATE'indicate that migration is unnecessary. -
Data Synchronization Information
Detailed descriptions of the specific content of imports and exports are provided, and the information is relatively easy to understand. Any changes in data on either the application side or the server side will be reflected in these messages.
-
Persistent History Tracking Information
NSPersistentCloudKitContaineruses persistent history tracking to manage import and export transactions. Information aboutNSPersistentHistoryTokenoften accompanies data synchronization messages. Additionally, messages likeIgnoring remote change notification because the exporter has already caught up to this transaction: 11 / 11 - <NSSQLCore: 0x7ff73e4053b0>are also generated by persistent history tracking and can be misleading, making it seem like there are always unprocessed transactions. For more onPersistent History Tracking, you can read my other article Using Persistent History Tracking in CoreData.
Information in Possible Abnormal Situations
-
Initialization Errors
Common issues include being unable to create or read the
sqlitefile, resulting in localurlerrors, andCKContainerIDpermission issues. If theurlpoints toappGroupContainer, make sure that theappGroupIDis correct and that theapphas obtainedgrouppermissions.CKContainerIDpermission issues are usually resolved by resetting the configuration inCertificates, Identifiers & Profilesas mentioned in a previous article. -
Model Migration Errors
Normally,
Xcodewon’t let you generate aManagedObjectModelthat is incompatible with theCloudKitSchema. So, most issues arise from mismatches between local data models and server-side data models in the development environment (such as changing a property name or using an older development version). If you’re sure the code version is correct, try deleting the localappand resetting theCloudKitdevelopment environment. However, if your application is already live, such issues should be avoided as much as possible. Consider the model migration strategies provided later in this article. -
Merge Conflicts
Have you set the correct merge conflict strategy
NSMergePolicy.mergeByPropertyObjectTrump? Have you made incorrect modifications to the data from theCloudKitconsole? If still in the development stage, the same methods as above can be used to resolve this. -
iCloud Account or Network Errors
Issues like
iCloudnot being logged in,iCloudserver not responding, or iCloud account restrictions are mostly beyond the control of developers.NSPersistentCloudKitContainerwill automatically resume synchronization once the iCloud account is logged in. Check the account status in the code and remind users to log in.
Here’s the translation of your text into English, maintaining the markdown directives:
Disabling Log Output
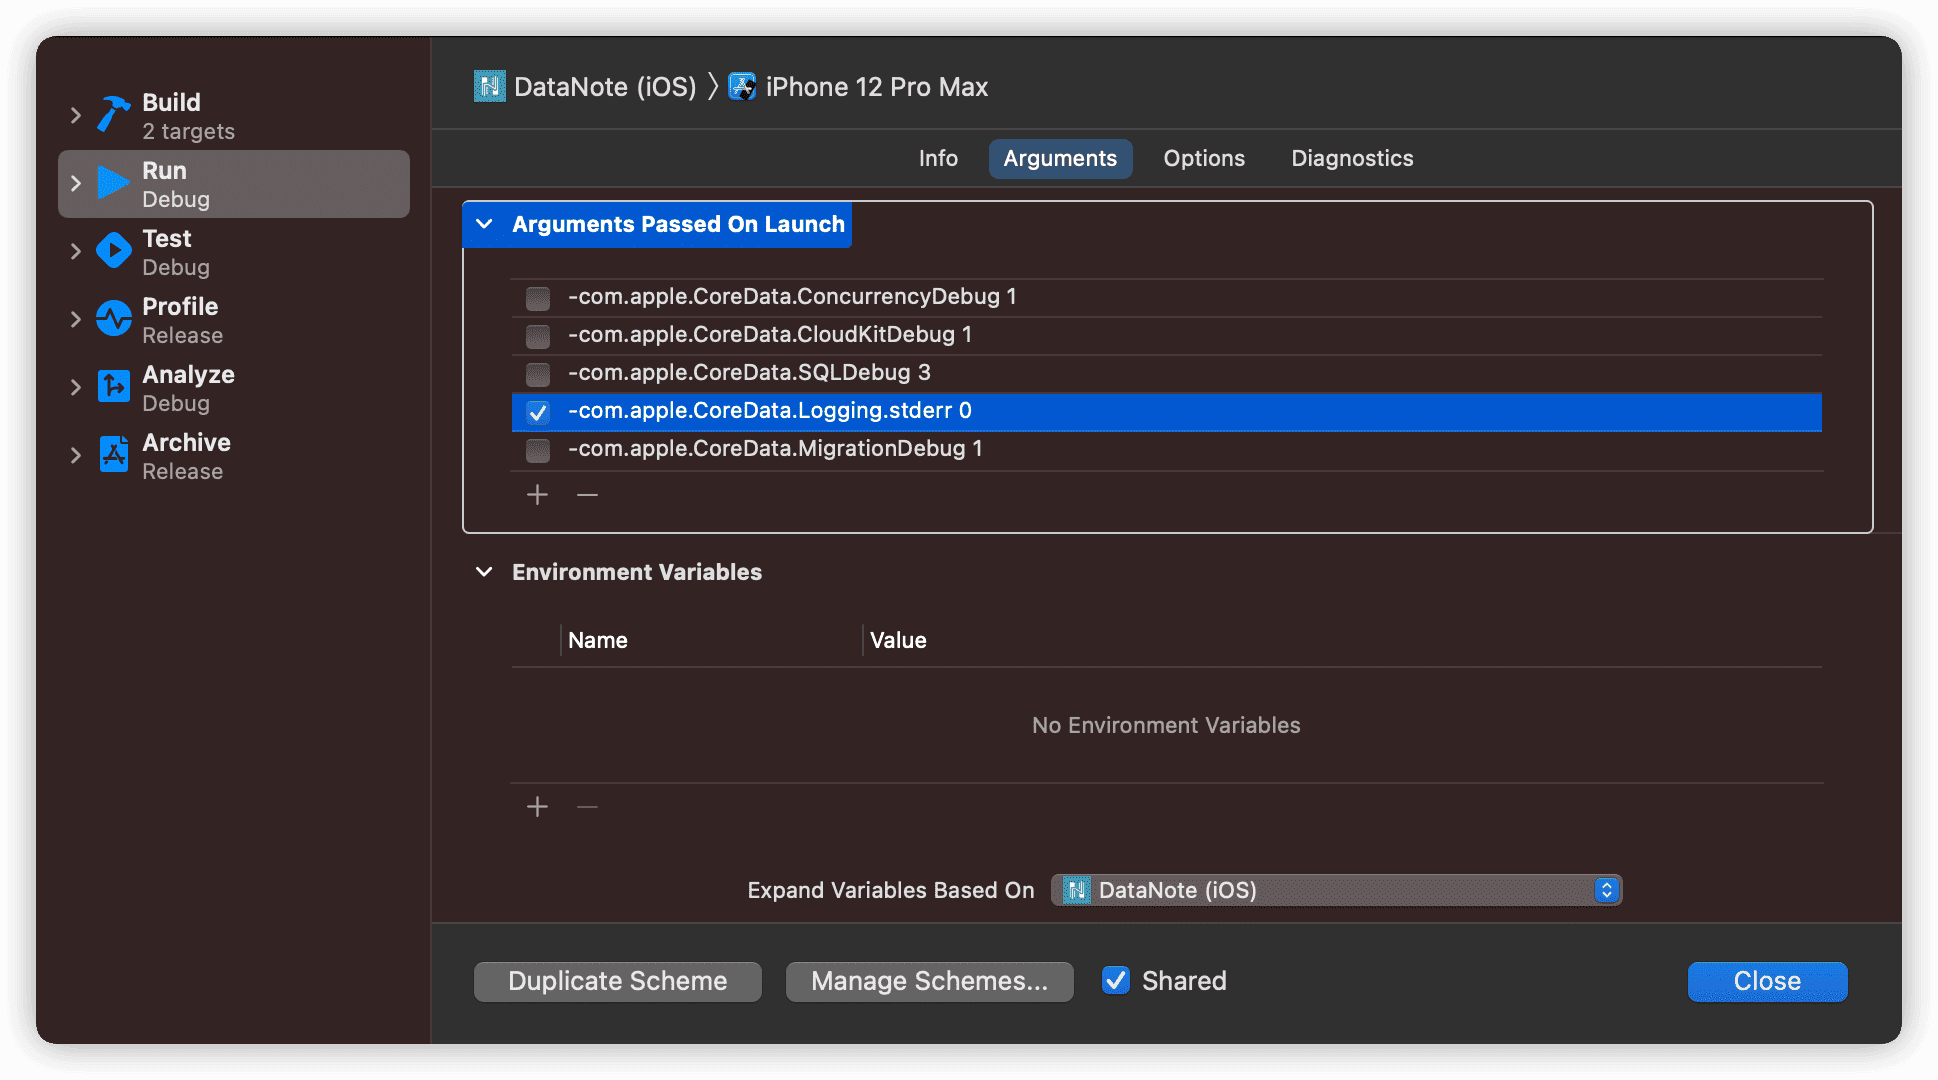
Once you’re confident that the synchronization functionality is working correctly and if you can’t tolerate the barrage of messages in the console, you might want to disable the log output of Core Data with CloudKit. For debugging any project using Core Data, I recommend adding the following default parameters:

-
-com.apple.CoreData.ConcurrencyDebug
Quickly identify problems caused by managed object or context threading errors. The application will crash immediately when executing any code that might cause errors, helping to eliminate hidden dangers during development. Once enabled, the console will show
CoreData: annotation: Core Data multi-threading assertions enabled. -
-com.apple.CoreData.CloudKitDebug
The output level of
CloudKitdebugging information starts at 1, with higher numbers providing more detailed information. -
-com.apple.CoreData.SQLDebug
The actual
SQLstatements sent byCoreDatatoSQLite, ranging from 1 to 4, with higher values being more detailed. The output information is useful when debugging performance issues — especially as it can tell you whenCore Datais performing a large number of small fetches (for example, when individually populatingfaults). -
-com.apple.CoreData.MigrationDebug
Migration debugging startup parameters will help you understand abnormal situations during data migration in the console.
-
-com.apple.CoreData.Logging.stderr
Toggle for outputting information
Setting -com.apple.CoreData.Logging.stderr 0 will stop all database-related log information from being outputted.
Disabling Network Synchronization
During the development phase of a program, sometimes we do not want to be disturbed by data synchronization. Adding network synchronization control parameters can help improve focus.
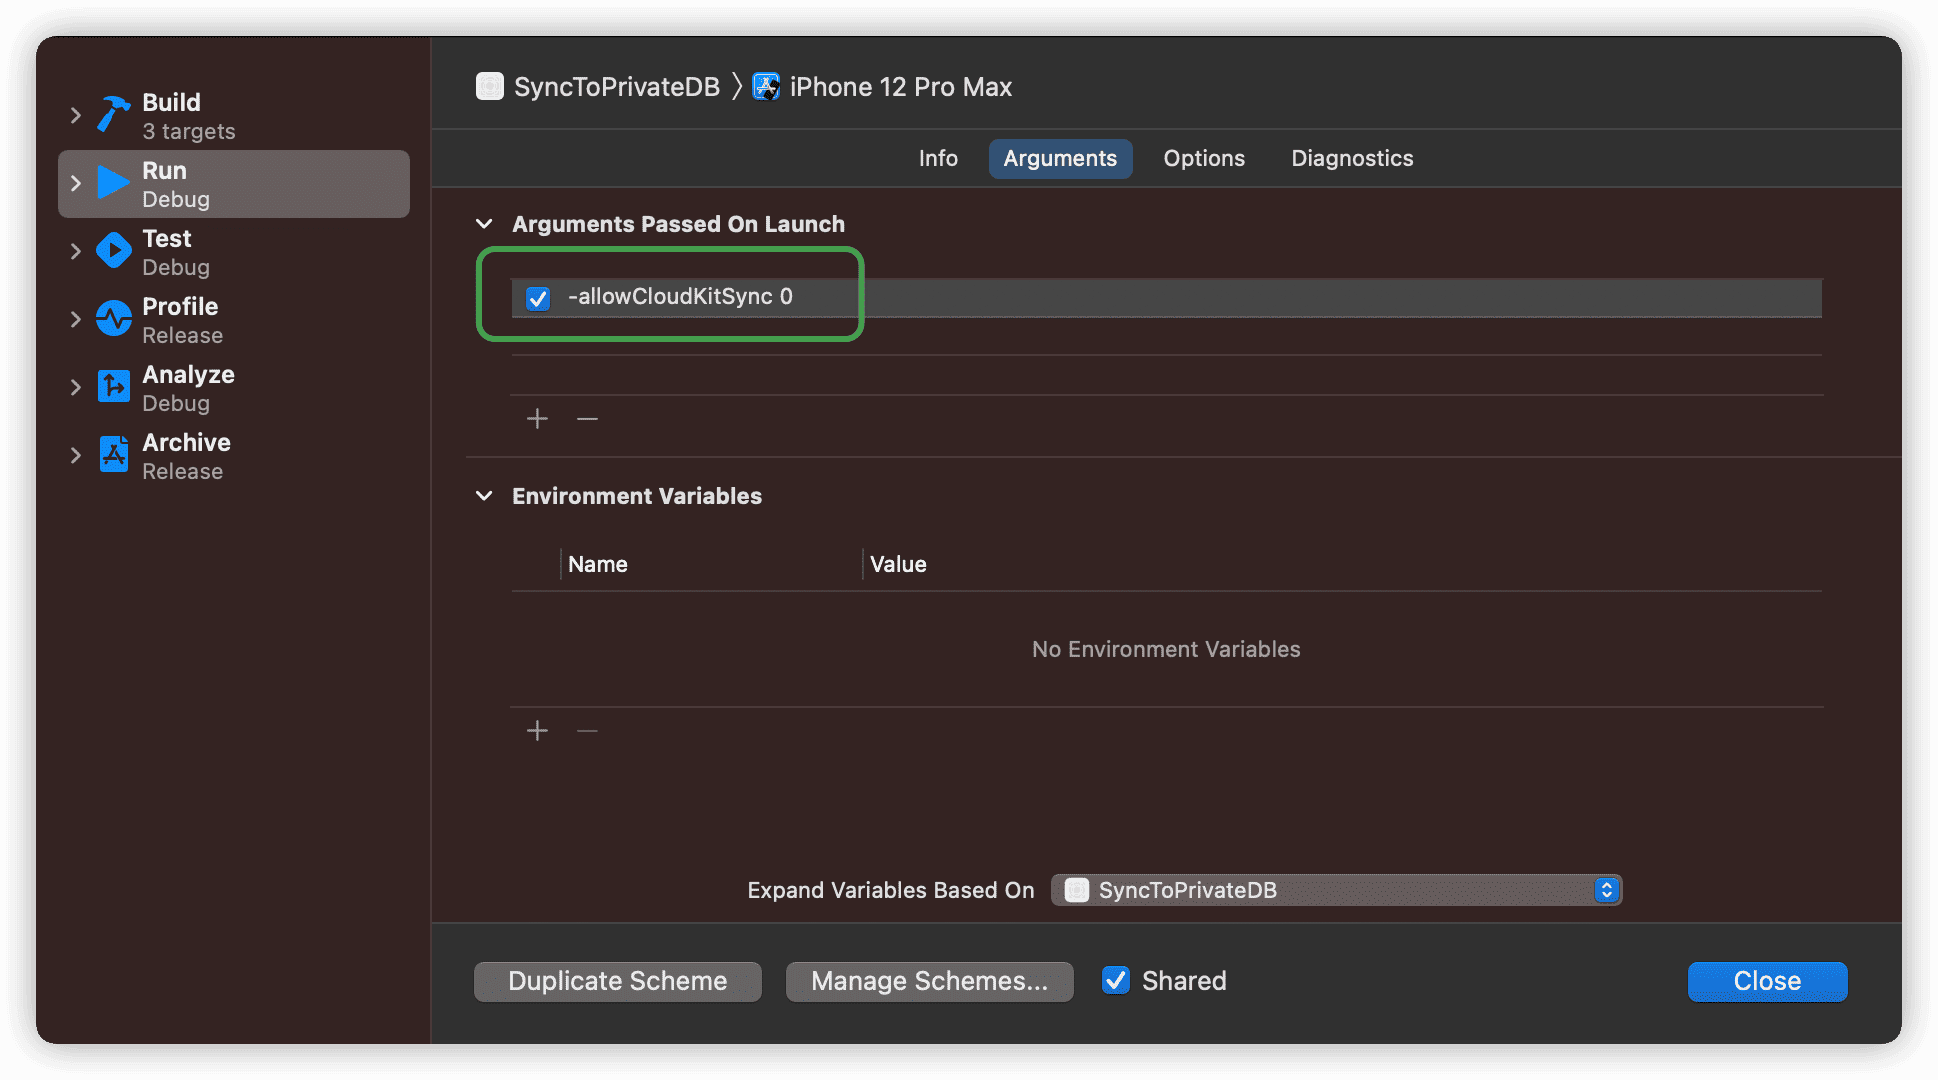
When NSPersistentCloudKitContainer loads an NSPersistentStoreDescription without configured cloudKitContainerOptions, its behavior is consistent with that of NSPersistentContainer. By using code like below, you can control whether to enable data network synchronization functionality during debugging.
let allowCloudKitSync: Bool = {
        let arguments = ProcessInfo.processInfo.arguments
        guard let index = arguments.firstIndex(where: {$0 == "-allowCloudKitSync"}),
              index + 1 < arguments.count - 1 else {return true}
        return arguments[index + 1] == "1"
    }()

if allowCloudKitSync {
            cloudDesc.cloudKitContainerOptions = NSPersistentCloudKitContainerOptions(containerIdentifier: "iCloud.fatobman.blog.SyncDemo")
        } else {
            cloudDesc.setOption(true as NSNumber, forKey: NSPersistentHistoryTrackingKey)
            cloudDesc.setOption(true as NSNumber,
                                forKey: NSPersistentStoreRemoteChangeNotificationPostOptionKey)
        }
Because NSPersistentCloudKitContainer automatically enables persistent history tracking, if NSPersistentCloudKitContainerOptions are not set, you must explicitly enable Persistent History Tracking in the code, otherwise, the database will become read-only.

Setting it to 0 will disable network synchronization.
Changes to the local database will still be synchronized to the server side after the synchronization functionality is restored.
Abnormal Synchronization
When network synchronization is abnormal, please try the following checks first:
- Whether the network connection is normal
- Whether the device is logged into an
iCloudaccount - Whether the devices syncing the private database are logged into the same
iCloudaccount - Check the logs for error messages, especially those from the server side
- The simulator does not support background silent push, so switch the
appin the simulator to the background and then back to see if there is any data
If you still can’t find the reason, make a pot of tea, listen to some music, look into the distance, and it might be fine after a while.
The frequency of Apple servers having issues is not low, so don’t be surprised by push delays.
Checking User Account Status
NSPersistentCloudKitContainer will automatically resume network synchronization when the iCloud account is available. Check the user’s iCloud account login status through code, and remind users to log in within the application.
Call CKContainer.default().accountStatus to check the user’s iCloud account status, subscribe to CKAccountChanged, and cancel the reminder after successful login. For example:
    func checkAccountStatus() {
        CKContainer.default().accountStatus { status, error in
          DispatchQueue.main.async {
            switch status {
            case .available:
               accountAvailable

 = true
            default:
               accountAvailable = false
            }
            if let error = error {
                print(error)
            }
          }
        }
    }
Checking Network Synchronization Status
CloudKit does not provide a detailed network synchronization status API, making it impossible for developers to obtain information such as how much data needs to be synchronized or the progress of the synchronization.
NSPersistentCloudKitContainer offers an eventChangedNotification notification, alerting us when switching between import, export, and setup states. Strictly speaking, it’s challenging to judge the actual synchronization status solely based on these notifications.
In practical use, the most significant impact on user perception is the data import state. When users install the application on a new device and already have a substantial amount of data saved online, facing an app with no data can be quite disorienting.
Data import starts about 20-30 seconds after the application launches. If there’s a large volume of data, it might take 1-2 minutes before users see the data in the UI (batch imports usually merge into the context only after the entire batch has been imported). Therefore, providing adequate user prompts is especially important.
In practice, when the import state ends, it switches to other states. Use code similar to the following to give users some indication:
@State private var importing = false
@State private var publisher = NotificationCenter.default.publisher(for: NSPersistentCloudKitContainer.eventChangedNotification)

var body: some View {
  VStack {
     if importing {
        ProgressView()
     }
  }
  .onReceive(publisher) { notification in
     if let userInfo = notification.userInfo {
        if let event = userInfo["event"] as? NSPersistentCloudKitContainer.Event {
            if event.type == .import {
              importing = true
            }
            else {
              importing = false
            }
         }
      }
   }
}
When the application is sent to the background, the synchronization task can only continue for about 30 seconds. Upon returning to the foreground, data synchronization will resume. Therefore, when there’s a large amount of data, it’s important to provide adequate user prompts (such as keeping the app in the foreground or asking users to continue waiting).
Creating a Default Data Set
Some applications provide users with default data, such as a starting data set or a demonstration data set. If the provided data set is placed in a synchronizable database, it needs to be handled carefully. For instance, if a default data set has already been created and modified on one device, reinstalling and running the application on a new device might lead to data being unexpectedly overwritten or duplicated.
-
Determine if the Data Set Needs to be Synchronized
If synchronization is not needed, consider using the selective data synchronization solution from Synchronizing Local Databases to iCloud Private Databases.
-
If Data Set Must be Synchronized
-
It’s best to guide users to manually click a button to create default data, letting them decide whether to create it again.
-
You can also use
CKQuerySubscriptionto query specific records and determine whether there is already data in the network database when the application is first run (this method was used by a netizen I spoke with a few days ago, although they were not satisfied with the response and found it not very user-friendly). -
Alternatively, consider using
NSUbiquitousKeyValueStorefor judgment.
-
Both methods 2 and 3 require a normal network and account status to check, and letting the user decide might be the simplest approach.
Moving the Local Database
For applications already on the AppStore, there may be a need to move the local database to a different URL in some cases. For example, to allow Widget access to the database, I moved the Health Notes database to appGroupContainerURL.
If using NSPersistentContainer, you can directly call coordinator.migratePersistentStore to safely complete the relocation of the database file. However, if this method is called on a store loaded by NSPersistentCloudKitContainer, you must forcefully exit the application and re-enter to use it normally again (although the database file is moved, the migration will report an error loading the CloudKit container, preventing synchronization. The application must be restarted for normal synchronization).
Therefore, the correct way to move the database is to use FileManager to move the database files to the new location before creating the container. You need to move three files: sqlite, sqlite-wal, and sqlite-shm.
Code similar to the following:
func migrateStore() {
        let fm = FileManager.default
        guard !FileManager.default.fileExists(atPath: groupStoreURL.path) else {
            return
        }

        guard FileManager.default.fileExists(atPath: originalStoreURL.path) else {
            return
        }


 let walFileURL = originalStoreURL.deletingPathExtension().appendingPathExtension("sqlite-wal")
        let shmFileURL = originalStoreURL.deletingPathExtension().appendingPathExtension("sqlite-shm")
        let originalFileURLs = [originalStoreURL, walFileURL, shmFileURL]
        let targetFileURLs = originalFileURLs.map {
            groupStoreURL
                .deletingLastPathComponent()
                .appendingPathComponent($0.lastPathComponent)
        }

        // Move the original files to the new location.
        zip(originalFileURLs, targetFileURLs).forEach { originalURL, targetURL in
            do {
                try fm.moveItem(at: originalURL, to: targetURL)
            } catch error {
                print(error)
            }
        }
}
Updating the Data Model
In the article CloudKit Dashboard, we’ve discussed the two environment settings of CloudKit. Once the Schema is deployed to the production environment, developers cannot rename or delete record types and fields. You must carefully plan your application to ensure it remains forward-compatible when updating the data model.
You can’t whimsically modify the data model. Try to only add and not remove or change entities and attributes.
Consider the following model update strategies:
Incremental Update
Add record types incrementally or add new fields to existing record types.
Using this approach, older versions of the application can still access records created by users, but not every field.
Make sure that the new attributes or entities serve only new functions of the new version, and that the new version of the program can still run normally even without these data (thus if users continue to update data with the old version, the newly added entities and attributes will be empty).
Adding a version Attribute
This strategy is an enhanced version of the previous one. By initially adding a version attribute to the entity for version control, you can extract records compatible with the current version of the application using predicates. Old version programs will not extract data created by new versions.
For example, the entity Post has a version attribute:
// The current data version.
let maxCompatibleVersion = 3

context.performAndWait {
    let fetchRequest = NSFetchRequest<NSManagedObject>(entityName: "Post")

    // Extract data not exceeding the current version
    fetchRequest.predicate = NSPredicate(
        format: "version <= %d",
        argumentArray: [maxCompatibleVersion]
    )

    let results = context.fetch(fetchRequest)
}
Lock Data, Prompt for Upgrade
Using the version attribute, the application can easily know that the current version no longer meets the needs of the data model. It can prevent users from modifying data and prompt them to update the application version.
Create a New CKContainer and New Local Storage
If your data model undergoes significant changes, and the above methods are difficult to handle or would result in significant data wastage, you can add a new associated container to the application and move the original data to the new container through code.
The general process is:
- Add a new
xcdatamodeldto the application (there should be two models at this point, the old model corresponding to the old container, the new model to the new container) - Add a new associated container to the application (using two containers simultaneously)
- Determine if the migration has occurred, if not, let the application run normally using the old model and container
- Let the user choose to migrate data (remind the user to ensure that the old data has been synchronized to the local before performing the migration)
- Move the old data to the new container and local storage through code, marking the migration as complete (using two
NSPersistentCloudKitContainers) - Switch the data source
Regardless of which strategy is used above, you should avoid data loss or confusion at all costs.
Conclusion
The issues discussed in this article are ones I have encountered and attempted to solve during development. Other developers will face many more unknown situations, but as long as they grasp the patterns, there is always a way to find a solution.
In the next article, we’ll talk about Synchronizing Public Databases.